Tuscan Kale & Cauliflower Curry with Chickpeas

main-curry

If you’re anything like me, you run in to roadblocks in the kitchen almost every day. What to make, ingredients to have on hand, cooking time, etc. It’s life. We get by. Even if dinner ends up as cereal with milk, there usually aren’t too many disgruntled customers.

If you follow my dinner posts on Instagram, you probably already recognize some of the usual suspects in my kitchen. From throwing in an egg for protein to tossing every vegetable in the pan – dinner can be anything. Play with the flavor.  Swap out the veggies. Switch your proteins around. It’s all good.

You also know that I love curry. From a haphazard cabbage curry to a polished palak paneer, curry rocks. When served over Basmati rice, it is perfect. It’s one of those dishes that spring from nowhere on a busy evening. You can take advantage of whatever fresh vegetables you have on hand and it’s quick to prepare. Add in a protein and go to flavortown and you’re there. Your dish has arrived. Dinner is served.

Well it happens that way in my head. A few more steps are thrown in. But like I said above, a great curry can be born from whatever you have lying in your fridge. Well, most of the stuff. Don’t try and make a curry out of marshmallow fluff! Did I just admit to having marshmallow fluff in my house? Oops.

This curry I’m sharing with you, like the others, was born out of necessity. Some amazing Tuscan Kale was taking over some valuable real estate in my fridge and I didn’t want it to go bad. My husband wanted something with chickpeas. I wanted the kale. It’s cooperation. Or something like that. Regardless, it tasted great, it’s a great vegan curry and it cooks up super fast.

I heated up a large pan with some olive oil and add in some onion, garlic and traditional curry spices.

Next I added the cauliflower and it it cook a few minutes to soften. About 5 minutes.

I then added the Kale and Chickpeas. The kale will wilt pretty quickly.

After that, I added the canned tomatoes and some vegetable broth.

I let the mixture cook for another 5-10 minutes – letting all of the flavors meld while simmering.

While everything cook, I had some basmati rice going in my rice cooker.

Dinner took about 20 minutes to cook. It was perfect – especially for these chilly days.


Hope you enjoy!

Tuscan Kale and Cauliflower Curry with Chickpeas
 
Author:
Ingredients
  • 1 tbsp. olive oil
  • 1 medium onion, chopped
  • 4 cloves garlic, peeled and chopped
  • 2-inch piece ginger, peeled and chopped
  • 1 tbsp. curry powder
  • 1 tsp. salt
  • half teaspoon turmeric powder
  • 1 tsp teaspoon ground cumin
  • 1 tsp teaspoon ground coriander
  • 1-2 tsp. chili flakes (optional)
  • 1 small head of cauliflower, washed and broken up in to florets
  • 1 bunch of Tuscan Kale, washed and chopped
  • 1 can of chickpeas, rinsed and drained
  • 1 cup crushed tomatoes
  • ½ cup vegetable broth
Instructions
  1. Heat up the oil in a large pan.
  2. Add in the onions, ginger and garlic and let soften a bit. About 2-3 minutes on medium-high heat.
  3. Stir in the spices and add the cauliflower florets.
  4. Cook about 4-5v minutes to allow the cauliflower to soften.
  5. Add in the kale and the chickpeas. Stir well to mix up the spices. Allow the kale to wilt a bit. About 2-3 minutes.
  6. Add in the crushed tomatoes and vegetable broth. Stir well and simmer for 3-5 minutes.
  7. Taste and season as necessary with salt and pepper.
  8. Serve with warm Basmati rice.
  9. Enjoy!

vertical-curry

Raspberry & Chocolate Cream Cheese Rugelach + Baking Chez Moi Review

rugelach-main

Dorie Greenspan is a baking god in my book. I look up to her. So when I was recently approached to adapt Dorie’s rugelach recipe with some fresh Driscoll raspberries, I got super excited. I jumped at the opportunity to check out her latest cookbook, Baking Chez Moi: Recipes From My Paris Home To Your Home Anywhere.

baking chez moi

And then it hit me. They wanted me to make rugelach. I’ve made rugelach once before, but only once. Rugelach meant that I would have to take out my rolling pin. You know how much I despise rolling out dough. But I’m doing it for Dorie. Because she’s a great teacher.

So I got to work. I read and reread the cookbook and studied the rugelach recipe. Her dough recipe is so simple and comes together fast. I mixed up the flour, butter, cream cheese and salt in my food processor. It took just a couple of minutes.

mixing-dough

I formed the mixture in to two squares, wrapped them up in plastic wrap and then chilled for a couple hours. While the dough chilled, I made the filling. I knew that I needed to fill the rugelach with some form of raspberry and chocolate, but it needed to be different than the last time I made rugelach. I decided to make my filling using cream cheese, sugar, the fresh raspberries and some 72% dark chocolate. I’m so glad I went in that direction.

raspberries

Next, I reviewed her rolling technique over and over. To be honest, at first I doubted her method. With the first batch of the cookies, I stuck to the pie slicing method that I’d used in the past. Of course it didn’t turn out the way I wanted to. I relented and tried Dorie’s method of rolling rugelach. She recommends rolling the dough into a rectangle and slicing in half and on each half, filling and then rolling the long way.

rolled-out-dough

I froze the two long rugelach tubes for a little bit before slicing. They sliced beautifully once chilled.

unbaked


I baked the rugelach for around 15 minutes. Lo and behold, Dorie’s version came out perfectly.

cooling

And that raspberry and chocolate and cream cheese filling? Amazing and rich. The perfect dessert. It meshes so well with the flaky and buttery dough. I am definitely making these rugelach again soon. I’m sure I will mix up the filling ingredients over and over again, but for now, this works for me.

Thanks to the publishers, I have a copy of Dorie Greenspan’s cookbook available to give away. Please enter below!


Raspberry & Chocolate Cream Cheese Rugelach + Baking Chez Moi Review
 
Author:
Ingredients
Dough:
  • 4 oz. cold cream cheese
  • 1 stick of butter
  • 1 cup all-purpose flour
  • ¼ tsp. salt
Filling:
  • 4 oz. room temperature cream cheese
  • 1 heaping cup fresh Driscoll's raspberries (around 6 oz.)
  • ⅓ cup sugar
  • 5 oz. chopped 70% or greater dark chocolate
For Top of Dough Rolls:
  • 1 egg beaten with a tablespoon of water
  • ½ cup sugar (approx.)
Instructions
  1. Cut up the cream cheese and butter in to chunks.
  2. Place the flour and salt in the bowl of a food processor.
  3. Add the butter and cream cheese to the food processor and pulse several times until it becomes crumbly. Don't let it come in to a ball on its' own.
  4. Transfer mixture to a floured board and form in to a ball with your hands. Separate in to two pieces.
  5. Shape each piece into a square and wrap in plastic wrap.
  6. Chill dough squares in fridge for two hours.
  7. For the filling, place the cream cheese, berries and sugar in the food processor and pulse until combined. You don't want the raspberries completely pureed - you want some pieces. Set mixture aside.
  8. Chop up the chocolate well. Set aside in small bowl.
  9. Take one square of dough out of the fridge. Move to a floured surface and dust the top of the dough and your rolling pin with flour.
  10. Roll out the dough to a 12 x 12 rectangle.
  11. Slice the rectangle in half to 12x6.
  12. Spread filling on rectangle, leaving one long edge without filling.
  13. Roll up the dough from that one edge. Roll it up jelly roll style, with seam side down.
  14. Repeat process with the second dough rectangle,
  15. Transfer both rolls to the freezer.
  16. Preheat the oven to 400.
  17. Once the oven is heated to temperature and the dough rolls are chilled thoroughly, remove the rolls from the freezer.
  18. Brush the top of the rolls with the egg mixture and sprinkle on some of the sugar.
  19. Slice each roll in to 1 inch slices
  20. Baked on parchment lined baking sheets for about 15 minutes
  21. Transfer to cooling racks
  22. Repeat the process with the rest of the dough.
  23. Enjoy!

 a Rafflecopter giveaway

Rugelach-Vertical

Arugula Pesto

pasta-with-arugula-pesto

If my 10-year-old self could see me now, I wonder what she’d say.

I was a picky eater with a pretty developed flavor palate. My parents are foodies, but at 10, I was anything but. My parents had a rule that we had to try everything. We couldn’t just stick out our tongue. I remember several evenings around the family dinner table where it was a total battle of wills to just take a bite of the mahi mahi or two bites of the curry. Who knew?

At age 10, all I wanted was a crunchy iceberg salad at dinner. Instead, I had a plate of mesclun and arugula greens. I remember the requests to “finish the arugula on the plate and then….” I didn’t believe in arugula at age 10. Why does this strange lettuce have to have so much flavor?! Arugula, really?? Who knew that I would grow up to be this person that seeks out arugula. Heck, I even grow arugula on my fire escape! That’s how much I love it!

In the off season, I tend to buy the bags of baby arugula from Trader Joe’s. Arugula is in season now – as are a variety of other greens. And I’m in salad green heaven.

Arugula is a fantastic green characterized by its amazing slightly peppery flavor. It’s also sometimes called roquette or rocket greens.

fresh-arugula

Last week, as I came upon the farmer’s market outside my office, I spotted some beautiful greens and I had to have them. I eagerly bought two bunches. Of course, when I came home and picked up my CSA, there were a couple more bunches. This whole lot of arugula was in addition to a bag of baby arugula sitting in my fridge. Um. I think I had more arugula that I needed. I mean, I love salads, but this much arugula was making me twitchy.

I decided to make a pesto out of the greens. My husband usually turns down a basil pesto, but I had a hunch that the lighter flavor of the arugula leaves would be more to his liking. And I was right!

I washed and dried a few cups of the greens and pulsed it in my Cuisinart along with some garlic, lemon juice, pine nuts, salt, pepper and olive oil. It took all of two minutes.

Arugula-cuisinart

I added the pesto to some pappardelle that I tossed with some sautéed shallots, garlic, mushrooms, chickpeas and additional lemon juice. I sprinkled on some red pepper flakes and ground black pepper and dinner was served. Dinner was a success. I stored the rest of the pesto in my freezer. I am totally making this again. If only arugula season was year-round.

Hope you enjoy this as much as I did!

Arugula Pesto
 
Author:
Ingredients
  • 3.5 cups of arugula leaves (you can include some of the stems), washed
  • 3 cloves garlic
  • ½ cup toasted pine nuts
  • juice of 1 lemon
  • 2 tsp. salt
  • 2 tsp. fresh ground pepper
  • ¾ cup olive oil
  • additional salt and pepper to taste
Instructions
  1. Place everything except for the olive oil in to the bowl of a food processor.
  2. Process everything then slowly pour in the olive oil until everything is processed and mixed together.
  3. Taste the pesto and add additional salt and pepper as needed.
  4. Enjoy! Add this pesto pasta or use as a pizza topping. The options are endless.

Arugula-Pesto-Long-as-Smart-Object-1


The Holiday Kosher Baker by Paula Shoyer: Giveaway & Babka Bites

Babka-Bites-for-Blog

The holidays are upon us. So much craziness. I’m thrilled that I get a fresh dinner on the table –  let alone somehow manage to pull off a holiday meal. Each day I come home from work with a new menu idea and a new shopping list. I know I should probably just stick to just one idea, but I’m always inspired by new things I see. My menu tends to change up until the actual holiday day. As long as it’s a holiday I can cook on, I tend to play and go with whatever my mood dictates.  As long as I have some fresh veggies and proteins on hand, I’m good to go.

The only thing I have trouble with though is dessert. I love chocolate and cookies as much as every other person out there, but I’m not always creative about it. 90% of the time, I tend to rely on my trusty cookbooks.

HBKCover-(1)

That’s where a book like The Holiday Baker by Paula Shoyer comes in. This cookbook is filled with fabulous treats to bake up in my kitchen. Paula Shoyer makes holiday desserts simple to create. Her recipes are easy to follow and the photos in the cookbook make me want to make and eat everything right away. She even has a fantastic section on must-have tools and tips. Was thrilled to get a copy of the cookbook this holiday season. My daughter has flagged about 10 recipes that I MUST make. Everything with chocolate was at the top of my list.

Paula Shoyer’s recipe for Babka Bites are on my must-make list. Such an amazing treat and the recipe is super easy to follow. I highly recommend you make this now.

Don’t forget to enter this fabulous giveaway for this amazing cookbook!

Shana Tova! Happy New Year. May you have a happy and sweet New Year!


Babka Bites
 
Recipe from The Holiday Kosher Baker by Paula Shoyer Sterling / November 2013
Author:
Ingredients
Dough
  • ¼ cup (60ml) warm water
  • ½ ounce (2 envelopes; 14g) dry yeast
  • ¼ cup (50g) plus 1 teaspoon sugar, divided
  • 2 ½ cups (315g) all-purpose flour
  • dash salt
  • 4 tablespoons (57g) margarine, at room temperature for at least 15 minutes
  • ¼ cup (60ml) canola oil
  • 1 large egg plus 1 egg white
Filling
  • ½ cup (1 stick; 113g) margarine, at room temperature for at least 30 minutes
  • ¼ cup (20g) unsweetened cocoa
  • ¾ cup (150g) sugar
  • 1⁄3 cup (60g) mini chocolate chips
Instructions
To make the dough:
  1. PLACE WARM WATER, yeast, and 1 teaspoon sugar into a large mixing bowl or the bowl of a stand mixer and let it sit for 10 minutes, until the mixture bubbles and thickens. Add the ¼ cup (50g) sugar, flour, salt, margarine, oil, egg, and egg white.
  2. Combine with a wooden spoon or a dough hook in a stand mixer until all the ingredients are mixed in. Cover bowl with plastic wrap and let rise 1 ½ hours.
To make the filling:
  1. PLACE THE MARGARINE into a medium or large bowl and beat until creamy. Add the cocoa and sugar and beat until combined. Cover with plastic and let sit at room temperature while the dough is rising.
  2. PREHEAT OVEN to 325°F (160°C). Place mini muffin papers into a 12-cup mini muffin pan. You will need to bake Babka Bites in batches.
To assemble and bake:
  1. AFTER THE DOUGH HAS RISEN, divide it in half. On a large piece of parchment paper sprinkled with a little flour, roll each piece of dough into a 9 x 12-inch (23 x 30-cm) rectangle so that the 12-inch (30-cm) side is facing you. Sprinkle a little flour on the rolling pin if the dough starts to stick to it. Use a silicone spatula to spread half the chocolate filling all the way to the edges. Sprinkle half the chocolate chips all over the chocolate filling and roll up tightly the long way. Cut into ½-inch (1.25-cm)
  2. slices and place one into each of the muffin cups, cut side up. You will have about 24 slices. Repeat with the rest of the dough.
  3. BAKE for 20 minutes, or until lightly golden. Serve warm or at room temperature. Store covered at room temperature for up to four days or freeze for up to three months.

a Rafflecopter giveaway

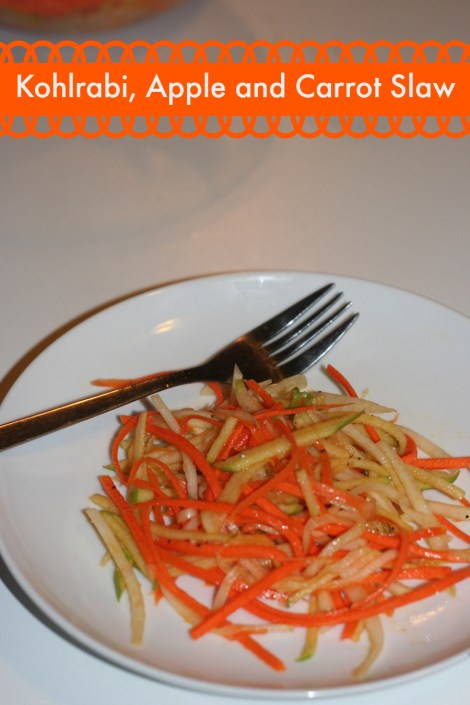
Kohlrabi, Apple and Carrot Slaw

Slawfront

I love this time of year. As the season changes, so does my palate. I look forward to every Tuesday as I go to pick up my CSA box. We’re still getting some sweet corn and tons of tomatoes, the apples are starting to come in and the greens are coming back. This past week, we had some fabulous kohlrabi and granny smith apples in the box.

I love the crunch of kohlrabi and it goes so well with apple. I decided to make a slaw out of it. We were having veggie burgers for dinner and I knew this simple slaw would top them well.

I julienned some carrots, apple, and kohlrabi. I also cut some of it into matchsticks. I then tossed everything with some fresh lemon juice, olive oil, salt and pepper. I let it sit for a bit at room temperature before eating. Delicious! Perfectly crisp and great as a side dish or as a sandwich topper,

I think I’m going to serve some of the leftovers with sloppy joes this week!

Simple salad success!


Kohlrabi, Apple and Carrot Slaw
 
Author:
Ingredients
  • 1 kohlrabi, peeled
  • 1 large carrot, peeled
  • ¾ Granny Smith apple, peeled
  • 1 tbsp. olive oil
  • Juice of 1 small lemon
  • 2 tsp. salt
  • 2 tsp. fresh ground black pepper
Instructions
  1. Using a julienne peeler, cut up the veggies into matchsticks. You can also use a knife to cut the veggies up.
  2. Mix together in a bowl with the lemon juice and olive oil. Add the salt and pepper to taste.
  3. Serve and enjoy!

Slawtext

#BeyondMeat Vegan Lettuce Tacos + Giveaway!


vegan-lettuce-tacosm

I am excited to have the opportunity to cook with and talk about the Beyond Meat line of vegan beef crumbles.

You all know that I’m a fan of the various vegan meat products out there. Whenever a new product is released, I’m first in line to try it. So I’ve definitely been watching Beyond Meat. Ever since they showed up at Whole Foods, I was there. First their mock chicken products, and now the beef crumbles. They’re not only vegan, they are also kosher and gluten free. It’s the absolute trifecta in my book. The fact that they taste good. Perfecto!

I’d already tried the beefy variety of the crumbles, so I decided to get a little crazy and try their Feisty crumbles.

vegan feisty crumbles

An idea immediately popped in to my head. I some amazing fresh lettuce and corn from my CSA. I decided I needed to make tacos out of these Feisty crumbles. It would be a perfect light, vegan and gluten free dinner. Since the Feisty crumbles already had some seasoning in there, I had a hunch that with just a bit of adaptation, they would be perfect for my tacos.

I chopped up some onion and garlic and added it to a hot pan. I added the frozen Beyond Meat crumbles to the pan and cooked for a few minutes, breaking up the pieces. I added some cumin, salt and pepper to the mix. I then added some corn that I cut off the cob. I cooked another five minutes.

cooking-crumbles

I washed and prepped some lettuce leaves. Romaine or Butter Lettuce are perfect for this. I also chopped up some peppers and avocado.

I scooped some of the meat mixture in to the lettuce pieces and then sprinkled over some peppers and avocado. You could also add some cheddar cheese for the ultimate taco experience.

This was the perfect summer dinner!

Don’t forget to enter the amazing giveaway below!

*Please note that this was a sponsored post. While the product was provided to me, the recipe and opinions are my own.


Vegan Lettuce Tacos
 
Author:
Ingredients
  • 1 tbsp. olive oil
  • 1 onion
  • 3 cloves garlic
  • 1 package of Beyond Meat Feisty Crumbles
  • 1 tbsp. cumin
  • 2 tsp salt
  • 1 tsp. black pepper
  • Corn from 2 ears of corn
  • Lettuce Leaves
  • 1 Red pepper, chopped
  • 1 Avocado, diced
  • Vegan or Dairy Cheddar (optional)
  • Additional salt and pepper as necessary
Instructions
  1. Heat up the olive oil in a large pan
  2. Add in the onions, garlic and spices. Cook for a few minutes.
  3. Add in the vegan beef crumbles and the corn. Cook for about 5-7 minutes. Remove from heat.
  4. Clean the lettuce leaves.
  5. Scoop the meat mixture in to the lettuce leaves and garnish with the remaining chopped veggies and optional cheese.
  6. Serve and enjoy!

  vertical-tacos

Summer Squash & Caramelized Onion Frittata

summer-squash-frittataToday is the day after CSA day. A kind of day where I’m still getting down from that high of checking out all the amazing farm-fresh goodness that came from my weekly share. If you follow along on Facebook or instagram, you know all about my weekly CSA share posts. So you may already know about the abundance of summer squash I’ve been getting the past few weeks. It’s amazing. I love supporting a local farm through the CSA and also love knowing that all the vegetables and eggs that I’m eating came from less than an hour away from  me.

So back to the summer squash. What’s not to love about it? It’s a mild-tasting and very versatile vegetable. Like a zucchini, you can do a lot with it. Add it to salad, chop it up and stir-fry it. The list goes on.

I love the way summer squash looks and I love highlighting the yellow skin when possible. I thought a frittata would be a great way to give this vegetable a lead role. Pairing it with some caramelized onions and some freshly picked basil leaves is a great way to let the summer squash shine.

I sliced up some onions and let them caramelize with some garlic. I then added most of the squash abd let them soften a bit. I poured in some beaten eggs and then added some basil, goat cheese, salt and pepper. I added some more thinly sliced summer squash on top.

I then placed in the oven until set.

The combination of all the flavors is perfect. Knowing that every item came from the farm makes the meal that much tastier. Well the basil didn’t come from the farm. I grew that on my fire escape. Do I get bonus points for that kind of commitment?


Summer Squash & Caramelized Onion Frittata
 
Author:
Ingredients
  • 1 tbsp. olive oil
  • 2 medium onions, sliced thinly
  • 2 cloves garlic, chopped
  • sea salt
  • freshly ground black pepper
  • 2 summer squash, sliced in thin rounds
  • 10 cage-free large eggs
  • 8 basil leaves, chiffonade slice
  • ½ cup goat cheese, crumbled (optional)
Instructions
  1. Preheat the oven to 400.
  2. Heat oil in a large oven-safe pan.
  3. Add onions and garlic to pan and saute on medium low until the onions begin to caramelize. This should take about 20 minutes.
  4. Add salt, pepper and most of the squash rounds to the pan. Leave a handful of the squash to the side for later.
  5. Turn the heat to medium high and let the squash cook for about 5-7 minutes.
  6. Beat the eggs in a bowl and add them to the pan.
  7. Chiffonade cut the basil leaves and add them to the pan.
  8. Place the squash rounds and crumbled goat cheese over the eggs.
  9. Transfer the pan to the oven and bake in the oven until the eggs are set. Should take around 15-20 minutes.
  10. Cool a few minutes before slicing and eating.
  11. Enjoy!

summer-squash-long


Smoked Plantain Chips

Smokey-Plantains

I love plantain chips when I am looking for something crunchy to snack on. I love the flavor. Sprinkled with a little salt – it’s the perfect treat.

It never occurred to me to make my own though. Whenever I pick up some green plantains in the market, I tend to stick with tostones or use them in a hash. I’ve always relied on the bagged chips though. Not sure why – especially now that I know how easy they are to make.

What I don’t like about the bagged variety are the additives. Way too much oil and sometimes other preservatives might be added to the mix. Plantains are a fairly healthy starch and when prepared properly, are not so bad for you!

plantains

So I made my own. And since I couldn’t just be all simple, I needed to spice it up. I chose to go the smokey route. I added some smoked paprika, garlic and salt. So easy! Tossed it all on some olive oil. Laid it on a baking sheet and then baked it for about 30 minutes or so, flipping over once. How easy can it get?

I let them cool about a minute before munching on them. They were so good. I’ve definitely given up my bagged plantain chip habit. These are so much better!


Smoked Plantain Chips
 
Author:
Ingredients
  • 3 Green Plantains
  • 1.5 tbsp. olive oil
  • 1.5 tbsp. smoked paprika
  • sea salt
  • ½ tbsp. garlic powder
Instructions
  1. Preheat oven to 350
  2. Peel the plantains (use the linked how-to guide)
  3. Slice the plantains thinly on a diagonal
  4. In a large bowl, toss the plantains with the oil and spices
  5. Lay the plantain chips in a single layer on a baking sheet
  6. Bake in the oven for about 30 minutes, until crisp. Flip the chips half-way through the baking process and check on them toward the end to ensure that they aren't burning.
  7. Cool for a few minutes before eating.
  8. Enjoy!

smoked-plantain-chips.jpg

 Loading InLinkz ...

Roasted Beets and Beet Greens with Pasta

roasted beet pasta900

If you’ve been following along on Facebook and Instagram feed, you probably already know all about my CSA and the amazing produce I get each week. I’ve been getting a weekly share from a local farm called Alstedes. Each week it’s like a foodie birthday present. As I pick up the crate of veggies and farm fresh cage-free eggs, I get a huge smile on my face. What am I going to make first out of all the amazing goodies?

I love beets. I love all kinds of beets. The first box that contained beets had me so happy. I had a bunch of red beets from the farmer’s market in my fridge, so when the golden beets came, I was exuberant. I love to see those rings when you cut in to a beet. They’re just so pretty. And the colors? I love it!

beet rounds

I often simply slice or grate beets and put them in a simple salad or side dish, but I decided to include them in something more substantial for dinner. I also wanted to include the beet tops. Did you know that you could eat beet greens? You totally can! Just wash them and eat them raw in a salad, or you can saute them! They’re fantastic and so good for you!

I started out by roasting my beets. I peeled and sliced the beets thinly and tossed in some olive oil, salt and pepper and placed on a baking sheet. I baked at 415 for about 20 minutes – keeping an eye on them so that they didn’t burn.

I cooked up the pasta, reserving some of the pasta cooking water.

I then sliced up both bunches of washed beet greens.

I toasted some pine nuts, then added some olive oil, chopped onion and garlic to the pan.

Next, I added the greens, some salt and pepper.

I love how fast everything cooks up in this dish. The greens take only a few minutes to wilt.

I tossed the cooked pasta in to the pan with a small amount of the cooking water.

I plated the pasta and greens and served with the amazing roasted beets and some goat cheese. So simple, yet so delicious!


Roasted Beets and Beet Greens with Pasta
 
Author:
Ingredients
  • 2 bunches of beets (about 6 medium beets)
  • 1 tbsp. olive oil
  • 1 tsp. salt
  • 1 tsp. pepper
  • ½ cup pine nuts
  • 1 tbsp. olive oil
  • 1 small onion, chopped
  • 3 cloves garlic, minced
  • Beet Greens from two bunches of beets, washed and sliced
  • additional salt and pepper as needed
  • Goat Cheese
  • parmesan cheese (optional)
  • ¾ pound pasta, cooked according to directions on box (reserving some pasta water)
Instructions
  1. Preheat oven to 400.
  2. Peel and slice the beets in to thin rounds. Toss with some olive oil, salt and pepper and place on baking sheet. Roast in oven for 20 minutes.
  3. Cook pasta according to the directions on the box, reserving some pasta water.
  4. Toast pine nuts in large pan for 2 minutes.
  5. Add in the olive oil, salt, pepper, onions and garlic and saute for 3-5 minutes to soften. Add in the beet greens and saute a couple more minutes.
  6. Mix in the cooked pasta and a couple tablespoons of the pasta cooking water.
  7. Plate the pasta and greens. Top with goat cheese, roasted beet rounds and Parmesan Cheese if desired.
  8. Add salt and pepper to taste.
  9. Enjoy!


roastedbeets text

Portabella and Kale Breakfast Muffins

Egg Muffins.jpg

Breakfast is the toughest meal for me. I know I need to eat a morning meal, but I am usually out the door and on my way to work before I can even contemplate ingesting anything beyond a mega-cup of coffee. I need a morning shot of protein, but the best time for me to eat it is probably 8:30am, when I’ve already been in my office for about an hour. What do you do for breakfast on the go?

I love egg and cheese sandwiches, but those aren’t particularly healthy on a daily basis and the amount of gluten in those rolls tend to put me to sleep. I often throw a container of Greek yogurt in my bag, but I love the idea of having a warm breakfast.

I decided to try something new. I recently started getting some wonderful local cage-free eggs from a farm through my CSA. I get a dozen eggs each week and decided to put some of these eggs to good use. I chose to prep some gluten free egg muffins that I could freeze for later use. These egg muffins came together quickly. I sautéed some chopped kale lightly with some salt, pepper, and garlic. I placed a little bit of kale at the bottom of each muffin cup. I then added a couple pieces of diced shallot, along with a few pieces of diced portabella mushroom cap. I whisked up the eggs with some salt and pepper. I then poured the egg mixture in to each muffin cup and sprinkled a little bit of cheese over. I baked the muffins until the egg was set. And then that was it! Can you believe it? Super easy to make.

egg muffin collage.jpg

I made a couple dozen and threw them in a ziploc bag. The next day, I grabbed a couple out and put them in a container to bring to work. I heated them up in my work microwave. They were perfect. It was like a stroke of genius! I’m totally doing this again. I’m also looking forward to playing with flavors. You can swap out any of the vegetables for whatever you prefer!


Portabella and Kale Breakfast Muffins
 
Author:
Ingredients
  • ½ tbsp. olive oil
  • 3 cups chopped kale
  • 1 portabella mushroom cap, cleaned and chopped
  • 1 small shallot, chopped
  • 12 eggs
  • 2 tsp. salt
  • 2 tsp. pepper
  • grated cheese, optional
  • oil spray
Instructions
  1. Preheat oven to 350
  2. Spray muffin tins with oil spray
  3. Lightly saute kale in olive oil with some salt and pepper to soften a bit. You don't need to cook it, you just want to take the edge off a bit.
  4. Place about a tablespoon of kale at the bottom of each muffin cup. Next, layer some chopped mushrooms and shallots.
  5. Whisk the eggs with salt and pepper in a small bowl.
  6. Pour eggs in to muffin cups.
  7. Sprinkle on some cheese.
  8. Bake in oven for about 20 minutes, or until egg has completely set.
  9. Let cool a bit and then use a knife to loosen egg muffins from the baking pan.
  10. Eat or freeze for later use.
  11. Enjoy!

Egg and Kale Breakfast Muffins.jpg

1 2