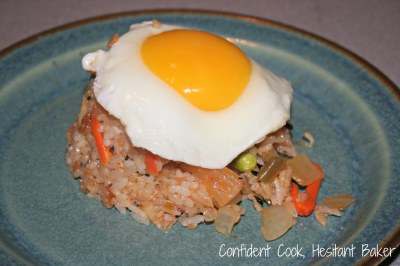
Kimchi Fried Rice

I am having the kind of week where I don’t want to cook much and I want to eat simple comfort foods. I don’t want a complicated salad. I really don’t want to be in a hot kitchen prepping all evening.  For these kinds of days, I keep some cooked rice on hand. I put up a pot of basmati or sushi rice, and I know that it’s one less step for meal prep a couple of days later.

I hadn’t had a chance to do any major grocery shopping the other night. I did have a couple of veggies, some kimchi and some already cooked rice. I also had a carton of eggs. Perfect! Dinner would happen! I love runny eggs in pasta or rice. It always enhances a dish. I also have a special place for kimchi. I tend to make a huge vat of it in the summer and savor it as long as I can.
 
Kimchi Fried Rice
Ingredients:
1 tbsp. oil
2 tsp. sesame oil
1 onion, chopped
4 garlic cloves, chopped
2 tbsp. ginger, chopped
1 tbsp. korean pepper paste
1-2 carrots, shredded
handful of edamame or peas
1-2 scallions, chopped
2 cups kimchi, chopped
1 tbsp. roasted sesame seeds
1 tbsp. soy sauce
3 cups cooked rice, cold
2 tsp. salt
4 eggs
Directions:
In a large pan, heat up the oils.
Add in the chopped onion and ginger and cook for a few minutes. Add in the korean pepper paste and garlic and cook for a few more minutes.
Add in the chopped kimchi and cook a few minutes. Mix everything together. Add in the rest of the veggies. You can add more than what I suggested. This is what I had on hand. Once the veggies have softened for a couple of minutes, add in the rice and stir together.
Add in some soy sauce and a little bit of salt as well as the sesame seeds. You can even add in some red pepper flakes – depending on your desired heat level.When your fried rice is almost done, take out another pan. I know, I know. I also hate messing up another pan. This is worth it.

Heat up a bit of oil or pam in the pan. Crack an egg in to the pan and sprinkle with a dash of salt. Don’t cook too much.

Plat up your rice and serve with the sunny side egg on top. Make sure to keep the yolk runny. It’s worth it. Enjoy!

Kimchi Fried Rice
This recipe is featured on Foodie Friends Friday!

Boozy Treats: Bourbon Peach Milkshakes

I am interrupting my usual Meatless Monday post for a very special post. This month, I am participating in the Kosher Connection recipe link-up. Our theme this month is frozen desserts. It happens to coincide with National  Ice Cream month. Perfect timing.

I recently picked up some lovely looking peaches at the market. I love when the fresh and colorful fruit begins to show up at the market. We’ve been snacking on assorted berries and stone fruit this weekend! So juicy and good! The kids are thrilled.

cutup peaches

For this month’s link-up, I wanted to do something for the adults. The kids always seem to be catered to around here. Why not do something for me. I knew it had to be boozy. I thought about popsicles, but I have posted a few already. I love ice cream, but I wanted to do a bit more than the standard ice cream.

I thought back to my Sunday excursions with my family to the Convention Grill for milkshakes. They still have the best milkshakes. A grilled cheese plate, the fries and a chocolate milkshakes. The bellyaches after were totally worth it. I haven’t had a milkshake in a long time.

I then looked at my liquor cabinet to see what tasty treats could come from it. I was having a really tough time deciding between rum and bourbon. After thinking about the fruit I had on hand, the bourbon seemed like the right choice. I got to work on a Bourbon Peach Milkshake.  I was very happy with the results.


Bourbon Peach Milkshakes 
Ingredients:

3-4 peaches
3 tbsp. brown sugar
3 tbsp. plus 1/4 cup (heaping) bourbon
7 scoops vanilla bean ice cream (homemade or store bought)
whip cream


Directions:

Peel and cut up the peaches.

Place the cut up peaches in a small saucepan with the brown sugar and 3 tablespoons of bourbon.  Turn it on medium-high.

Cook the peaches down a bit and let some of the liquid evaporate while the sugar melts. Cook for 5-10 minutes. Remove from heat. Chill in the fridge.

Place peach mixture in to blender. Add in the ice cream and the rest of the bourbon and blend away until you have reached desired consistency. Pour in to glasses and top with some whip cream.

Bourbon Peach Milkshakes

It would also be good if you drizzled some extra peach puree or jam along the side of the glass. No harm done if you don’t have extra though.

Enjoy!

Orecchiette with Caramelized Onions and Mushroom Sauce

I love pasta. Who doesn’t?

The best part about pasta is that my kids tend to love it–no matter what I put on it. Top it with veggies and some Parmesan cheese and they are happy campers.

Another reason I love pasta is because of all of the wonderful shapes it comes in. Every shape has a it’s benefits – based on how it sticks or holds whatever toppings you pair it with. One of my favorite pasta shapes is Orecchiette. The name of the pasta comes from it’s shape – the ear. Though my daughter thinks it resembles a hat more than an ear. We won’t go there. I love the shape and it’s consistency. I also love the way it grabs on to the toppings.

This recent pasta dinner was super easy to make – you just have to have a little bit of patience with the onions. I love onions, especially caramelized onions. They cook by themselves and require very little effort – my kind of meal. With the addition of some meaty baby bella mushrooms, the dish is complete.


Orecchiette with Caramelized Onions and Mushroom Sauce
Ingredients:


1 lb orecchiette pasta
1 tbsp. olive oil
1 tbsp. butter
2 large onions, sliced
4 cloves garlic, chopped
10 oz. baby bella mushrooms, sliced
sea salt
fresh ground pepper
1/4 cup chopped thyme
1/4 cup half & half
1/4 parmesan cheese

Directions:

Cook pasta according to the directions on the box. Cook to
al dente, reserving about 3/4 cup of the cook water. Strain the pasta. Do not rinse it. Set aside.

While pasta is cooking, work on the onions. 

Slice the onions in to thin strips. Heat up a pan with olive oil and butter. Add the onions. Let them cook on medium with a lid for about 20 minutes. You will see them begin to caramelize. 


After 20 minutes, add the garlic, mushrooms and thyme. Let it cook for a bit longer. 


After another 7 minutes or so, add in the half & half and the parmesan cheese. Season with salt and pepper. Stir.  Add in the pasta water and the pasta. Stir everything up.


Serve and enjoy!

IMG_1695

Meatless Monday: Cumin and Cardamom Spiced Cauliflower Soup with Homemade Croutons

My daughter’s recent vegetarianism has been a welcome treat for me. Aside from the whole 2 to 1 mentality of the vegetarian to meat-eater split, food prep has been easier in other ways. My picky 10-yr-old is suddenly willing to try more foods. After explaining to her that being a vegetarian didn’t meat that she could eat endless bowls of mac & cheese, she finally began to understand. We discussed the virtues of eating healthy proteins and good veggies with our meals; she has really dived in to a better, rounded diet.

Just a few short weeks in to what my husband hopes is a passing phase, my daughter is willing to eat an increased variety of vegetables as well as beans and fake meats for her protein. This is a kid who in the past would have the same yogurt every single day for lunch. This is a success. 
I asked her to help with our meal planning. She suggested soup for dinner. Soup. Soup, really??! On such a hot day? My husband thought it would be a good idea. I am always impressed by people who can eat and cook hot things throughout the summer. Regardless, I made them happy. I set out to make some soup for dinner as well as some croutons to go along with. 

Cumin and Cardamom Spiced Cauliflower Soup
Ingredients:

7-10 cardamom pods – crack them a little
1 tbsp. cumin seeds
1 tbsp. olive oil
1 onion, chopped
6 cloves garlic
1 tbsp. ginger, chopped
3 tsp. cumin powder
1 head cauliflower, broken up
2 carrots, chopped
2 stalks celery, chopped
6 cups vegetable broth
salt
pepper
1 tsp. cayenne pepper
Directions:
Heat up your soup pot
Add the cardamom pods and the cumin seeds to the pot. Toast them for a minute or two. They will start to get fragrant.
Add the oil to the pot.
Add in the onion, garlic and ginger. Cook for 3 minutes to let them soften. 
Add in the cumin and the chopped cauliflower. Stir up and let the cauliflower toast a bit in the oil. 
Add in the carrots and celery and cook for a few minutes.
Cover with the vegetable broth. Bring the broth to a boil. Turn the heat down to medium and cover with a lid. 
Cook for about an hour.
After an hour, the mixture should be soft. Puree the soup with an immersion blender.
Serve and enjoy!

Cardamom and Cumin Spiced Cauliflower Soup
Homemade Croutons
Ingredients:
2-3 cups of cubed crusty bread (I used some focaccia)
olive oil
salt (to taste)
Directions:
Preheat oven to 400.
Lay out the cubed bread on a baking sheet.
Toss with olive oil and some sea salt.
Toast in oven for about 7-8 minutes. 
croutons 002


Cool and store in airtight container.

Strawberry Balsamic Yogurt Popsicles

As the heat wave continues, I realize that I have to get creative in the kitchen. I am grateful that I bought that Popsicle maker. It continues to be such a hit, and I can make a variety of yummy frozen treats.

This week, I turned to the strawberries. They were on sale and had to be used up. I love a strawberry salad with a balsamic dressing, so I decided to see if it would work in a Popsicle. As my picky daughter can testify, it was a success! She gives it two thumbs up!


Strawberry Balsamic Yogurt Popsicles
Ingredients:

3/4 pound of fresh strawberries
2 tbsp. white sugar
1 tsp. vanilla
2 tbsp. balsamic vinegar (always use the good stuff)
3/4 cup plain Greek Yogurt

Directions:
Slice up the strawberries and place in a non metallic bowl.  Sprinkle the sugar over the strawberries and put them aside for 30 minutes to an hour to let them macerate.

IMG_1668

With an immersion blender, puree the strawberries. It can be chunky, but not too chunky. Mix in the rest of the ingredients.

Pour mixture in to Popsicle mold and freeze.

Eat them quickly before they melt.  Enjoy!

IMG_1671

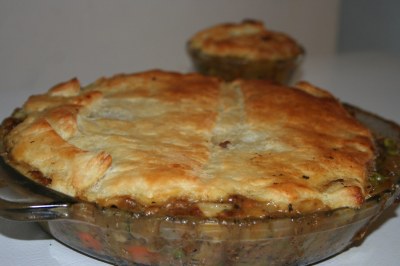
Vegetable Beef Pot Pie

I love venturing in to classic American comfort food recipes that I didn’t grow up with. One example, is a pot pie. I have been in awe of them and have been drooling over them from afar. I love a buttery crunch of a good pastry crust and I love the idea of sinking my fork in to something and scooping out something amazing.

This past year, I tried a vegetable pot pie for the first time. I am ashamed to say that it was a store-bought freezer meal, but it was so good. It was an Amy’s Organics pot pie. I loved it. No idea why I never thought to make it at home!

I rarely turn on the oven in the summer, but I was in the mood for a dinner like this and I had the right stuff around the house. To my surprise, even the kids liked it–they had two helpings each! Success in my book.

Vegetable Beef Pot Pie
Ingredients:

1 tbsp. olive oil
1 onion, chopped
2 shallots, chopped
4 cloves garlic, chopped
2 tsp. sea salt
2 tsp. fresh ground pepper
1 tbsp. fresh thyme
1 tbsp fresh sage, chopped
2 tsp. Herbes de Provence
2 medium red potatoes, cubed
3 carrots, chopped
1 package of soy ground beef or 1 pound of drained and cook ground beef
2 zucchinis, cubed
1 handful of cremini mushrooms, chopped
3/4 cup peas
2.5 tbsp flour
1 1/2 cups vegetable broth
1 tbsp. Worcestershire sauce
1 tbsp. balsamic vinegar
1 sheet of puff pastry
2 tbsp. butter (melted) or olive oil

Directions:

Preheat oven to 385.

Heat up the olive oil in a large pan. Start by sauteing the onions, garlic and shallots. Cook for a couple minutes, until it starts to soften.

Add in the herbs and spices.

Add in the carrots and potatoes and veggie meat. Use the real stuff if you’re in to that. Cook for a few minutes.

Add in the rest of the vegetables. You can choose a few different veggies if you’d like, but this is what worked in my house. Cook for another 2 minutes.

Stir in the flour. Let the flour cook in a bit. Pour in the vegetable broth and the balsamic vinegar. Let the mixture thicken. Remove from heat and cool for a few minutes.

Pour vegetable mixture in to a baking dish. I used a deep dish pie plate and two ramekins. Shape puff pastry over the top of the mixture. Brush the top of the pastry with oil or butter.

Place the baking dish on a baking sheet and bake in the oven for about 30 minutes.

Cool for about 10 minutes before serving.

Enjoy!

IMG_1659

IMG_1666

Caramelized Pear and Ginger Popsicles

It’s been something like 100 degrees here every day this week. Every single day with no break. Yes, I sit in air conditioning all day. I don’t have it all that bad, but it’s disgusting the moment you walk outside.

When I was pregnant with my older daughter,  I lived on popsicles. We went through box after box.

Last year, I came across this popsicle mold on a similarly hot day. It appeared on the perfect day. I have made popsicles a few times since, including these.

While not pregnant, I am still a big fan of popsicles. Today, I was in the mood for something fruity. I turned to pears and ginger because I love that combo. I’ve become a bit of a ginger addict when it comes to flavoring foods. That or garlic or both – and I don’t think garlic tastes good in popsicles.

I was so excited for these popsicles to freeze up so I could taste them. I wasn’t disappointed.


Caramelized Pear and Ginger Popsicles
Ingredients:

5 pears, cored and cubed
1/2 stick butter, unsalted is better
1/2 cup brown sugar
juice of 1 lemon
1 tsp. sea salt
1 tsp. vanilla
2.5 tbsp. chopped ginger

In a large saute pan, melt the butter. Add 1 tablespoon of the chopped ginger. Keep it going until the butter starts to foam. 

Stir in the brown sugar. Let the brown sugar melt a bit.


Add in the rest of the ingredients.  Let the pears caramelize and get soft.


The pears will start to give off it’s own juices. This is good. This should take 5-10 minutes.


Let the mixture cool a bit. 


Transfer mixture to a bowl and blend using an immersion blender. You could also transfer to a standard blender.


Chill the blended mixture in the fridge for about half an hour.


Pour in to popsicle molds and freeze overnight.


Enjoy!


Caramelized Pear and Ginger Popsicles

Meatless Monday: Blueberry Oatmeal Pancakes

I am horrible about eating breakfast. As I run out the door each morning, I should be grabbing something nutritious. Instead, I start my day with a double dose of iced coffee. That’s it. By lunch time, I’m starving. Once in a blue moon, I will have a bagel.

Of course I do crave a good breakfast. You know the kind. The kind that you get in a diner. Where they serve you a heaping plate of pancakes and the butter is melting down the side. There is a sticky jar of maple syrup waiting to be poured. That or eggs and a big crispy plate of hash browns. I haven’t had a breakfast like that in ages.

That is what was on my mind as I stepped in my sauna-like house this evening. A normal person would turn around and throw the kids in the car and then head to IHOP. Not me, though. I grabbed the flour off the shelf and set out to make some good old flapjacks.

I didn’t want to make the boxed kind, when it’s easy enough to make from scratch. These blueberry oatmeal pancakes were a big hit in this house. Super filling.

Blueberry Oatmeal Pancakes
Ingredients:

1 cup flour
3/4 cup quick oats
2.5 tbsp. brown sugar
1 tbsp. maple syrup
1 tsp. baking powder
1 tsp. baking soda
1/2 tsp. salt
1.5 cups milk
2 eggs
1 tsp. vanilla
1 tsp. cinnamon
3/4 cup blueberries
1 tbsp. vegetable oil

Whisk everything together slowly in a large mixing bowl.

Heat a large griddle.

Pour batter on to lightly greased griddle 1/2 cup at a time.

Flip over when side is done.

Serve with more blueberries, butter and maple syrup.

IMG_1645

Meatless Monday: Zucchini "Pasta" with Pesto

I am almost ashamed to post such a ridiculously simple recipe. I don’t know why it never occurred to me to make this.

My husband came home on Friday with a massive bag of some very large zucchini. He explained to me that the farmer’s market was closing up and they offered them to him. He isn’t one to say no to free vegetables.

Of course, I do realize that we will be eating zucchini every day this week.

Like every night, I needed a fast dinner for the kids. I had some pesto in the freezer to use up. I thought I would test out this famed low-carb and gluten free pasta idea.

I have a julienne slicer taking up space in my drawer. I love playing with it, but don’t use it as often as I should. Since it only cost about $2 on Amazon, I am not too distraught. This slicer would be perfect for what I had planned with the zucchini.

The verdict? Two thumbs up. My 5-year-old kept asking for more. Will have to make again.

IMG_1620


Zucchini “Pasta” with Pesto
Ingredients:

1-2 large zucchini, washed – 1 large zucchini served 2 hungry kids
2 tsp. olive oil
3 cloves garlic, chopped
1 cup peas
1/2 cup pesto
pine nuts
Parmesan cheese
salt
pepper

With your julienne slicer, turn you zucchini in to long thin strips. I cut mine up over paper towels to drain the “pasta” a bit.

IMG_1621

Heat up the oil in a large pan.

Toss in the garlic cloves.

Add in the zucchini noodles and cook for two minutes.

IMG_1622

Add in the peas

Add in the rest of the ingredients and cook for another two minutes.

Sprinkle with some pine nuts and more Parmesan cheese.

Enjoy!

IMG_1625

Meatless Monday: Mushroom and Sage Pasta with Poached Egg

I’m like a kid when it comes to my herb garden. Every day after work, I get a little excited as I run to the backyard to see how things are going. How much did my basil grow? What’s the sage doing  now? I love that I don’t have to run out and buy my herbs. I just take a little pair of kitchen shears out with me and make a few snips.

My sage plant is looking pretty impressive these days. Perfect for an easy dinner. I love the way sage pairs well with mushrooms. My mouth began to water as I thought about how dinner would turn out. 


Mushroom and Sage Pasta with Poached Egg (serves 3-4)
Ingredients:

1/2 box of thin spaghetti (cooked to al dente, reserve 1/2 cup cooking water)
1 tbsp. olive oil
1 tbsp. butter
3 shallots, chopped
4 cloves garlic, chopped
1/4 cup chopped sage leaves
1 tbsp. fresh thyme
1/2 container Cremini mushrooms, sliced
1/4 cup dry white wine
Parmesan cheese, grated
salt
ground pepper
2-3 tsp. red pepper flakes
3-4 eggs

In a large pan, heat up the butter and olive oil.

Toss in the shallots and the garlic. Let them get fragrant.

Add in the mushrooms and chopped sage and thyme and saute for a few minutes.

Deglaze the pan with some white wine.

Stir in about 1/4 cup of the Parmesan cheese and some of the cooking water.

Add in some salt and freshly ground pepper and the red pepper flakes.  Taste a noodle to see if it needs more seasoning.

Let the pasta cook in the mushroom sauce.

Now it’s time to poach your eggs.  They only need a couple of minutes.

While the eggs cook a bit, plate up your pasta. Make a small indentation and place the egg there.

You want the egg to be runny. Stir the runny yolk in to the pasta.

Serve with some additional Parmesan cheese and a twist of ground pepper.

Enjoy!

mushroom and sage pasta with poached egg
1 2