Swiss Chard & Chickpea Curry


So I peeked in my fridge the other night and was saddened by the dire vegetable situation in my kitchen after a long holiday weekend. So I headed out to Trader Joe’s in search of some hope for my cooking situation. Lo’ and behold, the shelves were bare. So I headed down the block to the trusty local kosher grocery store, and amazingly, there was some beautiful fresh swiss chard. It being the beginning of the new year and time for healthy new year’s resolutions and better eating plans, swiss chard is the perfect healthy green to be that representative to ease us into this special moment.

Swiss chard is a fabulous, hearty green that can adapt to any situation. It’s somewhere in between kale and spinach in terms of durability? Can greens be durable? I say, yes. Anyhow, they cook down nicely and pair well with most flavors. It also cooks up quickly, so it’s great for those evenings where you get home at 6pm and dinner needs to be ready before the half hour episode of The Simpsons is over. Am I the only crazy busy mom who does that? I try not to, but to be honest, the occasional park the kid in front of a show moment is the only way that dinner will be cooked and bellies will get filled.

Curry is the perfect wintery dish. It’s comforting, warm, spicy and pretty healthy. And if you follow some of my other recipes on here and also my instagram, you’ve probably seen a fair amount of similar dishes. It’s such an easy meal to turn to as I usually have all of the base ingredients at home already.

I quickly set up some basmati rice to cook. Basmati rice also mostly babysits itself while it cooks.

I sauteed up some onions, garlic and ginger and curry spices. Next, I added in the chopped swiss chard and let that cook down a little bit. I then added some chickpeas, a small amount of broth and some diced tomatoes. I added in a small amount of salt. I let everything simmer for a little bit – five to seven minutes and I was ready to go. By the time the curry was ready, so was the rice.

I tried to keep the heat level on this dish more mild so my kids would eat it, and eat it they did! Hope you enjoy this as well!


Swiss Chard & Chickpea Curry
 
Author:
Ingredients
  • 1 tbsp. vegetable oil
  • 1 onion, chopped
  • 2 cloves garlic, peeled and chopped
  • 2 tbsp. ginger paste
  • 1 tbsp. curry powder
  • 1 tsp. salt
  • half teaspoon turmeric powder
  • 2 tsp teaspoon ground cumin
  • 1 tsp teaspoon ground coriander
  • 1 large bunch of green swiss chard, washed and chopped
  • 1 can of chickpeas, rinsed and drained
  • 1 can diced tomatoes
  • ¼ cup vegetable broth
  • additional salt to taste
Instructions
  1. Heat up the oil in a large pan.
  2. Add in the onions, ginger and garlic and let soften for a couple minutes.
  3. Stir in the spices and cook another minute.
  4. Add in the swiss chard and let it cook down for a few minutes, stirring well.
  5. Add in the drained chickpeas, tomatoes and broth. Stir everything well.
  6. Let simmer for five to seven minutes, stirring every so often.
  7. Taste and add salt as necessary. If you'd like some heat, add in some cayenne or red pepper flakes.
  8. Serve with warm Basmati rice.
  9. Enjoy!

Dirty Chai Frappé & Hamilton Beach Blender Giveaway

frappe-hor2

I’ve been shopping around for a blender for a while. And I have to admit that I’ve been considering some of those super high-priced blenders like Vitamix and Blendtec. So when Hamilton Beach emailed me and let me know about their new Wave-Action blender, the timing was spot on.  I wasn’t sure what to expect. I looked it up and it had some decent reviews. It’s a $50 blender though.

blender-box

I have a good track record with Hamilton Beach products. I’ve tried their food processor and coffee maker, so I know that they have some great budget-friendly products that perform well. But could this blender compete with some more expensive blenders? Could this blender work in my kitchen?

I typically use a blender for a morning smoothie and occasionally some soup or even a frozen cocktail. Each year I commit to using the blender more though.

One of my favorite drinks in the summer is iced coffee. Another favorite is an iced chai latte. I make iced coffee at home all the time, but I’m ashamed to admit that the majority of my iced chais tend to come from places like Starbucks. I always tell myself that I should be making it at home. I shouldn’t be paying five dollars for a drink.

When I do get an iced chai, I often ask for it with a shot of espresso  – which is often referred to as a dirty chai latte. So I decided to pull this blender out of the box and make myself a dirty chai frappé.

I boiled some water and seeped the tea bags in a cup of water to make a strong chai concentrate. I also frozen some cold brew coffee in some ice cube trays.

chai

When the tea and coffee were ready, I blended both with some maple syrup and almond milk. I had myself a vegan dirty chai frappé! And it took me all of two minutes!

ings

This blender worked wonders on my iced chai cravings. It’s Wave Action technology easily pulls everything in to the blades. The blender does include a stirring tamper piece, but I didn’t have to use it on my frappé. I imagine that it will come in helpful with soups or veggie purees. But I was very impressed with it.blender-out

And thanks to Hamilton Beach, you also have the opportunity to win your own blender! Awesome, right? So check it out and enter.

And try my dirty chai frappé.


Dirty Chai Frappé
 
Author:
Serves: 2-3 servings
Ingredients
  • 1 cup cold brew coffee
  • 1 cup water
  • 3 chai tea bags
  • 2 tbsp. maple syrup
  • ⅓ cup almond milk
Instructions
  1. Freeze the cold brew coffee in ice cube trays
  2. Boil the water and brew the tea in the water. Stir in some maple syrup and chill.
  3. When both the coffee is frozen and tea is chilled, place in blender and blend with some almond milk.
  4. Serve and enjoy!

frappevert

a Rafflecopter giveaway

Tuscan Kale & Cauliflower Curry with Chickpeas

main-curry

If you’re anything like me, you run in to roadblocks in the kitchen almost every day. What to make, ingredients to have on hand, cooking time, etc. It’s life. We get by. Even if dinner ends up as cereal with milk, there usually aren’t too many disgruntled customers.

If you follow my dinner posts on Instagram, you probably already recognize some of the usual suspects in my kitchen. From throwing in an egg for protein to tossing every vegetable in the pan – dinner can be anything. Play with the flavor.  Swap out the veggies. Switch your proteins around. It’s all good.

You also know that I love curry. From a haphazard cabbage curry to a polished palak paneer, curry rocks. When served over Basmati rice, it is perfect. It’s one of those dishes that spring from nowhere on a busy evening. You can take advantage of whatever fresh vegetables you have on hand and it’s quick to prepare. Add in a protein and go to flavortown and you’re there. Your dish has arrived. Dinner is served.

Well it happens that way in my head. A few more steps are thrown in. But like I said above, a great curry can be born from whatever you have lying in your fridge. Well, most of the stuff. Don’t try and make a curry out of marshmallow fluff! Did I just admit to having marshmallow fluff in my house? Oops.

This curry I’m sharing with you, like the others, was born out of necessity. Some amazing Tuscan Kale was taking over some valuable real estate in my fridge and I didn’t want it to go bad. My husband wanted something with chickpeas. I wanted the kale. It’s cooperation. Or something like that. Regardless, it tasted great, it’s a great vegan curry and it cooks up super fast.

I heated up a large pan with some olive oil and add in some onion, garlic and traditional curry spices.

Next I added the cauliflower and it it cook a few minutes to soften. About 5 minutes.

I then added the Kale and Chickpeas. The kale will wilt pretty quickly.

After that, I added the canned tomatoes and some vegetable broth.

I let the mixture cook for another 5-10 minutes – letting all of the flavors meld while simmering.

While everything cook, I had some basmati rice going in my rice cooker.

Dinner took about 20 minutes to cook. It was perfect – especially for these chilly days.


Hope you enjoy!

Tuscan Kale and Cauliflower Curry with Chickpeas
 
Author:
Ingredients
  • 1 tbsp. olive oil
  • 1 medium onion, chopped
  • 4 cloves garlic, peeled and chopped
  • 2-inch piece ginger, peeled and chopped
  • 1 tbsp. curry powder
  • 1 tsp. salt
  • half teaspoon turmeric powder
  • 1 tsp teaspoon ground cumin
  • 1 tsp teaspoon ground coriander
  • 1-2 tsp. chili flakes (optional)
  • 1 small head of cauliflower, washed and broken up in to florets
  • 1 bunch of Tuscan Kale, washed and chopped
  • 1 can of chickpeas, rinsed and drained
  • 1 cup crushed tomatoes
  • ½ cup vegetable broth
Instructions
  1. Heat up the oil in a large pan.
  2. Add in the onions, ginger and garlic and let soften a bit. About 2-3 minutes on medium-high heat.
  3. Stir in the spices and add the cauliflower florets.
  4. Cook about 4-5v minutes to allow the cauliflower to soften.
  5. Add in the kale and the chickpeas. Stir well to mix up the spices. Allow the kale to wilt a bit. About 2-3 minutes.
  6. Add in the crushed tomatoes and vegetable broth. Stir well and simmer for 3-5 minutes.
  7. Taste and season as necessary with salt and pepper.
  8. Serve with warm Basmati rice.
  9. Enjoy!
vertical-curry

#BeyondMeat Vegan Lettuce Tacos + Giveaway!


vegan-lettuce-tacosm

I am excited to have the opportunity to cook with and talk about the Beyond Meat line of vegan beef crumbles.

You all know that I’m a fan of the various vegan meat products out there. Whenever a new product is released, I’m first in line to try it. So I’ve definitely been watching Beyond Meat. Ever since they showed up at Whole Foods, I was there. First their mock chicken products, and now the beef crumbles. They’re not only vegan, they are also kosher and gluten free. It’s the absolute trifecta in my book. The fact that they taste good. Perfecto!

I’d already tried the beefy variety of the crumbles, so I decided to get a little crazy and try their Feisty crumbles.

vegan feisty crumbles

An idea immediately popped in to my head. I some amazing fresh lettuce and corn from my CSA. I decided I needed to make tacos out of these Feisty crumbles. It would be a perfect light, vegan and gluten free dinner. Since the Feisty crumbles already had some seasoning in there, I had a hunch that with just a bit of adaptation, they would be perfect for my tacos.

I chopped up some onion and garlic and added it to a hot pan. I added the frozen Beyond Meat crumbles to the pan and cooked for a few minutes, breaking up the pieces. I added some cumin, salt and pepper to the mix. I then added some corn that I cut off the cob. I cooked another five minutes.

cooking-crumbles

I washed and prepped some lettuce leaves. Romaine or Butter Lettuce are perfect for this. I also chopped up some peppers and avocado.

I scooped some of the meat mixture in to the lettuce pieces and then sprinkled over some peppers and avocado. You could also add some cheddar cheese for the ultimate taco experience.

This was the perfect summer dinner!

Don’t forget to enter the amazing giveaway below!

*Please note that this was a sponsored post. While the product was provided to me, the recipe and opinions are my own.


Vegan Lettuce Tacos
 
Author:
Ingredients
  • 1 tbsp. olive oil
  • 1 onion
  • 3 cloves garlic
  • 1 package of Beyond Meat Feisty Crumbles
  • 1 tbsp. cumin
  • 2 tsp salt
  • 1 tsp. black pepper
  • Corn from 2 ears of corn
  • Lettuce Leaves
  • 1 Red pepper, chopped
  • 1 Avocado, diced
  • Vegan or Dairy Cheddar (optional)
  • Additional salt and pepper as necessary
Instructions
  1. Heat up the olive oil in a large pan
  2. Add in the onions, garlic and spices. Cook for a few minutes.
  3. Add in the vegan beef crumbles and the corn. Cook for about 5-7 minutes. Remove from heat.
  4. Clean the lettuce leaves.
  5. Scoop the meat mixture in to the lettuce leaves and garnish with the remaining chopped veggies and optional cheese.
  6. Serve and enjoy!

  vertical-tacos

Kimchi Hamentashen Dumplings

kimchi-hamentashen

The Jewish holiday of Purim will be upon us in a few weeks, and I’m in that creative zone thinking about what to prepare. Purim is a very lighthearted holiday. You can learn more about it here.

One of the foods that we traditionally eat on Purim are hamentashen. They are usually triangular filled cookies made to represent the evil Haman from the holiday story. I’ve been making these little cookies since I was a kid, but in the past few years, I’ve been trying to balance the savory and the sweet when making my hamentashen for the Jewish Holiday of Purim. This year was no different.

I’ve been brainstorming various flavors this year and hope to share a few of them with you over the next several days.

This hamentashen came about because I’ve been wanting to make traditional Korean Mandu for a while now. I’m also a huge fan of Kimchi – and from that, kimchi dumplings, of course. It dawned on me last week, that I could possibly turn it in to a hamentashen of sorts. Both are always filled and shaped. Why not? I made some vegan  daikon kimchi a few weeks ago, so these dumplings came together quickly.

I decided to cook them potsticker style so that I could keep the hamentashen dumplings up right, so that it looked like a traditional hamentashen where you can see the filling.

I started by quickly stir-frying some tofu with ginger and garlic. Next, I added in some grated carrots, scallions and Napa cabbage. Once that mixture had softened, I added some of my special radish kimchi. I added enough that it was would contribute a lot of flavor to the mix, but I didn’t want the kimchi to overpower or overheat the dumpling. The smell coming off of the pan is amazing! I seasoned with a small amount of salt – about a teaspoons.

dumpling-filling

When the filling mixture was done cooking, I transferred it to a bowl and let it cool.

I placed a tablespoon of the filling in the dumpling wrappers and then pinched the round dough to form corners, like I’ve done in the past with my hamentashen cookies. I dabbed the corners with a bit of water mixed with corn starch. It helps glue the corners in a bit.

Shaping Kimchi Dumplings

Once I prepared several dumplings, I heated my pan with vegetable and sesame oils. I placed the dumplings in the pan and let them brown a bit. Once they were browned, I added some water to the pan and covered the pan to let them steam. I removed the lid when the water had evaporated.

Prepping and Cooking Dumplings

We then dug in.

Oh my. Now this is a hamentashen to enjoy and be proud of! Definitely making these dumplings and these hamentashen again.


Kimchi Hamentashen Dumplings
 
Author:
Ingredients
  • 2 tsp. vegetable oil
  • 2 tsp. sesame oil
  • ½ lb. super firm tofu, diced small
  • 2 tbsp. ginger, peeled and minced
  • 3 cloves garlic, minced
  • 2 carrots, peeled and grated
  • ¾ cup napa cabbage, chopped
  • ¾ cup daikon kimchi (veganized), chopped (can sub cabbage kimchi if you have that)
  • 2 scallions, sliced thinly
  • 1-2 tsp. salt - as needed
  • dumpling wrappers (I used around 30)
  • ½ cup warm water mixed with a 3 tsp. corn starch (to seal the dumplings)
  • 2 tsp. vegetable oil
  • 2 tsp. sesame oil
  • water for steaming
Dipping Sauce
  • 3 tbsp. tamari
  • 2 tsp. sesame oil
  • 1 tbsp. rice vinegar
  • chopped scallions
Instructions
  1. Heat up the 2 teaspoons of vegetable oil along with the 2 teaspoons of the sesame oil. Add in the tofu and cook for several minutes. Once the tofu is cooked a bit, add in the garlic and ginger.
  2. Let the garlic and ginger get fragrant, then add in the carrots, cabbage and scallions. Let them soften a bit.
  3. Next, add in the chopped kimchi. Stir everything together.
  4. Salt as necessary.
  5. Place a tablespoon of dumpling filling on the dumpling wrapper. Pinch in the corners and seal with the corn starch and water mixture.
  6. Repeat with more dumplings.
  7. Heat the oils in a large pan that has a fitting lid.
  8. Place the dumplings bottom down in the pan and let them brown a bit. Should take a couple of minutes. Once the dumplings have lightly browned on the bottom, pour about ⅔ cup of water in the bottom of the pan and cover pan with a lid to steam the dumplings.
  9. Let the dumplings steams until the water has evaporated completely.
  10. Transfer to a platter. Repeat with any additional dumplings.
  11. Dip the dumplings in a mixture of tamari, sesame oil, rice vinegar and scallions.
  12. Enjoy!

kimchi-hamentashen-dumplings-tall

Kosher BBQ Tofu Sandwiches


So the weekend is here. Thank goodness. I love the weekends. Time to get stuff done. Time to have fun and relax with my family. Time to eat good food.

We’re in the thick of winter right now on the East Coast. We’ve had snow non-stop. It’s getting a bit ridiculous. Feeling like I’ve been stuck inside way too long. So I’ve been trying to come up with foods that remind me of summer.

bbq-tofu-sandwich

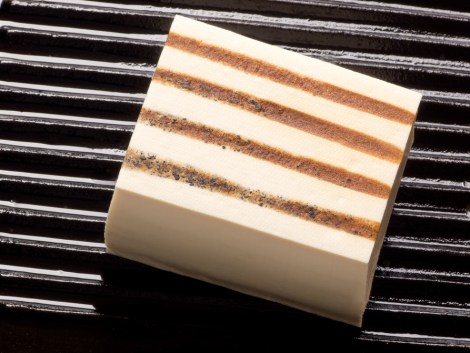
When I think of summer, I think of grilling. I love eating food from the grill.  My father has always been the master of the barbecue. Even in the winter, he heads out to the grill. I thought I’d share with you a fabulous Kosher BBQ Tofu Sandwich that even my father would be proud of. Since it’s vegetarian, the whole family will enjoy it! In the summer, I make this on the grilled, but in the winter, I stay inside with my trusty grill pan.

grilled tofu

Kosher BBQ Tofu Sandwiches
 
Author:
Ingredients
  • 1 (12 ounce) package extra firm Tofu
  • 3 tbsp. Vegetable Oil
  • 1 Onion, thinly sliced
  • Cole Slaw
  • 1 ½ cups BBQ sauce
  • 6 Hamburger buns
Instructions
  1. Start by draining the tofu. To effectively drain it, place tofu on a plate lined with two layers of paper towel. Put two additional paper towels atop the tofu. Afterwards, place a plate with something heavy on it to slowly weigh it all down without crumbling the tofu. Allow it to set for 30 minutes and once all the water has been squeezed out, you can proceed to cutting the tofu. Make sure they are about ¼ inch thick so they would be easier to cook. To ensure that the tofu would be meaty and chewy rather than soft and gooey, it is best to freeze them for an hour. You would notice that the edges would be frozen. Do not thaw them before placing in the skillet.
  2. Heat the vegetable oil in a skillet or non-stick pan. Once hot enough, place the tofu slices and fry until both sides are golden brown; 3-4 minutes is good enough. It is recommended that you shake the pan while cooking so the tofu won’t stick to the pan. Add onions. Pour in BBQ sauce to desired taste. Make sure BBQ sauce is enough to coat the tofu. When you notice that the sauce is setting on the tofu, you’re done. Top with coleslaw and serve on toasted wheat buns.
  3. If you are thinking of pairing this with wine, Chris Murphy, resident wine expert from M&S advises that “The rule of thumb when finding an excellent wine pairing is to try and match the textures of food with the wine, and this works for all cuisines, vegetarian or not.” In this case, the most dominant ingredient is the tofu and sparkling wine like Desroches Champagne (labelled suitable for vegetarians) allows the flavor of tofu to come through.


Pan-Seared Tofu with Harissa Chickpeas

Pan-Seared-Tofu-Harissa

I think this month’s Bon Appétit Magazine may be one of my favorites. They focused on healthful foods this  month. Page after page, I was just blown away and inspired by the ideas and photos. Their cover photo inspired my recent miso soup. When I paged through and landed on their Pan-Roasted Chicken with Harissa Chickpeas, my mouth began to water some more. Harissa. I love the spice paste and I have always wanted to make it myself. I knew right then that I had to veganize this dish. I also knew that I wasn’t going to use store-bought harissa. I had to make it my own.

Harissa is a North African chili paste. It’s spicy and fragrant – so full of flavor. I often buy it to spread on challah for Shabbat, or I sometimes spread it on fish. I knew from past research that Harissa uses freshly toasted spices and would be the perfect opportunity to break out my new mortar and pestle.

The amazing folks at Core Bamboo recently sent me a beautiful mortar and pestle that would be perfect for this Harissa job. Core Bamboo is also amazingly generous and sponsoring a giveaway for a mortar and pestle just like mine. So check out the end of this blog post if you are interested in winning a set for your own kitchen. Core Bamboo produces an amazing array of kitchen products. I think I have a cutting board addiction, and several in my collection are made by Core, as are several of my bowls. I may also hoard serving bowls. I’m a kitchen stuff hoarder. Plain and simple.

Anyhow, back to the dish.

First, I made the Harissa. I soaked some dried chile peppers in boiling water.

peppers

While the peppers soaked, I toasted the spices in a hot pan. I then ground up the toasted spices in my mortar and pestle.

mortar-and-pestle

Once the peppers were soft, I seeded and stemmed them and then I transferred everything to my Cuisinart food processor and blended the mixture. Everything came together quickly.

Cuisinart

Once the harissa is ready, transfer the mixture to a clean jar and add some extra olive oil to cover the paste.

harissa

I then set out to make the rest of the meal.

Next, I sliced my tofu and spiced it with salt, pepper and cumin. I seared the sliced tofu in a hot pan and then transferred the tofu to a plate.

I sautéed some onion, garlic and additional spices. I added my chickpeas to the pan, along with some harissa, tomato paste and vegetable broth.  I let the mixture cook for a few minutes. I then added the tofu back to the pan so that it gets coated with the Harissa.

Chickpeas

I served the tofu and chickpeas with some lemon wedges.

Pan-Seared-Tofu-Harissa

Dinner was amazing. It was super easy to make and everyone walked away with full, happy bellies. I hope you enjoy!

Don’t forget to enter the amazing giveaway for a Core Bamboo Mortar & Pestle!

Pan-Seared Tofu with Harissa Chickpeas
 
Author:
Ingredients
  • ½ tablespoon olive oil
  • 1 lb extra-firm tofu, drained and sliced
  • 1-2 tsp. salt
  • 2 tsp. ground black pepper
  • 2 tsp. cumin
  • 1 medium onion, chopped
  • 4 cloves garlic, chopped
  • 3 tbsp. tomato paste
  • 3 cups cooked or canned chickpeas
  • ⅓ cup Harissa (see recipe below) or use store-bought
  • ½ cup vegetable broth
  • ¼ cup chopped cilantro
  • ¼ chopped parsley
  • Lemon wedges, for serving
Instructions
  1. Heat oil in a large pan over medium high heat.
  2. Season the tofu slices with the salt, pepper and cumin and sear the tofu until browned on both sides. Transfer to a plate when done.
  3. Add onion and garlic to the pan and saute for a few minutes until softened.
  4. Stir in the tomato paste and add in the chickpeas and the harissa.
  5. Stir in the vegetable broth and let the mixture simmer.
  6. Let it cook for about 5-10 minutes and then add the tofu back to the pan. Ensure that the tofu is coated with the harissa mixture.
  7. Serve the dish with lemon wedges for squeezing over the dish. You may also like rice along side the dish.
  8. Enjoy!

 
Homemade Harissa
 
Adapted from Saveur
Author:
Recipe type: sauce, dip, paste
Cuisine: Moroccan, Tunisian
Ingredients
  • 6 Dried Guajillo Chiles
  • 3 Dried Pasilla Chiles
  • 2 Dried Chiles de Arbol
  • 1⁄2 tsp. Caraway seeds
  • 1⁄4 tsp. Coriander seeds
  • 1⁄4 tsp. Cumin seeds
  • 1 tsp. Dried Mint Leaves
  • 3 tbsp. Extra-Virgin Olive Oil, plus more as needed
  • 1 1⁄2 tsp. kosher salt
  • 5 cloves garlic
  • Juice of 1 lemon
  • 2 tbsp. tomato paste
Instructions
  1. Put the chilies in a bowl and pour bowling water over the chiles to allow them to soften. Let them sit for about 20-30 minutes.
  2. In a dry pan, toast the caraway, coriander and cumin seeds over medium heat. Toast them for a few minutes until they begin to become fragrant.
  3. Transfer the spices to a mortar and pestle and grind them so that they become a powder.
  4. Drain the chiles and remove the stems and the seeds. Transfer them to your food processor.
  5. Add the rest of the ingredients to the food processor, including the ground spices, and puree until everything is well integrated and smooth.
  6. Store the mixture in a sterile glass jar. Add some olive oil to the top of the harissa paste and seal the jar. Store in the fridge for up to a few weeks.

Pan-Seared-Tofu

a Rafflecopter giveaway

Curried Spinach and Chickpea Veggie Burgers

spinach-and-chickpea-burger

Let me tell you something about myself. I love veggie burgers. I often judge a restaurant by three things; their veggie burgers, their grilled cheese and their onion rings. I know they sound like simple dishes, but often, they’re what I turn to when I go out to eat. And if those dishes are not good, uh oh.

So I’m always trying out new flavor combinations for veggie burgers at home. It’s a great weeknight dinner and they tend to freeze well for future meals.

This spinach and chickpea burger fell together. I was in the mood for a falafel flavor without the falafel and the mess it comes with. I needed simple. I also had some spinach I wanted to use up and I didn’t want to turn it in to a salad.

I’ve been keeping my Cuisinart food processor out on the counter lately, so these came together super fast.

I mixed up a can of chickpeas, an onion, some garlic and the spinach in the food processor. I then added some spices.

I formed them in to burger shapes and then lightly fried the burgers in a pan that was coated lightly in olive oil. I just wanted them to brown and hold together.

I then placed them in an oven at 375 to finish cooking.

I enjoyed these with a salad, while my kids devoured them on a sandwich thin along with extra spinach and sliced avocado and French fries on the side. Hope you enjoy these as much as we did!


Curried Chickpea and Spinach Burgers
 
Author:
Recipe type: Burger, Sandwich, Veggie Burger
Ingredients
  • 2 tsp. olive oil
  • 1 can chickpeas
  • 1 small onion
  • 1 bag of baby spinach – about 3 cups
  • 3 cloves garlic
  • 2 tsp. cumin
  • 2 tsp. curry powder
  • 1 tsp. sea salt
  • 1 tsp. ground black pepper
Instructions
  1. Mix everything together in a food processor.
  2. Form mixture in to burgers.
  3. Pan fry in a large sauté pan.
  4. Finish cooking in an oven at 375. It should bake for around 10 minutes or so.
  5. Serve them dressed with your preferred burger toppings. Enjoy!

spinach-and-chickpea-burgers

Spicy Miso Ginger Soup with Mushrooms & Spinach

miso-ginger-soup

We were having a get-together with some friends and I offered to bring something over. They suggested soup. I initially thought I would do something simple like my Cardamom Cauliflower Soup or perhaps my French Onion Soup. I wanted to change things up a bit though. It’s been pretty cold around here and I’ve been craving spicy Asian noodle soups. My Bon Appétit Magazine had just arrived and I was drooling over the rice noodle soup on the cover.

Having looked through various recipes for inspiration, I decided to come up with my own vegan soup recipe. I had some miso on hand as well as shiitake mushrooms. I knew I could pull something together.

I began by sautéing up some shallots, garlic and ginger in a little bit of sesame and canola oil. As they softened, I added some cubed extra firm tofu and some sliced shiitake mushrooms, along with the whites of the scallions. I let everything sear and soften. The smell coming off the pot was amazing.

I stirred in some chili garlic paste and added some vegetable broth to the pot. I then added a strip of Kombu to the broth mixture. Kombu is a type of seaweed that adds amazing flavor to soups.

Next, I stirred in some miso and tamari to the mix. I tasted the broth a bit to see if it needed additional spice. I like heat, so I added a couple of squirts of Sriracha.

Next, I added some spinach, shredded daikon and shredded carrots. The spinach cooks up fast. At that point, the soup smelled amazing and I really wanted to dig in. I let the soup simmer for about a half hour. I then ladled in to a bowl over some gluten free soba noodles.

This soup is perfect. It’s great for these cold winter days. Add some extra sriracha if you want an extra kick.

ladled-miso-ginger-soup

Spicy Miso Ginger Soup with Mushrooms & Spinach
 
Author:
Recipe type: Soup
Cuisine: Asian, Gluten Free
Ingredients
  • ½ tbsp. rice bran oil
  • 2 tsp. sesame oil
  • 2 shallots, chopped
  • 4 inch piece of ginger, peeled
  • 4 cloves garlic, peeled
  • 2 scallions, chopped (whites and light green only)
  • ½ pound extra firm tofu, drained and cubed
  • 10 oz. shiitake mushrooms, sliced
  • 2 tsp. chili garlic paste
  • 10 cups vegetable or imitation chicken broth
  • 1 6-inch strip of kombu
  • 2 tbsp. white miso paste
  • 1 tbsp. tamari or soy sauce (can adjust taste)
  • 1-2 tbsp. sriracha (optional, to taste)
  • red pepper flakes (optional, to taste)
  • 1.5 cups shredded carrot
  • 1.5 cups shredded daikon
  • 2-3 cups packed spinach leaves (could also use kale or mustard greens)
  • Soba noodles (optional, to serve)
Instructions
  1. Process the garlic and ginger in to a paste in the food processor.
  2. Heat up the oils in a heavy bottom soup pot.
  3. Add in the garlic, ginger and scallions and saute for a few minutes to soften.
  4. Add in the mushrooms and the tofu and saute for several minutes.
  5. Stir in the chili paste and add in the broth.
  6. Mix in the miso paste and tamari and taste the soup a bit. Add additional sriracha or red pepper flakes for extra heat.
  7. Add in the shredded veggies and spinach and cover the pot. Let the soup simmer for about a half hour.
  8. Serve over soba noodles.
  9. Enjoy!

Spicy-Miso-Ginger-Soup

White Bean and Kale Soup

white-bean-soup

My daughter came home from a friend’s house and excitedly told me all about the Olive Garden soup she had just eaten for dinner. I don’t think I’ve been to Olive Garden since I was about ten-years-old. I definitely didn’t remember any soup. The friend’s family knows that we don’t eat at Olive Garden and they understand that Gila is a vegetarian. After a moment of panic, I composed myself and asked her to tell me more. She happily told me about this amazing soup filled with spinach, potatoes and delicious broth. For days after, she asked me if I had made my version of the soup yet. I had just finished a marathon soup cooking session. My freezer was already bursting with various soups. I wasn’t ready to make another soup.

As they often do, circumstances change. In the middle of the work day, I quickly texted my husband and asked him what he thought I should prepare for dinner. With a groan, he told me all about his two root canals from earlier that morning and then fast forwarded to the part where he told me that all his jaw could handle was some warm soup. He told me not to worry. He assured me that he would just venture out to a local take-out place and buy something. I couldn’t let that happen. I decided that this was the night to make the soup of Gila’s dreams.

I had some kale in the fridge that needed to be used up.  I decided that it would be perfect in place of the spinach. I also had a ziploc bag of already cooked white beans in the freezer. I set off to make my version of this Olive Garden Soup. Amazingly, I was successful. Gila went to bed with a full and happy belly and Jason happily had three bowls of soup. This hearty soup is a winner and will definitely be made again!


White Bean and Kale Soup
 
Author:
Ingredients
  • 1 tbsp. olive oil
  • 1 onion, chopped
  • 4 carrots, cut up
  • 4 stalks of celery, chopped
  • 5 cloves garlic, chopped
  • 2 tsp. salt
  • 2 tsp. fresh ground pepper
  • 3 small potatoes, peeled and sliced (I used purple, but you can use your preference)
  • 1 bunch of kale, washed and trimmed and chopped
  • 2 cans of white beans, rinsed and drained
  • 1 can of diced tomatoes
  • 2 tsp. basil
  • 2 tsp. oregano
  • 2 tsp. thyme
  • 6 cups of vegetable broth
  • 3 cups water
  • Additional salt and pepper as needed
  • Soup noodles (alphabet or any variety will do) optional
Instructions
  1. Heat up the olive oil in a large soup pot
  2. Add in the onions, carrots, celery and garlic and cook a few minutes to soften.
  3. Stir in the salt and pepper
  4. Add in the kale and the potatoes and the kale and cook a couple of minutes
  5. Add white beans, tomatoes, broth and the water - along with the spices
  6. Bring the soup to a boil
  7. Turn the heat down and let simmer while covered for at least an hour.
  8. If you'd like some noodles in your soup, add them about 15 minutes before serving.
  9. Taste and adjust seasoning.
  10. Serve and enjoy!

white-bean-soup-in-spoon

1 2