Creamy White Bean Soup with Swiss Chard

soup-main

I had a huge amount of swiss chard in my kitchen. I was going to turn it into a stir fry, but the wintery weather got the better of me. I decided to come up with a soup recipe that would work with what I had on hand.

swiss-chard-2

My daughter loves spinach in her soup. I had a hunch that the swiss chard would be a good stand-in. So I got to work.

I sauteed some onions and garlic in some olive oil and added in some rosemary and two cans of cannellini beans.

beans

I then added some vegetable broth to the mixture and let it come to a boil. I let the soup simmer on the stove on low for about an hour.

While the bean soup cooked, I worked on the swiss chard. I chopped up some washed swiss chard. Then, I sauteed some shallots and garlic with some salt and pepper. I used lots of garlic. I added the chopped swiss chard to the pan and let that cook for a few minutes. Swiss chard takes about 5 minutes or so to be cooked. Once it was softened, I set it aside for when the soup was done.

swiss-chard-cooking

Once the beans were cooked through, I took out my immersion blender and pureed the soup mixture. I made sure to puree everything, giving it a velvety and creamy texture. Once that was done, I added the swiss chard to the pot.

soup-pot

This soup took about an hour from start to finish. Woot woot! And my daughter approved. She’s my toughest critic!


Creamy White Bean Soup with Swiss Chard
 
Author:
Ingredients
  • 1 tbsp. olive oil
  • 2 small onions, chopped
  • 5 cloves garlic, chopped
  • 2 cans cannellini beans, rinsed and drained
  • 3 tsp. salt
  • 3 tsp. fresh ground pepper
  • 3 tbsp. fresh rosemary, chopped
  • 4 cups vegetable broth
For the Swiss Chard:
  • 1 tbsp. olive oil
  • 1 shallot, chopped
  • 5-6 cloves garlic, chopped
  • 2 tsp. salt
  • 2 tsp. ground pepper
  • 1 big bunch of swiss chard, stems trimmed off, washed and chopped (about 4-5 overflowing cups)
  • red pepper flakes (optional)
  • additional salt and pepper as needed
Instructions
  1. Start by heating up the olive oil in a medium size soup pot.
  2. Add in the onions and garlic, drained beans, salt, pepper and rosemary and saute another 5-7 minutes.
  3. You want the garlic and onions to soften a bit and get fragrant.
  4. Add in the vegetable broth and bring to a boil.
  5. Cover and let the mixture simmer.
  6. While the beans cook, work on the swiss chard.
  7. In a large saute pan, heat up the olive oil.
  8. Add in the shallots and the garlic and cook for a couple of minutes.
  9. Add in the chopped swiss chard, the salt and pepper and stir a bit and let it soften - stirring a every couple of minutes.
  10. The swiss chard process should take about 5-7 minutes.
  11. Turn off the heat and set the swiss chard to the side.
  12. Let the bean soup mixture cook for a total of about an hour. The beans should be pretty soft.
  13. Using your immersion blender, puree the soup completely. The beans will give the soup a very creamy and velvety texture.
  14. Once the soup is pureed, stir in the cooked swiss chard.
  15. Serve and enjoy!

white-bean-soup

Rosemary, Fig & Goat Cheese Latkes

latkes-main

Chanukah starts tomorrow night. It only hit me when I glanced at my calendar on Outlook and it told me that I had to light the first candle on Tuesday.  I stifled a gasp. I’m totally not caught up with holiday preparations. I need to buy Chanukah and Christmas presents. Need to buy presents for my kid’s teachers and therapists. I need to sort out a chanukah party menu. The list goes on. I will breathe after December 23. That’s when I start my staycation.

Chanukah is already in the air though. Even if it hasn’t begun. The Chanukah spirit arrived last week when I made those delicious golden beet latkes. Today, I have another fun Chanukah treat and I’m sure I’ll have some more goodies for you through the holiday.

I’m so excited to share these latkes with you. The idea for these latkes came about one evening when I had some people over for a wine and cheese night. I served an appetizer that had some roasted figs with rosemary and goat cheese on them. As I worked through the flavors, and loved them, I knew these flavors had to become a latke! So here we are today!

I soaked some dried figs in some port wine and brought some goat cheese to room temperature. You can let the figs soak for about 20 minutes, or you can get distracted like I did and keep them soaking for an hour. You want them to soften and plump up. I chopped up the figs along with some shallots and mixed them with the goat cheese. I set that bowl aside.

goat-cheese-and-figs

filling

The potato process needs to happen fast as you want them to keep their light color. I washed and peeled the potatoes. I shredded the potatoes, along with some onion, garlic and more shallots in the food processor using the shredding disc. Next, I rinsed the grated potato mixture and squeezed out all of the liquid.

I placed the mixture in to a large mixing bowl and stirred in some eggs, almond flour, salt, pepper and fresh chopped rosemary.

potato-mixture

Next, I heated up some oil in a large fry pan.

I placed a thin layer of potato mixture in my hand and then placed some fig and goat cheese layer on top of it. You want a decent amount of goat cheese, but make sure that there’s an edge of potato around it. I topped the goat cheese with another thin layer of potatoes. You want the latke to be thin so that it gets crispy and cooked through, but you also want the cheese to shine through. The cheese should be completely covered by the potato mixture.

stuffed-latkes

I fried the latkes until crisp on both sides. The trick with latkes is to place them in the pan and leave them alone until you see the shredded potatoes begin to brown at the edges. The browning will poke through. But don’t peek and don’t flip until you can see that it’s very crisp.

frying-latkes

Drain the finished latkes on a cooling rack over a paper towel lined cookie sheet.

drain-latkes

It’s best to serve fresh. But if you have to make these ahead of time, you can keep them warm in a 250-degree oven.

These latkes are out of this world. Because of the creamy goat cheese with figs inside, you don’t need any sauce or sour cream on top. There’s a huge amount of flavor all packed in to the latke! It’s amazing! My first thought as I sunk my teeth in to the latke was that it was “off the hook!” And I never say that! It was that good though. I hope you enjoy them as much as I did!


Rosemary, Fig & Goat Cheese Latkes
 
Author:
Ingredients
Fig & Goat Cheese Filling
  • 7 dried figs
  • 1 cup of port wine or other semi dry red wine
  • 1 shallot, chopped
  • 4 oz. goat cheese (chevre)
Latke Blend
  • 4 large red potatoes, washed and peeled nand quartered
  • 1 medium onion
  • 1 shallot
  • 4 cloves garlic
  • 3 tablespoons fresh rosemary, chopped
  • 1 tbsp. salt
  • 4 tsp. fresh ground pepper
  • additional salt and pepper to taste
  • 8 tbsp. almond flour or all-purpose flour
  • 2 eggs
  • Oil for frying
Instructions
  1. Soak the figs in the wine for at least 20 minutes.
  2. Drain the figs and chop them finely. In a small bowl, mix the figs with the chopped shallot and goat cheese. Set the bowl aside.
  3. In a food processor fitted with a shredding disc, grate the potatoes, onions, garlic and shallot.
  4. Rinse and drain the grated potato mixture. Squeeze out all of the liquid.
  5. Transfer to a large mixing bowl.
  6. Mix the rosemary, salt, pepper, egg and flour into the potato mixture.
  7. Heat about a ½ an inch of oil in a large frying pan.
  8. Form the potato mixture in to a small thin patty in your hand and place a tablespoon or so of goat cheese filling in the middle. Cover it with a small thin layer of potato mixture and seal along the edges.
  9. Fry in the oil until browned and crisp on both sides.
  10. Drain on a cooling rack or paper towels.
  11. Enjoy!

latkes-tower


Tuscan Kale & Cauliflower Curry with Chickpeas

main-curry

If you’re anything like me, you run in to roadblocks in the kitchen almost every day. What to make, ingredients to have on hand, cooking time, etc. It’s life. We get by. Even if dinner ends up as cereal with milk, there usually aren’t too many disgruntled customers.

If you follow my dinner posts on Instagram, you probably already recognize some of the usual suspects in my kitchen. From throwing in an egg for protein to tossing every vegetable in the pan – dinner can be anything. Play with the flavor.  Swap out the veggies. Switch your proteins around. It’s all good.

You also know that I love curry. From a haphazard cabbage curry to a polished palak paneer, curry rocks. When served over Basmati rice, it is perfect. It’s one of those dishes that spring from nowhere on a busy evening. You can take advantage of whatever fresh vegetables you have on hand and it’s quick to prepare. Add in a protein and go to flavortown and you’re there. Your dish has arrived. Dinner is served.

Well it happens that way in my head. A few more steps are thrown in. But like I said above, a great curry can be born from whatever you have lying in your fridge. Well, most of the stuff. Don’t try and make a curry out of marshmallow fluff! Did I just admit to having marshmallow fluff in my house? Oops.

This curry I’m sharing with you, like the others, was born out of necessity. Some amazing Tuscan Kale was taking over some valuable real estate in my fridge and I didn’t want it to go bad. My husband wanted something with chickpeas. I wanted the kale. It’s cooperation. Or something like that. Regardless, it tasted great, it’s a great vegan curry and it cooks up super fast.

I heated up a large pan with some olive oil and add in some onion, garlic and traditional curry spices.

Next I added the cauliflower and it it cook a few minutes to soften. About 5 minutes.

I then added the Kale and Chickpeas. The kale will wilt pretty quickly.

After that, I added the canned tomatoes and some vegetable broth.

I let the mixture cook for another 5-10 minutes – letting all of the flavors meld while simmering.

While everything cook, I had some basmati rice going in my rice cooker.

Dinner took about 20 minutes to cook. It was perfect – especially for these chilly days.


Hope you enjoy!

Tuscan Kale and Cauliflower Curry with Chickpeas
 
Author:
Ingredients
  • 1 tbsp. olive oil
  • 1 medium onion, chopped
  • 4 cloves garlic, peeled and chopped
  • 2-inch piece ginger, peeled and chopped
  • 1 tbsp. curry powder
  • 1 tsp. salt
  • half teaspoon turmeric powder
  • 1 tsp teaspoon ground cumin
  • 1 tsp teaspoon ground coriander
  • 1-2 tsp. chili flakes (optional)
  • 1 small head of cauliflower, washed and broken up in to florets
  • 1 bunch of Tuscan Kale, washed and chopped
  • 1 can of chickpeas, rinsed and drained
  • 1 cup crushed tomatoes
  • ½ cup vegetable broth
Instructions
  1. Heat up the oil in a large pan.
  2. Add in the onions, ginger and garlic and let soften a bit. About 2-3 minutes on medium-high heat.
  3. Stir in the spices and add the cauliflower florets.
  4. Cook about 4-5v minutes to allow the cauliflower to soften.
  5. Add in the kale and the chickpeas. Stir well to mix up the spices. Allow the kale to wilt a bit. About 2-3 minutes.
  6. Add in the crushed tomatoes and vegetable broth. Stir well and simmer for 3-5 minutes.
  7. Taste and season as necessary with salt and pepper.
  8. Serve with warm Basmati rice.
  9. Enjoy!

vertical-curry

Summer Squash & Caramelized Onion Frittata

summer-squash-frittataToday is the day after CSA day. A kind of day where I’m still getting down from that high of checking out all the amazing farm-fresh goodness that came from my weekly share. If you follow along on Facebook or instagram, you know all about my weekly CSA share posts. So you may already know about the abundance of summer squash I’ve been getting the past few weeks. It’s amazing. I love supporting a local farm through the CSA and also love knowing that all the vegetables and eggs that I’m eating came from less than an hour away from  me.

So back to the summer squash. What’s not to love about it? It’s a mild-tasting and very versatile vegetable. Like a zucchini, you can do a lot with it. Add it to salad, chop it up and stir-fry it. The list goes on.

I love the way summer squash looks and I love highlighting the yellow skin when possible. I thought a frittata would be a great way to give this vegetable a lead role. Pairing it with some caramelized onions and some freshly picked basil leaves is a great way to let the summer squash shine.

I sliced up some onions and let them caramelize with some garlic. I then added most of the squash abd let them soften a bit. I poured in some beaten eggs and then added some basil, goat cheese, salt and pepper. I added some more thinly sliced summer squash on top.

I then placed in the oven until set.

The combination of all the flavors is perfect. Knowing that every item came from the farm makes the meal that much tastier. Well the basil didn’t come from the farm. I grew that on my fire escape. Do I get bonus points for that kind of commitment?


Summer Squash & Caramelized Onion Frittata
 
Author:
Ingredients
  • 1 tbsp. olive oil
  • 2 medium onions, sliced thinly
  • 2 cloves garlic, chopped
  • sea salt
  • freshly ground black pepper
  • 2 summer squash, sliced in thin rounds
  • 10 cage-free large eggs
  • 8 basil leaves, chiffonade slice
  • ½ cup goat cheese, crumbled (optional)
Instructions
  1. Preheat the oven to 400.
  2. Heat oil in a large oven-safe pan.
  3. Add onions and garlic to pan and saute on medium low until the onions begin to caramelize. This should take about 20 minutes.
  4. Add salt, pepper and most of the squash rounds to the pan. Leave a handful of the squash to the side for later.
  5. Turn the heat to medium high and let the squash cook for about 5-7 minutes.
  6. Beat the eggs in a bowl and add them to the pan.
  7. Chiffonade cut the basil leaves and add them to the pan.
  8. Place the squash rounds and crumbled goat cheese over the eggs.
  9. Transfer the pan to the oven and bake in the oven until the eggs are set. Should take around 15-20 minutes.
  10. Cool a few minutes before slicing and eating.
  11. Enjoy!

summer-squash-long


Creamy Tomato Soup & Loaded Grilled Cheese

Grilled-Cheese

This month’s Kosher Connection link-up is all about comfort food. I had a hard time decided just which food I should share with you. I decided to share with you a food and a memory that brings comfort to me. Be sure to scroll all the way down to the end of this post to see some other great recipes from my fellow Kosher Connection bloggers!

I have several defining food moments of my life. Many of them revolve around lazy Sundays with my family. My parents would both be cooking in the kitchen and my sisters and I would be running from room to room taking in the delicious smells, and probably engaged in some sibling rivalry.

Sundays were days filled with a bustle of activity. Our days were spent running from swimming to pottery to theater at the JCC, and then home for a warm supper around the family table. One of my dad’s specialties is a loaded grilled cheese sandwich. My sisters and I would gobble that sandwich up.

This grilled cheese was never just standard white bread and American cheese. It was always filled with surprises. Some days it would be tomato and onion within the gooey cheese. Other days, we might find a sprinkling of sunflower seeds hidden inside. We always enjoyed it.

Later in college, whenever I was in the mood for that taste of home,  I would order up a grilled cheese sandwich. Like during my childhood, it always had stuff in it. It was often filled with provolone, onions and mushrooms. On a rainy day, I would add a cup of soup to the meal. I learned to love creamy tomato soup on those rainy New York days. Dipping a corner of grilled cheese in to that soup and chowing down – that spelled out a bit of heaven.

Pure comfort on a plate.

I thought I’d share this fabulous meal with you today.

Creamy Tomato Soup
 
Author:
Recipe type: Soup
Ingredients
  • 1 tbsp. olive oil
  • 1 onion, chopped
  • 2 stalks celery, chopped
  • 2 carrots, chopped
  • 5 cloves garlic, chopped
  • 1 tbsp. fresh basil, chopped
  • 1 tbsp. fresh oregano, chopped
  • 1 tbsp. fresh thyme, chopped
  • 2 tsp. salt
  • 2 tsp. ground pepper
  • 1 - 28 oz. can of roasted tomatoes
  • 5 cups vegetable broth
  • ½ cup half & half
  • additional salt and pepper to taste
Instructions
  1. In a large soup pot, heat up the olive oil on medium-high heat.
  2. Add in the onions, celery, carrots, garlic and herbs.
  3. Cook on medium-high for a few minutes until the onions begin to soften.
  4. Stir in the canned tomatoes.
  5. After a couple minutes of cooking, add in the vegetable broth.
  6. Let the soup come to a boil and then turn down the heat to medium low and cover the pot.
  7. Let the soup simmer covered for about 45 minutes.
  8. Check on the soup. The carrots should have softened.
  9. Puree the soup with an immersion blender.
  10. Stir in the half & half.
  11. Taste the soup and adjust seasoning.
  12. Serve and enjoy!

Creamy-Tomato-Soup
Loaded Grilled Cheese
 
Author:
Recipe type: Sandwich
Serves: 2 sandwiches
Ingredients
  • 1 tbsp. butter
  • ½ tbsp. olive oil
  • 1 onion, sliced thinly
  • 1 tsp. salt
  • 1 tsp. ground pepper
  • 3 cloves garlic, chopped
  • 5 cremini mushrooms, sliced thinly
  • 3-4 slices cooked veggie bacon, optional (or the real bacon!)
  • 4 slices of your favorite hearty bread
  • 2 slices Provolone cheese
  • 2 slices Cheddar cheese
  • 2 slices Swiss Cheese
  • Butter for grilling the sandwiches
Instructions
  1. Heat up the butter and olive oil in a saute pan.
  2. Once the butter has melted, add in the onions. Turn the heat down to medium-low. Cook the onions slowly until caramelized. About 15-20 minutes.
  3. Once the onions begin to caramelize, add in the garlic and sliced mushrooms. Let those cook and soften as well.
  4. Remove from heat once onions are done and set aside.
  5. Cook the veggie bacon or regular bacon in a pan or in the oven or per directions on the package. Set aside.
  6. Make the sandwich. Place a slice of provolone on the bread slice and then layer the onions and mushrooms then cheese then bacon then more cheese and then the other slice of bread.
  7. Butter the outside of the bread.
  8. Grill in a fry pan over medium-high heat until brown on both sides and the cheese is melted.
  9. Serve and enjoy!


Wild Mushroom & Roasted Garlic Latkes

mushroom-and-potato-latkes

We light the first candle on our menorah for Chanukah tonight. My kids are so excited. Dreidels and chocolate gelt have already begun to make an appearance in our house. The kids are curious what we have in store for the holiday. Chanukah is always a fun time in our home. As a kid, I patiently waited for Chanukah to start so we could light candles and open some presents. The light of the menorah against the dark night is always beautiful.

Chanukah is also one of my favorite foodie holidays. To commemorate the miracle of the oil in the ancient temple, there’s the tradition to eat fried foods during the holiday. Who doesn’t love fried foods? That Chanukah happens to fall at the same time as Thanksgiving in the US – extra foodie fun!

I try to come up with new latke ideas each year. Some years I’ve focused on a different root veggies, other years I’ve added some herbs. This latke idea came to me just the other day as I was making dinner. Mushrooms are one of my favorite veggies. Why not try and add them to latkes? I had a bag of dried wild mushrooms that I thought would complement the latkes very well. I paired the wild mushrooms with some sage and roasted garlic. Latke perfection! I’m so glad I made these right away!

I roasted a head of garlic and then I soaked the mushrooms in boiling water.

soak-mushrooms

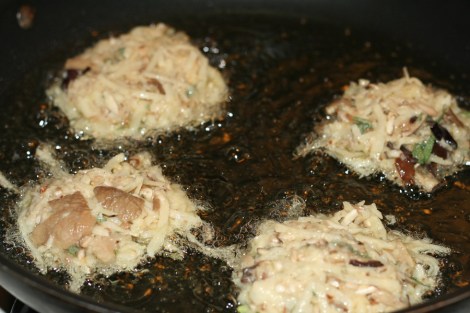
I shredded the potatoes, mushrooms and onions in my Cuisinart food processor. I then mixed everything together and added some eggs, potatoes and sage.

I fried up the latkes and then drained them on a wire rack lined with paper towels.

fry-in-oil

drain-on-towels

These latkes were a huge hit! I highly recommend serving them with sour cream. Enjoy and Have a Happy Chanukah!


Wild Mushroom & Roasted Garlic Latkes
 
Author:
Ingredients
  • 1 head of garlic, roasted
  • 5 Idaho Russet Potatoes
  • 1 large yellow onion
  • 2 cups of dried wild mushrooms
  • 5 oz. cremini mushooms
  • 2 tsp. salt
  • 1 tsp. pepper
  • ½ cup flour
  • 3 large eggs
  • oil for frying
  • additional salt and pepper to taste
Instructions
  1. Preheat the oven to 400. Cut off the top quarter-inch of the head of garlic to expose the cloves. Drizzle some olive oil over the garlic and wrap in foil. Place in oven for 30 minutes and roast. Then allow to cool.
  2. Rinse the dried mushrooms and soak them in boiling water for about 15 minutes. Drain and set aside.
  3. Peel and quarter the onions and potatoes.
  4. Rinse and quarter the Cremini mushrooms.
  5. With a shredding disc, process the potatoes, onion and mushrooms in the food processor.
  6. Transfer to a colander and squeeze as much liquid out of the potatoes as possible. I sometimes like to place them in a tea towel and squeeze more water from there like I did with this latke recipe.
  7. Transfer the mixture to a large mixing bowl.
  8. Squeeze out the roasted garlic cloves in to the bowl.
  9. Add in the chopped sage leaves.
  10. Stir in the eggs, flour, salt and pepper.
  11. Heat up the oil in a deep fry pan.
  12. From potato mixture in to patties and fry. Flip the latke over when you see the edges begin to brown.
  13. Transfer the finished latke to a rack positioned over paper towels to drain and cool.
  14. These latkes are great with sour cream.
  15. Enjoy!

latkeswithtext

Grain Free Collard Green Burritos

burritos-wrapped

I’ve been trying to make some changes in regards to what I eat this summer. As more and more amazing fruits and vegetables are available and super fresh, I am trying to consume fewer processed foods. While I do that, I am also trying to cut back on some processed grains, easing up on my intake of wheat and rice products. I feel better, have more energy and feel good about what I am eating. No worries, I still indulge a bit. Just making sure that what I put in my body is quality.

A recent vegetable share included these massive collard greens. I’ve never cooked with collard greens before. Many of the recipes I saw online and heard about from friends was all about simple sautes. I knew that I wanted to do something different with these wonderful greens, but wasn’t quite sure what.

collards

As I glanced at these ginormous leaves, I thought about using it as a wrap of sorts. Why not use it in place of a tortilla.

I quickly gathered up a few veggies, along with a can of black beans, and sautéed them up in a pan along with some spices.

While the veggies were sautéing, I washed, trimmed and steamed the collard green leaves.

I let the leaves cool for a couple minutes and then I laid them on a cutting board, added some of the bean mixture, and wrapped the leaves up like a burritos.

burritowrapping

It worked out perfectly. Will definitely be making these again.


Grain Free Collard Green Burritos
 
Author:
Ingredients
  • Collard Green Leaves (1 per burrito)
  • 1 tbsp. olive oil
  • 1 onion, chopped
  • 3 cloves garlic, chopped
  • 1 red pepper, chopped
  • 8 oz. mushrooms, chopped
  • 1 can black beans, rinsed and drained
  • 2 plum tomatoes, chopped
  • 2 tsp. cumin
  • 2 tsp. salt
  • 2 tsp. pepper
  • 2 tsp. chili powder
  • 1 tsp. red pepper flakes (optional)
Instructions
  1. Wash and trim the stems off of the collard green leaves.
  2. Bring some salted water to a boil in a small saucepan and add the washed and trimmed leaves to the pot. Steam the leaves for just a few minutes.
  3. Heat up the olive oil in a large saute pan.
  4. Add the onions and garlic and saute for a few minutes.
  5. Add the rest of the ingredients and cook another 5-7 minutes. The veggies should be soft.
  6. Lay a collard green leaf on a flat surface.
  7. Place around three tablespoons of filling in the center of a leaf.
  8. Wrap the collard green around the filling, like a burrito. Folding the sides in first and then rolling up.
  9. Serve with a salad.
  10. Enjoy!

Grain Free Collard Green Burritos

Bacon and Onion Stuffed Turkey Burgers

Bacon-and-Onion-Stuffed-Turkey-Burgers

It may be shocking to see me posting a meat recipe. It happens once in a while. It’s grilling season. You got to cook up some burgers during grilling season!

When I do buy and cook meat, I like to know that my meat is coming from a good place. Kind of like the chicken on the Portlandia episode. Well, I’m not that intense. I do like to know though, that the animals were treated well and fed well. I prefer to only buy sustainable, pasture-raised and grass-fed meats when possible. That’s where KOL Foods comes in to play. They have an amazing selection of pastured and grass-fed meats and poultry. You can read more about them here.

They recently sent me some beef bacon and ground turkey. I was so excited when the meats showed up. I had a few things in mind as to what to create.

Being that July 4th, Independence Day, is almost upon us, I thought I would share a treat that’s perfect for your family barbecues. These bacon and onion stuffed turkey burgers come together fairly painlessly and you will reap the rewards with the amazing flavor.

Earlier in the day, I stepped on to my deck to pick some herbs for my burgers. I like using sage, rosemary, parsley  and thyme whenever I mix up some burger meat.

In one pan, I began to caramelize some onions and garlic. I love caramelized onions both on and in the burger.

Bacon and Onion Stuffed Turkey Burgers

In another grill pan, I began to fry up the bacon. Half of the bacon was reserved for garnishing the burgers, but the other half would be going in the burgers.

Bacon and Onion Stuffed Turkey Burgers

I let both the bacon and the onions cool a bit.

In the bacon pan, I sliced up some portabello mushrooms and grilled them.

I began to mix up my burgers. I mixed the ground turkey with chopped onion, garlic, salt, pepper, rosemary, parsley, thyme and sage. I then added some gluten free oats, vegan worcestershire sauce and an egg to the mix. I mixed everything well. If you are not gluten free, feel free to add some bread crumbs or panko crumbs instead. I wanted to keep these gluten free for me.

Bacon and Onion Stuffed Turkey Burgers

I crumbled up half of the cooked bacon.

Bacon and Onion Stuffed Turkey Burgers

I formed some of the burger mixture in to a patty and then placed about a tablespoon of chopped bacon and a tablespoon of onions in the center of the formed patty. I then placed more of the burger mixture over it and sealed the bacon and onions in.

Bacon and Onion Stuffed Turkey Burgers

I managed to get 7 burgers out of this mixture.

Bacon and Onion Stuffed Turkey Burgers

I then grilled the burgers in my grill pan until done. (You can use the BBQ. It was raining that day)

Burgers-Grilling

I served up the burgers with additional bacon, onion, mushrooms, spinach and avocado. Oh my. That burger was amazing! You must make it!

As far as KOL Foods goes, they are amazing. I found that the meats and poultry are much more flavorful than the traditional store-bought varieties. The turkey tastes like turkey and the no-nitrite bacon was incredibly flavorful. I really loved the meats I received from them and am excited to order and cook from them again soon. Thank you, KOL Foods!

Bacon and Onion Stuffed Turkey Burgers
 
Author:
Ingredients
  • 1 tbsp. olive oil
  • 1 tsp. salt
  • 1 large vidalia onion, sliced
  • 1 large spanish onion, sliced
  • 1 large red onion, sliced
  • 5 cloves garlic, chopped
  • 1 lb. of bacon (beef or pork) - half will be used in the burger, other half to top burger
  • 1 pound of mushrooms (portabella or baby bella), sliced
  • 2 lb. ground turkey
  • 1 tbsp. worcestershire sauce
  • 1 small onion, chopped
  • 2 cloves garlic, chopped
  • 1 tbsp. fresh parsley, chopped
  • 1 tbsp. fresh rosemary, chopped
  • 1 tbsp. fresh sage, chopped
  • ½ tbsp. fresh thyme
  • 1 tsp. salt
  • 1 tsp. fresh ground pepper
  • 1 extra large egg
  • ½ cup gluten free oats or bread crumbs
  • 1 tbsp. olive oil
  • Recommended Burger Toppings:
  • Avocado
  • Bacon
  • spinach or arugula
  • caramelized onions
  • grilled mushrooms
Instructions
  1. In one pan, heat up some olive oil. Add the onions, garlic, salt and pepper. Cook on medium until the onions are caramelized. Set pan aside when done.
  2. In another pan, cook the bacon. Because the bacon is fatty, you don't need to add any oil. Cook the bacon until crisp. Drain on paper towels and set aside.
  3. In that same grill pan, grill the mushrooms until nicely browned. Set aside.
  4. Crumble up half of the bacon.
  5. In a mixing bowl, mix up the ground turkey with the fresh herbs, the egg, the oats or bread crumbs, the worcestershire sauce, salt and pepper.
  6. Form the burger in to a small patty.
  7. Place a tablespoon of the crumbled bacon and the caramelized onions in center of each patty. Top and seal with additional burger mixture.
  8. Cook burger on a barbecue or on a grill pan until done.
  9. Top with your favorite burger toppings.
  10. Enjoy!
Bacon-and-Onion-Stuffed-Turkey-Burgers


Grilled Cheese with Pears and Caramelized Onions

My dad is the sandwich master – especially on the weekends. Even my kids know. Zaydie is who you turn to when you want any multitude of sandwiches. After a few weeks with my parents, my daughter came home asking me to make lunch like Zaydie did. “Zaydie likes it this way.” “Zaydie makes this differently,” and so on. Egg salad is never just chopped eggs with Zaydie. It’s amped up with herbs and pickles or olives. Same with grilled cheese. There was always something added to it. I remember a period of time when grilled cheese was often filled with cheddar, tomato and sunflower seeds.

So…tonight’s dinner is dedicated to my dad. As I drove home, debating what to make. I thought of the bag of fresh cheeses I had just bought at the store. With Shavuot coming up, I had to stock up. I wanted something fast and something tasty. I decided to make this. Not sure if I have upped the ante on my dad’s sandwich skills, but hopefully, I have come close to reaching his sandwich awesomeness.

Grilled Cheese with Pears and Caramelized Onions (makes 2 good sized sandwiches)
Ingredients:


1 large onion, sliced thinly
1 tbsp. butter
2 tsp. salt
3 tsp. thyme
4 slices of bread ( I used rye, but a ciabatta or a sourdough would be great with this)
dijon mustard
gouda cheese, sliced
1 ripe bosc pear
more butter, for grilling

Start by heating up a small saute pan. Add butter to the pan. Get it hot. Once the butter is melted, add the onions and turn the heat down to medium-low.  Cook the onions slowly. Add the salt and the thyme. Let the onions caramelize.  This will take around ten minutes or so. Stir every so often. Once the onions are done, set aside.

IMG_1290

Slice up your pear in to thin slices. About 1/4-inch thick.

IMG_1294

Spread a thin layer of dijon mustard on the inside of two of the slices of bread. Make sure not too put too much mustard on, or it will overpower the other flavors. Add a slice of cheese; then a pear layer; then the caramelized onions and finally another slice of cheese. Sandwich it together with an a slice of the bread that doesn’t have any mustard. You are now ready for some grilling!

This sandwich would do really well in a panini press. Alas, that is the one kitchen appliance that I don’t have.

In a large pan, heat up a tablespoon of butter. Place sandwich in to pan. Pan should be on medium-high heat.

Take a large cast iron pan or some other heavy heatproof object and press it down on your sandwich.

IMG_1295
Grill for a few minutes on each side.

Slice in half and eat up! Serve with some salad on the side.

IMG_1299

Enjoy!

Amazing Onion Rings and Dipping Sauce

Some of you who know me, may know that I am obsessed with onion rings. Whenever I go out to eat, I often judge a place by two things; if they have onion rings, and if they are any good. Often times when you go out to eat they will toss you a plate of those dreadful Kineret freezer bag onion rings. Or, in the case of a place like Dougie’s, they will throw some onions in whatever batter everything else is getting tossed in. That’s just not how it’s supposed to be done! I wish there was a good kosher restaurant that would step up to the plate and do it right. If you know of some place, please, pretty please – fill me in on the details.

I have eaten onion rings at both kosher and non kosher places. I have sampled onion blossoms, strings, wedges, and whatever shape they come in. I just want them to give me that greasy, but not too greasy and crunchy feel that I need. I am a fan of both the breaded style and the battered style – again it just has to come out right. Both can achieve greatness. 

The recipe I will share with you today is for a battered recipe. This onion ring came out perfectly crunchy with the right balance of coating to onion. It was especially good with the great horseradish dipping sauce I made. Highly recommend this recipe when you are in the mood for some greasy goodness!

Dipping Sauce
Ingredients:

1/2 cup mayonnaise
1 tablespoon ketchup
2 tablespoons horseradish sauce
1/2 teaspoon paprika
1/2 teaspoon italian seasoning
1/4 teaspoon oregano
dash of salt
2 grinds of black pepper
splash of some sriracha or cayenne (optional)

Mix up the sauce ingredients in a small bowl and set to the side while you make the onion rings. It’s that easy!

Onion Rings – slightly adapted this Martha Stewart Recipe
Ingredients:

1 large Vidalia onion, sliced in to thin rings
Vegetable oil for frying
3/4 cup flour
1/8 cup cornstarch
1 teaspoons baking powder
1.5 teaspoons salt
2 teaspoons garlic powder
1 teaspoon black pepper
1 teaspoon italian seasoning
1 teaspoon paprika
1 cup ice cold water

Soak the sliced onions in cold water for about 5 minutes and then dry them well on a towel.  Let them dry while you make the batter.

Start to eat up your oil. You will want at least an inch of oil to cover the onions.

In a small mixing bowl, whisk the dry ingredients together. Slowly whisk in the ice water. Whisk until you get a nice, smooth consistency.  Sit the bowl over a bowl of ice. Keep the batter cold.

Dip the onions in to the batter. It needs a thin even coating. The batter will puff up, so it doesn’t need to be too heavy. Place the onions in a single layer in to the hot oil. Fry onions in batches for a few minutes each. The onion rings should be light brown.

Drain onion rings on a paper towel.

Serve hot with the dipping sauce on the side. Enjoy!

1 2