Roasted Beets and Beet Greens with Pasta

roasted beet pasta900

If you’ve been following along on Facebook and Instagram feed, you probably already know all about my CSA and the amazing produce I get each week. I’ve been getting a weekly share from a local farm called Alstedes. Each week it’s like a foodie birthday present. As I pick up the crate of veggies and farm fresh cage-free eggs, I get a huge smile on my face. What am I going to make first out of all the amazing goodies?

I love beets. I love all kinds of beets. The first box that contained beets had me so happy. I had a bunch of red beets from the farmer’s market in my fridge, so when the golden beets came, I was exuberant. I love to see those rings when you cut in to a beet. They’re just so pretty. And the colors? I love it!

beet rounds

I often simply slice or grate beets and put them in a simple salad or side dish, but I decided to include them in something more substantial for dinner. I also wanted to include the beet tops. Did you know that you could eat beet greens? You totally can! Just wash them and eat them raw in a salad, or you can saute them! They’re fantastic and so good for you!

I started out by roasting my beets. I peeled and sliced the beets thinly and tossed in some olive oil, salt and pepper and placed on a baking sheet. I baked at 415 for about 20 minutes – keeping an eye on them so that they didn’t burn.

I cooked up the pasta, reserving some of the pasta cooking water.

I then sliced up both bunches of washed beet greens.

I toasted some pine nuts, then added some olive oil, chopped onion and garlic to the pan.

Next, I added the greens, some salt and pepper.

I love how fast everything cooks up in this dish. The greens take only a few minutes to wilt.

I tossed the cooked pasta in to the pan with a small amount of the cooking water.

I plated the pasta and greens and served with the amazing roasted beets and some goat cheese. So simple, yet so delicious!


Roasted Beets and Beet Greens with Pasta
 
Author:
Ingredients
  • 2 bunches of beets (about 6 medium beets)
  • 1 tbsp. olive oil
  • 1 tsp. salt
  • 1 tsp. pepper
  • ½ cup pine nuts
  • 1 tbsp. olive oil
  • 1 small onion, chopped
  • 3 cloves garlic, minced
  • Beet Greens from two bunches of beets, washed and sliced
  • additional salt and pepper as needed
  • Goat Cheese
  • parmesan cheese (optional)
  • ¾ pound pasta, cooked according to directions on box (reserving some pasta water)
Instructions
  1. Preheat oven to 400.
  2. Peel and slice the beets in to thin rounds. Toss with some olive oil, salt and pepper and place on baking sheet. Roast in oven for 20 minutes.
  3. Cook pasta according to the directions on the box, reserving some pasta water.
  4. Toast pine nuts in large pan for 2 minutes.
  5. Add in the olive oil, salt, pepper, onions and garlic and saute for 3-5 minutes to soften. Add in the beet greens and saute a couple more minutes.
  6. Mix in the cooked pasta and a couple tablespoons of the pasta cooking water.
  7. Plate the pasta and greens. Top with goat cheese, roasted beet rounds and Parmesan Cheese if desired.
  8. Add salt and pepper to taste.
  9. Enjoy!


roastedbeets text

Maple Bourbon Glazed Turkey Wings

turkeywings

Happy Thanksgiving and Happy Chanukah everybody! Hope everyone who celebrates is enjoying the holiday and relaxing a bit. I also hope you’ve indulged in some good foodie fun!

Because Chanukah and Thanksgiving only coincide once every 70,000 years or so, KOL Foods selected a group of eight bloggers to come together and share eight days of fabulous turkey recipes with you! At the end of Chanukah, you will have the opportunity to vote for your favorite Thanksgivukkah recipe and you’ll also have the opportunity to win $200 in credit towards your next KOL Foods purchases! Learn more about the contest here. If you aren’t familiar with KOL Foods, they are the only source online for domestic, 100% grass-fed, kosher beef and organic, pastured, kosher chicken, turkey and duck.

We’ve been celebrating Thanksgiving for the past few years with an assortment of good friends and family. The great turkey debate happens in the house each year. Our friends and family are a mixture of vegetarians and meat-eaters, and there is always a discussion of whether to change things up to a dairy Thanksgiving dinner. Somehow, tradition always wins out, and a giant turkey is prepared. Somehow, the turkey business always lands in my kitchen. I usually rely on my parents for trusty Thanksgiving turkey recipes. The giant 20-pound birds often intimidates me. I decided to come up with my own bird ideas this year.

Each year when we make the turkey, there always seems to be a race to the favorite turkey parts. In our gaggle of friends, the thighs and wings seem to be the most popular. Probably because they retain a lot of turkey flavor and juice. Unfortunately for us, turkeys only have two thighs and two wings. This year, I decided to forego the whole turkey and only cook up the various turkey parts that our guests prefer. I love using pastured, grass-fed turkey and KOL Foods sent me some turkey wings to work with. I decided to go with a maple bourbon glaze for my turkey. I’ve done a similar glaze on chicken and thought it would work well with turkey.

I preheated the oven, then I sliced some onions and laid them in my roasting pan, along with some cubed sweet potatoes, acorn squash, garlic and herbs. I used a combination of fresh thyme and fresh sage. I laid the turkey on top of the cubed veggies and stuffed some additional herbs and garlic under the skin. I ground some salt and pepper over the turkey skin. In a bowl, I mixed together the maple syrup, olive oil, bourbon, soy sauce, dijon mustard, garlic paste, apple cider vinegar, chopped sage and thyme. I poured everything over the turkey and veggie mixture.

prepped-turkey-wings

I then baked it in the oven for about an hour and a half or so. I checked on the turkey a few times to baste with the pan juices and to make sure that the turkey skin wasn’t burning. Some sort of magic happened in that oven. As I pulled the turkey out of the oven, even I, the turkey hater, was tempted to take an early bite of these turkey wings. That crispy skin promised to be amazing.

baked-wings

Good news. The turkey did not disappoint.

If you have some leftover  turkey wings (or other parts) from your recent turkey feast, I would recommend you lightly brush on some of the sauce and bake/reheat the turkey at 325 until heated through to a safe temperature. Keep in mind, for a few small pieces, you do not need as much sauce. It is a great way though to refresh a bland or drier turkey. You could also chop up leftover turkey and  pan fry with some of the glaze and chopped veggies and onions. It tastes amazing. We did this with a leftover semi-dry turkey breast and it totally revived the turkey!

Check out the recipe below and then head on over to KOL Foods to enter to win $200 in KOL Foods credit!

Maple Bourbon Glazed Turkey Wings
 
Author:
Ingredients
  • 6 cloves garlic, chopped
  • 10 sage leaves
  • 12 sprigs of thyme
  • 2 sweet potatoes, peeled and cubed
  • 1 small acorn squash, peeled and cubed
  • 1 large onion. chopped
  • 4.5 lbs turkey wings
  • ½ cup Bourbon
  • ½ cup Maple Syrup - Grade B
  • 1 tbsp. olive oil
  • 1 tbsp. apple cider vinegar
  • 1 tbsp. dijon mustard
  • 1 tbsp. soy sauce
  • 1 tbsp. garlic paste
Instructions
  1. Preheat the oven to 350
  2. Place the onions, sweet potatoes, squash and half of the garlic in the bottom of a roasting pan
  3. Chop up the herbs and place about a third of them over the veggies
  4. Place the turkey wings over the veggies and onions.
  5. Sprinkle ground pepper and salt over the turkey
  6. In a mixing bowl, mix up the bourbon, maple syrup, olive oil, vinegar, garlic paste, mustard and soy sauce. Mix in about a third of the herbs.
  7. Pour the sauce mixture over the turkey.
  8. Sprinkle the remaining herbs and garlic over the turkey.
  9. Bake in the oven for about 1.5-2 hours. Check and baste the turkey every 30 minutes.
  10. Enjoy!

turkeywings

Stir Fried Bok Choy and Orange Cauliflower with Tofu

cauliflower-and-bok-choy

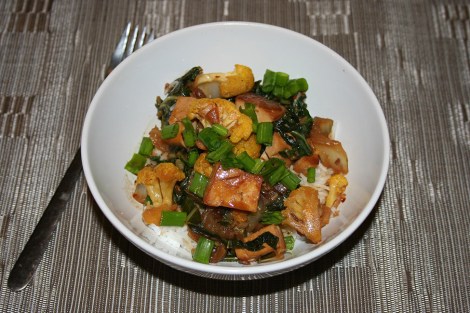
I am very fortunate to live and work in areas where I have easy access to fresh, organic produce from local farms. My local farmer’s market often determines any given dinner. On a recent recent night, my dinner came from some fresh and massive bok choy from my co-op and an orange cauliflower from the farmer’s market outside my office building. I have never had this particular kind of cauliflower, but since the sign labeled it as “Cheddar Cheese Cauliflower,” of course I had to pick it up.

cauliflower-fun

The farmer told me that the cauliflower would taste a bit sweeter than the standard variety. I couldn’t tell the difference, but it was still mighty tasty!

I recently discovered the “Super Extra Firm” tofu at Trader Joe’s. It’s pre-pressed, so it requires minimal draining. It’s perfect for quick dinners like this one.

I cubed up the tofu and then washed and cut up the veggies. I then did a quick stir fry along with some garlic, ginger, tamari, Hoisin Sauce, sesame oil and miso. The dish came out perfect. I served it with some Basmati rice, but brown rice will also work just as well.

A regular white cauliflower will work just as well as the “Cheddar Cheese” variety.

Stir Fried Bok Choy and Orange Cauliflower with Tofu
 
Author:
Recipe type: Main Course, Dinner
Cuisine: Stir Fry, Asian
Ingredients
  • 1 tbsp. canola oil or other flavorless oil
  • 2 tsp. sesame oil
  • 1 lb. extra firm tofu, drained and pressed - cut up in to cubes
  • 2 tsp.
  • 3 shallots, chopped
  • 4 cloves garlic, chopped
  • 2 tbsp. ginger, chopped
  • 1 head of bok choy, cut up in 1-inch pieces
  • 1 head of cauliflower, washed and cut in to florets
  • 2 tbsp. tamari or soy sauce
  • 2 tbsp. hoisin sauce
  • 2 tbsp. red miso
  • 3 tbsp. vegetable broth
  • 2 tsp. red pepper flakes
  • scallions, chopped plus extra to garnish
Instructions
  1. Heat up the oils in a large wok or saute pan
  2. Add in the cubed tofu and brown for a few minutes
  3. Once the tofu has browned, add in the salt, onions, garlic, ginger and garlic and saute a few minutes.
  4. Add in the cauliflower and bok choy and stir fry for about five minutes. Let the veggies soften. You don't want them too mushy.
  5. Mix up the soy sauce, miso, hoisin and vegetable broth in a small bowl and then pour over the stir fry.
  6. Add in some of the scallions and the red pepper flakes. Taste and add additional salt as needed.
  7. Serve over rice. Enjoy!

cauliflower-and-bok-choy

Tomatillo Quiche

tomatillo-quiched-baked

I joined an organic co-op this year, and I’ve been loving all of the wonderful fruits and vegetables I am getting. It forces me to get more creative and try new ideas.

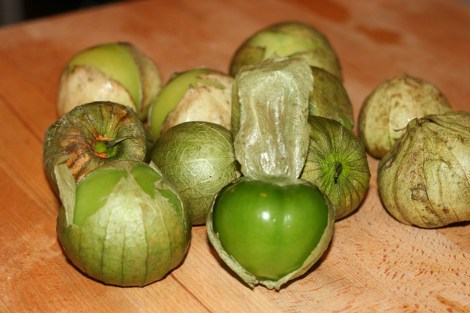
Last week, I got a bunch of tomatillos in my vegetable share. In the past, I’ve turned them in to salsa verde for enchiladas. I wanted to try something different this time.

tomatillo

Like other nights, I looked to my pantry and fridge for ideas. I seemed to have a surplus of organic eggs from my co-op, and I also had some cheese on hand. I knew I could turn this in to a quiche in no time.

I washed and sliced the tomatillos along with some bell pepper, onion, garlic and cilantro. I then sauteed the mixture.

saute-tomatillo

I happened to have some pie crusts in the freezer. I added the cheese to the bottom of the pie crust, then added the veggie mixture, then poured over the egg mixture. In to the oven it went.

tomatillo-quiche-uncooked

It came out perfectly.

I love the bite of the tomatillo. It has a strong, slightly acidic flavor. It works well with the other flavors in the quiche. I highly recommend this for your next dinner.

sliced-quiche


Tomatillo Quiche
 
Author:
Recipe type: Brunch, Dinner, Breakfast
Ingredients
  • 1 tbsp. oilve oil
  • 1 onion, chopped
  • 1 red bell pepper, chopped
  • 6 tomatillos, chopped
  • 3 cloves garlic, chopped
  • 2 tsp. ground black pepper
  • 3 tsp. salt
  • 2 tbsp. chopped fresh cilantro
  • 4 eggs
  • 1 cup half and half
  • 9" Deep Dish Pie Crust
  • ¾ cup shredded cheese (I used a mixture of cheddar and monterey jack)
  • additional salt and pepper as needed
Instructions
  1. Preheat the oven to 375.
  2. Heat up the oil in a large saute pan. Saute the chopped veggies and spices for about 7 minutes, until softened.
  3. Beat the eggs with the half and half in a small mixing bowl.
  4. Sprinkle the shredded cheese in the bottom of the pie crust.
  5. Place the veggie mixture over the cheese.
  6. Pour over the egg mixture.
  7. Place the pie tin on a baking sheet and place in oven. Bake for around 35-40 minutes, until the egg has completely set.
  8. Cool for about 5-10 minutes before serving.
  9. Slice and enjoy!

tomatillo-quiched-baked

Fermented Radishes

Follow my blog with Bloglovin

Fermented Radishes

I’ve recently been studying up more on fermentation. I am learning all about the benefits of fermented foods in my diet. I’ve made kimchi in the past, and enjoyed it, but I didn’t really realize how good it is for you! I started to delve more in to fermentation when I ended up with excess vegetables in my CSA. I didn’t want to risk wasting vegetables that I may not use, so I looked for ways to prolong their life.

I considered canning my vegetables, but I don’t have the patience to deal with the whole jar sterilization and cooking process. Maybe one day.

I learned that fermentation can be very easy, and doesn’t require as many tools as canning. It’s also far less precise than the canning process.

I then learned about the health benefits . Fermented foods are said to aid in digestion, creating a natural probiotic that helps balance your gut. As food ferments, the foods becomes enriched with good enzymes and vitamins. I kept reading, and as I did, I knew I had to give it a try.

I began my summer ferments with some radishes. I had a large amount of beautiful organic radishes from my co-op share and I knew that they wouldn’t all get eaten in salads. I decided that I’d ferment them using a simple 2%  brine base.

Fermented Radishes

I began by cleaning and trimming these beautiful radishes. Then, I sliced them thinly.

sliced-radishes

I washed my jars well and packed the jars with garlic, dill, my sliced radishes and some peppercorns. I then added some of the liquid brine and  sealed the Bell jars and set them aside in a warm, dark corner.

radishes-in-jars

I checked on them every few days to see how they tasted and to make sure that the radishes were still under the liquid brine, pressing them down if they began to pop out.

I kept them in my dark corner of the counter for 2 weeks, at which time, I determined by tasting them, that the radishes were ready and then placed them in my fridge.

They were done and ready to be used. I highly recommend this simple ferment if you are a beginner at fermenting.

Fermented Radishes


Fermented Radishes
 
Author:
Recipe type: Side Dish, Pickles
Ingredients
  • 2 bunches of radishes
  • ½ cup fresh dill
  • 6-8 cloves garlic
  • 1 tbsp. peppercorns
  • 4 cups filtered water
  • 2¾ tbsp sea salt
Instructions
  1. Heat up the water in a pot and add the salt. Let the salt dissolve.
  2. Remove water from heat and let cool completely.
  3. Wash, trim and slice radishes thinly.
  4. Pack the radish slices along with the garlic and dill in to the glass jars. There should be a 1-inch clearance between the tops of the radishes and the lid.
  5. Pour the brine over the radish mixture so that the liquid covers the radishes
  6. Some people like to add a weight or a cabbage leaf on top to ensure that the radishes are completed submerged in the brine mixture. You will have some brine leftover.
  7. Seal the lids tightly.
  8. Place jars in a warm and dark space for up to 2 weeks.
  9. Check on the jars ever 1-2 days, burping the jars and resealing them. This is also the time where you take a taste and see if the radish pickles are sour enough.
  10. When the radishes have reached the desired sourness, move the jars to the fridge.
  11. Enjoy!


Bacon and Onion Stuffed Turkey Burgers

Bacon-and-Onion-Stuffed-Turkey-Burgers

It may be shocking to see me posting a meat recipe. It happens once in a while. It’s grilling season. You got to cook up some burgers during grilling season!

When I do buy and cook meat, I like to know that my meat is coming from a good place. Kind of like the chicken on the Portlandia episode. Well, I’m not that intense. I do like to know though, that the animals were treated well and fed well. I prefer to only buy sustainable, pasture-raised and grass-fed meats when possible. That’s where KOL Foods comes in to play. They have an amazing selection of pastured and grass-fed meats and poultry. You can read more about them here.

They recently sent me some beef bacon and ground turkey. I was so excited when the meats showed up. I had a few things in mind as to what to create.

Being that July 4th, Independence Day, is almost upon us, I thought I would share a treat that’s perfect for your family barbecues. These bacon and onion stuffed turkey burgers come together fairly painlessly and you will reap the rewards with the amazing flavor.

Earlier in the day, I stepped on to my deck to pick some herbs for my burgers. I like using sage, rosemary, parsley  and thyme whenever I mix up some burger meat.

In one pan, I began to caramelize some onions and garlic. I love caramelized onions both on and in the burger.

Bacon and Onion Stuffed Turkey Burgers

In another grill pan, I began to fry up the bacon. Half of the bacon was reserved for garnishing the burgers, but the other half would be going in the burgers.

Bacon and Onion Stuffed Turkey Burgers

I let both the bacon and the onions cool a bit.

In the bacon pan, I sliced up some portabello mushrooms and grilled them.

I began to mix up my burgers. I mixed the ground turkey with chopped onion, garlic, salt, pepper, rosemary, parsley, thyme and sage. I then added some gluten free oats, vegan worcestershire sauce and an egg to the mix. I mixed everything well. If you are not gluten free, feel free to add some bread crumbs or panko crumbs instead. I wanted to keep these gluten free for me.

Bacon and Onion Stuffed Turkey Burgers

I crumbled up half of the cooked bacon.

Bacon and Onion Stuffed Turkey Burgers

I formed some of the burger mixture in to a patty and then placed about a tablespoon of chopped bacon and a tablespoon of onions in the center of the formed patty. I then placed more of the burger mixture over it and sealed the bacon and onions in.

Bacon and Onion Stuffed Turkey Burgers

I managed to get 7 burgers out of this mixture.

Bacon and Onion Stuffed Turkey Burgers

I then grilled the burgers in my grill pan until done. (You can use the BBQ. It was raining that day)

Burgers-Grilling

I served up the burgers with additional bacon, onion, mushrooms, spinach and avocado. Oh my. That burger was amazing! You must make it!

As far as KOL Foods goes, they are amazing. I found that the meats and poultry are much more flavorful than the traditional store-bought varieties. The turkey tastes like turkey and the no-nitrite bacon was incredibly flavorful. I really loved the meats I received from them and am excited to order and cook from them again soon. Thank you, KOL Foods!

Bacon and Onion Stuffed Turkey Burgers
 
Author:
Ingredients
  • 1 tbsp. olive oil
  • 1 tsp. salt
  • 1 large vidalia onion, sliced
  • 1 large spanish onion, sliced
  • 1 large red onion, sliced
  • 5 cloves garlic, chopped
  • 1 lb. of bacon (beef or pork) - half will be used in the burger, other half to top burger
  • 1 pound of mushrooms (portabella or baby bella), sliced
  • 2 lb. ground turkey
  • 1 tbsp. worcestershire sauce
  • 1 small onion, chopped
  • 2 cloves garlic, chopped
  • 1 tbsp. fresh parsley, chopped
  • 1 tbsp. fresh rosemary, chopped
  • 1 tbsp. fresh sage, chopped
  • ½ tbsp. fresh thyme
  • 1 tsp. salt
  • 1 tsp. fresh ground pepper
  • 1 extra large egg
  • ½ cup gluten free oats or bread crumbs
  • 1 tbsp. olive oil
  • Recommended Burger Toppings:
  • Avocado
  • Bacon
  • spinach or arugula
  • caramelized onions
  • grilled mushrooms
Instructions
  1. In one pan, heat up some olive oil. Add the onions, garlic, salt and pepper. Cook on medium until the onions are caramelized. Set pan aside when done.
  2. In another pan, cook the bacon. Because the bacon is fatty, you don't need to add any oil. Cook the bacon until crisp. Drain on paper towels and set aside.
  3. In that same grill pan, grill the mushrooms until nicely browned. Set aside.
  4. Crumble up half of the bacon.
  5. In a mixing bowl, mix up the ground turkey with the fresh herbs, the egg, the oats or bread crumbs, the worcestershire sauce, salt and pepper.
  6. Form the burger in to a small patty.
  7. Place a tablespoon of the crumbled bacon and the caramelized onions in center of each patty. Top and seal with additional burger mixture.
  8. Cook burger on a barbecue or on a grill pan until done.
  9. Top with your favorite burger toppings.
  10. Enjoy!

Bacon-and-Onion-Stuffed-Turkey-Burgers


1 2