Brussel Sprout, Cauliflower & Mushroom Hash


Can I let you in on a little secret? I’m a little bit obsessed with brussel sprouts. These little cabbage-like balls of goodness are so tasty and so surprisingly versatile. As soon as brussel sprouts are in season, I pounce. Brussel sprouts tend to appear at the local markets sometime in November and I totally dance a little jig when I see that bucket at my favorite market stand for the first time in the seaons. And sometimes, during the fall and winter holidays, I get all silly and buy them on the stalk. Because I am fancy like that. But really, on most days, I toss them with olive oil, garlic, salt and pepper and just let them roast. But not this time. I went all out with my brussel sprouts.

A lunch with my mom this past fall inspired this dish. We went to this funky pub near her hotel where I had a simple brussel sprout hash with eggs and creme fraiche. The lunch was a perfect treat, and its’ simplicity made me really happy. I knew I had to create a dinner inspired by this dish. I knew that cauliflower would work well with brussel sprouts. And well, mushrooms, because mushrooms. I always add mushrooms to everything. Or so it seems.

I started by caramelizing some diced onion and garlic while I shredded up the brussel sprouts. I like buying my brussel sprouts whole and chopping myself, but I wouldn’t hold it against you if you picked up a bag of already shredded brussel sprouts over at Trader Joe’s.

Once the onions were done, I added the shredded sprouts to my cast iron skillet. I let those cook a bit while I chopped up my cauliflower. If you wanted a shortcut here, you could also use a bag of that riced cauliflower. I quickly chopped half a head of cauliflower – stalks and crowns. I added that to the pan and let that cook a few minutes before adding in the chopped mushrooms. I continued to let it cook in the skillet for another 7-10 minutes or so, stirring every so often.

I served this brussel sprout hash over some baby spinach and then topped it with a gloriously fried egg. You can also go for a poached egg, if fried isn’t your style. If you’re vegan or just not in the mood for an egg, you can certainly leave it out. It’s all good. This was dinner in our house, but I could totally see this being served again as breakfast, brunch or lunch as well.

Enjoy!


Brussel Sprout, Cauliflower & Mushroom Hash
 
Author:
Ingredients
  • 1 tbsp. olive oil or butter
  • 1 onion, dice
  • 1 clove garlic, minced
  • 1 tbsp. olive oil or butter (additional)
  • 2 tsp. salt
  • 2 tsp. ground black pepper
  • 1.5 pounds of brussel sprouts, washed and trimmed
  • 4 cups chopped or riced cauliflower
  • 8 oz. cremini or baby bella mushrooms, diced
  • Additional salt and pepper to taste
  • Eggs (optional)
  • Butter for frying the eggs
Instructions
  1. Heat up the oil or butter in a large, deep skillet. I like using my cast iron pan for this.
  2. Turn the heat down to medium-low and add in the onion and garlic let it soften and caramelize.
  3. While the onion cooks, shred the brussel sprouts by halving and slicing thinly.
  4. Add the salt and pepper to the onions.
  5. After about 7 minutes, add in the brussel sprouts. Stir a bit and turn the heat to medium.
  6. Let the brussel sprouts cook down for 3-5 minutes and then stir in the cauliflower and chopped mushrooms.
  7. Mix everything well and let the mixture cook for about 10 minutes.
  8. Taste and adjust seasoning.
  9. Fry up some eggs, sunny side up if you like.
  10. Serve the hash with some fried eggs or salad, or even with some meat - if that's your speed.
  11. Enjoy!


Rosemary, Fig & Goat Cheese Latkes

latkes-main

Chanukah starts tomorrow night. It only hit me when I glanced at my calendar on Outlook and it told me that I had to light the first candle on Tuesday.  I stifled a gasp. I’m totally not caught up with holiday preparations. I need to buy Chanukah and Christmas presents. Need to buy presents for my kid’s teachers and therapists. I need to sort out a chanukah party menu. The list goes on. I will breathe after December 23. That’s when I start my staycation.

Chanukah is already in the air though. Even if it hasn’t begun. The Chanukah spirit arrived last week when I made those delicious golden beet latkes. Today, I have another fun Chanukah treat and I’m sure I’ll have some more goodies for you through the holiday.

I’m so excited to share these latkes with you. The idea for these latkes came about one evening when I had some people over for a wine and cheese night. I served an appetizer that had some roasted figs with rosemary and goat cheese on them. As I worked through the flavors, and loved them, I knew these flavors had to become a latke! So here we are today!

I soaked some dried figs in some port wine and brought some goat cheese to room temperature. You can let the figs soak for about 20 minutes, or you can get distracted like I did and keep them soaking for an hour. You want them to soften and plump up. I chopped up the figs along with some shallots and mixed them with the goat cheese. I set that bowl aside.

goat-cheese-and-figs

filling

The potato process needs to happen fast as you want them to keep their light color. I washed and peeled the potatoes. I shredded the potatoes, along with some onion, garlic and more shallots in the food processor using the shredding disc. Next, I rinsed the grated potato mixture and squeezed out all of the liquid.

I placed the mixture in to a large mixing bowl and stirred in some eggs, almond flour, salt, pepper and fresh chopped rosemary.

potato-mixture

Next, I heated up some oil in a large fry pan.

I placed a thin layer of potato mixture in my hand and then placed some fig and goat cheese layer on top of it. You want a decent amount of goat cheese, but make sure that there’s an edge of potato around it. I topped the goat cheese with another thin layer of potatoes. You want the latke to be thin so that it gets crispy and cooked through, but you also want the cheese to shine through. The cheese should be completely covered by the potato mixture.

stuffed-latkes

I fried the latkes until crisp on both sides. The trick with latkes is to place them in the pan and leave them alone until you see the shredded potatoes begin to brown at the edges. The browning will poke through. But don’t peek and don’t flip until you can see that it’s very crisp.

frying-latkes

Drain the finished latkes on a cooling rack over a paper towel lined cookie sheet.

drain-latkes

It’s best to serve fresh. But if you have to make these ahead of time, you can keep them warm in a 250-degree oven.

These latkes are out of this world. Because of the creamy goat cheese with figs inside, you don’t need any sauce or sour cream on top. There’s a huge amount of flavor all packed in to the latke! It’s amazing! My first thought as I sunk my teeth in to the latke was that it was “off the hook!” And I never say that! It was that good though. I hope you enjoy them as much as I did!


Rosemary, Fig & Goat Cheese Latkes
 
Author:
Ingredients
Fig & Goat Cheese Filling
  • 7 dried figs
  • 1 cup of port wine or other semi dry red wine
  • 1 shallot, chopped
  • 4 oz. goat cheese (chevre)
Latke Blend
  • 4 large red potatoes, washed and peeled nand quartered
  • 1 medium onion
  • 1 shallot
  • 4 cloves garlic
  • 3 tablespoons fresh rosemary, chopped
  • 1 tbsp. salt
  • 4 tsp. fresh ground pepper
  • additional salt and pepper to taste
  • 8 tbsp. almond flour or all-purpose flour
  • 2 eggs
  • Oil for frying
Instructions
  1. Soak the figs in the wine for at least 20 minutes.
  2. Drain the figs and chop them finely. In a small bowl, mix the figs with the chopped shallot and goat cheese. Set the bowl aside.
  3. In a food processor fitted with a shredding disc, grate the potatoes, onions, garlic and shallot.
  4. Rinse and drain the grated potato mixture. Squeeze out all of the liquid.
  5. Transfer to a large mixing bowl.
  6. Mix the rosemary, salt, pepper, egg and flour into the potato mixture.
  7. Heat about a ½ an inch of oil in a large frying pan.
  8. Form the potato mixture in to a small thin patty in your hand and place a tablespoon or so of goat cheese filling in the middle. Cover it with a small thin layer of potato mixture and seal along the edges.
  9. Fry in the oil until browned and crisp on both sides.
  10. Drain on a cooling rack or paper towels.
  11. Enjoy!

latkes-tower


Golden Beet Latkes + Hamilton Beach Giveaway

latkes main

So I woke up this week and realized that it’s already the middle of December. The snow clued me in a little, but the giant 8 ft. tall santa and reindeer on my neighbor’s lawn is probably what really did me in. Anyways, it’s December and the holidays are almost here and I’m over the moon about it. Can’t you tell?

With Chanukah almost here, I need to continue my tradition of coming up with some new latke recipes. On last year’s menu, there were some carrot ginger latkes and some wild mushroom & roasted garlic latkes. Both were amazing. How could I top that? I really wanted to go for something somewhat simple for my first latke of the season. You really have to ease into it. I decided to turn to one of my favorite root veggies. Golden beets. I definitely don’t show enough love for the humble golden beet often enough. So a latke it must be.

beets

Hamilton Beach recently sent me their Stack and Snap™ 10 Cup Food Processor to check out and use in my holiday cooking. What better way to test out a food processor then to abuse using it during my latke making fest?! It really is the perfect way to check out what it’s made of.

hamilton beach

I loved the simplicity of the set up as I took it out of the box. Everything just stacked together. There was very little question as to what piece goes where. I also loved how the shredding disc is reversible. One side slices and one side shreds. Another thing I noted as I took hold of the new appliance was how light it is. It didn’t feel cumbersome in my arms or on my kitchen counter.

When it got down to making the machine work, I was also pleasantly surprised and impressed. Beets are much firmer than potatoes, so I figured that shredding the beets would be a pretty good test. When I placed the beets in the feeding tube and pushed down, the beets were shredded in seconds! The machine was really strong and worked really well!

shredded beets

Later in the day, I tested the machine with some dried fruit and nuts. I tested with that mixture because I knew it would be difficult to cut through. and it’s what I used for charoset at Pesach. If this machine can handle my Passover Charoset, then it definitely is a winner! And lo and behold, it worked! It attacked the dried apricots and figs with gusto!

I didn’t think that a budget-friendly machine would work for me, but so glad that this Stack and Snap™ 10 Cup Food Processor works well! This food processor would be the perfect addition to my year-round kitchen gear AND for my pesach kitchen gear. I love how this machine processes the food so fast and is so easy to handle. I also love that it comes with the extra shredding and slicing disc.  I would definitely recommend this food processor to anyone! Good news for you, I’ve got one of these Hamilton Beach Stack and Snap™ 10 Cup Food Processor to give away!

Anyways, back to these golden beet latkes.

Here’s what I did.

I washed and peeled the beets and onions and then I quartered them. I processed them in the food processor with the shredding disc.

I transferred the mixture to a bowl and then added the chopped garlic, chopped dill, salt and pepper, egg and the flour. I mixed everything together well.

I then heated up some oil in my fry pan, shaped the mixture in to latke patties and then fried them until browned and crispy on both sides. I drained the latkes on paper towels.

latkes frying

I served the latkes with sour cream, though next time, I think I will serve them with a nice lemon aioli.

These latkes are delicious.

Check out the recipe below and don’t forget to enter to win your own Stack and Snap™ 10 Cup Food Processor!


vertical latkes

Golden Beet Latkes
 
Author:
Ingredients
  • 3 golden beets
  • 2 small onions
  • 2 tbsp. fresh dill, chopped
  • 2 cloves garlic, chopped
  • 6 tbsp. almond flour, (you can also use regular all-purpose flour)
  • 1 egg
  • 3 tsp. salt
  • 2 tsp. fresh ground pepper
  • Additional salt and pepper to taste
  • Oil for frying
  • - See more at: https://confident-cook.com/2014/12/golden-beet-latkes.html#sthash.8QM4ZrrJ.dpuf
Instructions
  1. Wash, peel and quarter the beets
  2. peel and quarter the onions
  3. Using the shredding disc on your food processor, shred the beets and onions.
  4. Transfer to a large mixing bowl and add the rest of the ingredients
  5. Mix everything together well
  6. Form beet mixture in to thin patties and fry in hot oil until browned on both sides.
  7. Drain on paper towels.
  8. Serve with some sour cream and dill or a lemon aioli.
  9. Enjoy!

a Rafflecopter giveaway

**Hamilton Beach provided me with this food processor to review, but all opinions and the recipe are my own.

Tuscan Kale & Cauliflower Curry with Chickpeas

main-curry

If you’re anything like me, you run in to roadblocks in the kitchen almost every day. What to make, ingredients to have on hand, cooking time, etc. It’s life. We get by. Even if dinner ends up as cereal with milk, there usually aren’t too many disgruntled customers.

If you follow my dinner posts on Instagram, you probably already recognize some of the usual suspects in my kitchen. From throwing in an egg for protein to tossing every vegetable in the pan – dinner can be anything. Play with the flavor.  Swap out the veggies. Switch your proteins around. It’s all good.

You also know that I love curry. From a haphazard cabbage curry to a polished palak paneer, curry rocks. When served over Basmati rice, it is perfect. It’s one of those dishes that spring from nowhere on a busy evening. You can take advantage of whatever fresh vegetables you have on hand and it’s quick to prepare. Add in a protein and go to flavortown and you’re there. Your dish has arrived. Dinner is served.

Well it happens that way in my head. A few more steps are thrown in. But like I said above, a great curry can be born from whatever you have lying in your fridge. Well, most of the stuff. Don’t try and make a curry out of marshmallow fluff! Did I just admit to having marshmallow fluff in my house? Oops.

This curry I’m sharing with you, like the others, was born out of necessity. Some amazing Tuscan Kale was taking over some valuable real estate in my fridge and I didn’t want it to go bad. My husband wanted something with chickpeas. I wanted the kale. It’s cooperation. Or something like that. Regardless, it tasted great, it’s a great vegan curry and it cooks up super fast.

I heated up a large pan with some olive oil and add in some onion, garlic and traditional curry spices.

Next I added the cauliflower and it it cook a few minutes to soften. About 5 minutes.

I then added the Kale and Chickpeas. The kale will wilt pretty quickly.

After that, I added the canned tomatoes and some vegetable broth.

I let the mixture cook for another 5-10 minutes – letting all of the flavors meld while simmering.

While everything cook, I had some basmati rice going in my rice cooker.

Dinner took about 20 minutes to cook. It was perfect – especially for these chilly days.


Hope you enjoy!

Tuscan Kale and Cauliflower Curry with Chickpeas
 
Author:
Ingredients
  • 1 tbsp. olive oil
  • 1 medium onion, chopped
  • 4 cloves garlic, peeled and chopped
  • 2-inch piece ginger, peeled and chopped
  • 1 tbsp. curry powder
  • 1 tsp. salt
  • half teaspoon turmeric powder
  • 1 tsp teaspoon ground cumin
  • 1 tsp teaspoon ground coriander
  • 1-2 tsp. chili flakes (optional)
  • 1 small head of cauliflower, washed and broken up in to florets
  • 1 bunch of Tuscan Kale, washed and chopped
  • 1 can of chickpeas, rinsed and drained
  • 1 cup crushed tomatoes
  • ½ cup vegetable broth
Instructions
  1. Heat up the oil in a large pan.
  2. Add in the onions, ginger and garlic and let soften a bit. About 2-3 minutes on medium-high heat.
  3. Stir in the spices and add the cauliflower florets.
  4. Cook about 4-5v minutes to allow the cauliflower to soften.
  5. Add in the kale and the chickpeas. Stir well to mix up the spices. Allow the kale to wilt a bit. About 2-3 minutes.
  6. Add in the crushed tomatoes and vegetable broth. Stir well and simmer for 3-5 minutes.
  7. Taste and season as necessary with salt and pepper.
  8. Serve with warm Basmati rice.
  9. Enjoy!

vertical-curry

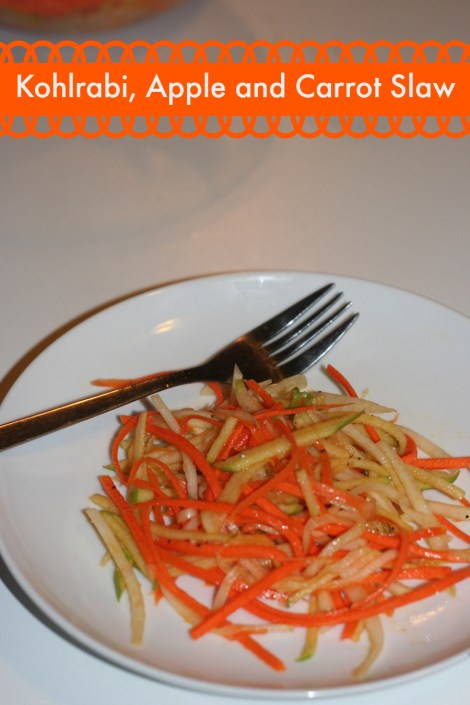
Kohlrabi, Apple and Carrot Slaw

Slawfront

I love this time of year. As the season changes, so does my palate. I look forward to every Tuesday as I go to pick up my CSA box. We’re still getting some sweet corn and tons of tomatoes, the apples are starting to come in and the greens are coming back. This past week, we had some fabulous kohlrabi and granny smith apples in the box.

I love the crunch of kohlrabi and it goes so well with apple. I decided to make a slaw out of it. We were having veggie burgers for dinner and I knew this simple slaw would top them well.

I julienned some carrots, apple, and kohlrabi. I also cut some of it into matchsticks. I then tossed everything with some fresh lemon juice, olive oil, salt and pepper. I let it sit for a bit at room temperature before eating. Delicious! Perfectly crisp and great as a side dish or as a sandwich topper,

I think I’m going to serve some of the leftovers with sloppy joes this week!

Simple salad success!


Kohlrabi, Apple and Carrot Slaw
 
Author:
Ingredients
  • 1 kohlrabi, peeled
  • 1 large carrot, peeled
  • ¾ Granny Smith apple, peeled
  • 1 tbsp. olive oil
  • Juice of 1 small lemon
  • 2 tsp. salt
  • 2 tsp. fresh ground black pepper
Instructions
  1. Using a julienne peeler, cut up the veggies into matchsticks. You can also use a knife to cut the veggies up.
  2. Mix together in a bowl with the lemon juice and olive oil. Add the salt and pepper to taste.
  3. Serve and enjoy!

Slawtext

#BeyondMeat Vegan Lettuce Tacos + Giveaway!


vegan-lettuce-tacosm

I am excited to have the opportunity to cook with and talk about the Beyond Meat line of vegan beef crumbles.

You all know that I’m a fan of the various vegan meat products out there. Whenever a new product is released, I’m first in line to try it. So I’ve definitely been watching Beyond Meat. Ever since they showed up at Whole Foods, I was there. First their mock chicken products, and now the beef crumbles. They’re not only vegan, they are also kosher and gluten free. It’s the absolute trifecta in my book. The fact that they taste good. Perfecto!

I’d already tried the beefy variety of the crumbles, so I decided to get a little crazy and try their Feisty crumbles.

vegan feisty crumbles

An idea immediately popped in to my head. I some amazing fresh lettuce and corn from my CSA. I decided I needed to make tacos out of these Feisty crumbles. It would be a perfect light, vegan and gluten free dinner. Since the Feisty crumbles already had some seasoning in there, I had a hunch that with just a bit of adaptation, they would be perfect for my tacos.

I chopped up some onion and garlic and added it to a hot pan. I added the frozen Beyond Meat crumbles to the pan and cooked for a few minutes, breaking up the pieces. I added some cumin, salt and pepper to the mix. I then added some corn that I cut off the cob. I cooked another five minutes.

cooking-crumbles

I washed and prepped some lettuce leaves. Romaine or Butter Lettuce are perfect for this. I also chopped up some peppers and avocado.

I scooped some of the meat mixture in to the lettuce pieces and then sprinkled over some peppers and avocado. You could also add some cheddar cheese for the ultimate taco experience.

This was the perfect summer dinner!

Don’t forget to enter the amazing giveaway below!

*Please note that this was a sponsored post. While the product was provided to me, the recipe and opinions are my own.


Vegan Lettuce Tacos
 
Author:
Ingredients
  • 1 tbsp. olive oil
  • 1 onion
  • 3 cloves garlic
  • 1 package of Beyond Meat Feisty Crumbles
  • 1 tbsp. cumin
  • 2 tsp salt
  • 1 tsp. black pepper
  • Corn from 2 ears of corn
  • Lettuce Leaves
  • 1 Red pepper, chopped
  • 1 Avocado, diced
  • Vegan or Dairy Cheddar (optional)
  • Additional salt and pepper as necessary
Instructions
  1. Heat up the olive oil in a large pan
  2. Add in the onions, garlic and spices. Cook for a few minutes.
  3. Add in the vegan beef crumbles and the corn. Cook for about 5-7 minutes. Remove from heat.
  4. Clean the lettuce leaves.
  5. Scoop the meat mixture in to the lettuce leaves and garnish with the remaining chopped veggies and optional cheese.
  6. Serve and enjoy!

  vertical-tacos

Portabella and Kale Breakfast Muffins

Egg Muffins.jpg

Breakfast is the toughest meal for me. I know I need to eat a morning meal, but I am usually out the door and on my way to work before I can even contemplate ingesting anything beyond a mega-cup of coffee. I need a morning shot of protein, but the best time for me to eat it is probably 8:30am, when I’ve already been in my office for about an hour. What do you do for breakfast on the go?

I love egg and cheese sandwiches, but those aren’t particularly healthy on a daily basis and the amount of gluten in those rolls tend to put me to sleep. I often throw a container of Greek yogurt in my bag, but I love the idea of having a warm breakfast.

I decided to try something new. I recently started getting some wonderful local cage-free eggs from a farm through my CSA. I get a dozen eggs each week and decided to put some of these eggs to good use. I chose to prep some gluten free egg muffins that I could freeze for later use. These egg muffins came together quickly. I sautéed some chopped kale lightly with some salt, pepper, and garlic. I placed a little bit of kale at the bottom of each muffin cup. I then added a couple pieces of diced shallot, along with a few pieces of diced portabella mushroom cap. I whisked up the eggs with some salt and pepper. I then poured the egg mixture in to each muffin cup and sprinkled a little bit of cheese over. I baked the muffins until the egg was set. And then that was it! Can you believe it? Super easy to make.

egg muffin collage.jpg

I made a couple dozen and threw them in a ziploc bag. The next day, I grabbed a couple out and put them in a container to bring to work. I heated them up in my work microwave. They were perfect. It was like a stroke of genius! I’m totally doing this again. I’m also looking forward to playing with flavors. You can swap out any of the vegetables for whatever you prefer!


Portabella and Kale Breakfast Muffins
 
Author:
Ingredients
  • ½ tbsp. olive oil
  • 3 cups chopped kale
  • 1 portabella mushroom cap, cleaned and chopped
  • 1 small shallot, chopped
  • 12 eggs
  • 2 tsp. salt
  • 2 tsp. pepper
  • grated cheese, optional
  • oil spray
Instructions
  1. Preheat oven to 350
  2. Spray muffin tins with oil spray
  3. Lightly saute kale in olive oil with some salt and pepper to soften a bit. You don't need to cook it, you just want to take the edge off a bit.
  4. Place about a tablespoon of kale at the bottom of each muffin cup. Next, layer some chopped mushrooms and shallots.
  5. Whisk the eggs with salt and pepper in a small bowl.
  6. Pour eggs in to muffin cups.
  7. Sprinkle on some cheese.
  8. Bake in oven for about 20 minutes, or until egg has completely set.
  9. Let cool a bit and then use a knife to loosen egg muffins from the baking pan.
  10. Eat or freeze for later use.
  11. Enjoy!

Egg and Kale Breakfast Muffins.jpg

Pan-Seared Tofu with Harissa Chickpeas

Pan-Seared-Tofu-Harissa

I think this month’s Bon Appétit Magazine may be one of my favorites. They focused on healthful foods this  month. Page after page, I was just blown away and inspired by the ideas and photos. Their cover photo inspired my recent miso soup. When I paged through and landed on their Pan-Roasted Chicken with Harissa Chickpeas, my mouth began to water some more. Harissa. I love the spice paste and I have always wanted to make it myself. I knew right then that I had to veganize this dish. I also knew that I wasn’t going to use store-bought harissa. I had to make it my own.

Harissa is a North African chili paste. It’s spicy and fragrant – so full of flavor. I often buy it to spread on challah for Shabbat, or I sometimes spread it on fish. I knew from past research that Harissa uses freshly toasted spices and would be the perfect opportunity to break out my new mortar and pestle.

The amazing folks at Core Bamboo recently sent me a beautiful mortar and pestle that would be perfect for this Harissa job. Core Bamboo is also amazingly generous and sponsoring a giveaway for a mortar and pestle just like mine. So check out the end of this blog post if you are interested in winning a set for your own kitchen. Core Bamboo produces an amazing array of kitchen products. I think I have a cutting board addiction, and several in my collection are made by Core, as are several of my bowls. I may also hoard serving bowls. I’m a kitchen stuff hoarder. Plain and simple.

Anyhow, back to the dish.

First, I made the Harissa. I soaked some dried chile peppers in boiling water.

peppers

While the peppers soaked, I toasted the spices in a hot pan. I then ground up the toasted spices in my mortar and pestle.

mortar-and-pestle

Once the peppers were soft, I seeded and stemmed them and then I transferred everything to my Cuisinart food processor and blended the mixture. Everything came together quickly.

Cuisinart

Once the harissa is ready, transfer the mixture to a clean jar and add some extra olive oil to cover the paste.

harissa

I then set out to make the rest of the meal.

Next, I sliced my tofu and spiced it with salt, pepper and cumin. I seared the sliced tofu in a hot pan and then transferred the tofu to a plate.

I sautéed some onion, garlic and additional spices. I added my chickpeas to the pan, along with some harissa, tomato paste and vegetable broth.  I let the mixture cook for a few minutes. I then added the tofu back to the pan so that it gets coated with the Harissa.

Chickpeas

I served the tofu and chickpeas with some lemon wedges.

Pan-Seared-Tofu-Harissa

Dinner was amazing. It was super easy to make and everyone walked away with full, happy bellies. I hope you enjoy!

Don’t forget to enter the amazing giveaway for a Core Bamboo Mortar & Pestle!

Pan-Seared Tofu with Harissa Chickpeas
 
Author:
Ingredients
  • ½ tablespoon olive oil
  • 1 lb extra-firm tofu, drained and sliced
  • 1-2 tsp. salt
  • 2 tsp. ground black pepper
  • 2 tsp. cumin
  • 1 medium onion, chopped
  • 4 cloves garlic, chopped
  • 3 tbsp. tomato paste
  • 3 cups cooked or canned chickpeas
  • ⅓ cup Harissa (see recipe below) or use store-bought
  • ½ cup vegetable broth
  • ¼ cup chopped cilantro
  • ¼ chopped parsley
  • Lemon wedges, for serving
Instructions
  1. Heat oil in a large pan over medium high heat.
  2. Season the tofu slices with the salt, pepper and cumin and sear the tofu until browned on both sides. Transfer to a plate when done.
  3. Add onion and garlic to the pan and saute for a few minutes until softened.
  4. Stir in the tomato paste and add in the chickpeas and the harissa.
  5. Stir in the vegetable broth and let the mixture simmer.
  6. Let it cook for about 5-10 minutes and then add the tofu back to the pan. Ensure that the tofu is coated with the harissa mixture.
  7. Serve the dish with lemon wedges for squeezing over the dish. You may also like rice along side the dish.
  8. Enjoy!

 
Homemade Harissa
 
Adapted from Saveur
Author:
Recipe type: sauce, dip, paste
Cuisine: Moroccan, Tunisian
Ingredients
  • 6 Dried Guajillo Chiles
  • 3 Dried Pasilla Chiles
  • 2 Dried Chiles de Arbol
  • 1⁄2 tsp. Caraway seeds
  • 1⁄4 tsp. Coriander seeds
  • 1⁄4 tsp. Cumin seeds
  • 1 tsp. Dried Mint Leaves
  • 3 tbsp. Extra-Virgin Olive Oil, plus more as needed
  • 1 1⁄2 tsp. kosher salt
  • 5 cloves garlic
  • Juice of 1 lemon
  • 2 tbsp. tomato paste
Instructions
  1. Put the chilies in a bowl and pour bowling water over the chiles to allow them to soften. Let them sit for about 20-30 minutes.
  2. In a dry pan, toast the caraway, coriander and cumin seeds over medium heat. Toast them for a few minutes until they begin to become fragrant.
  3. Transfer the spices to a mortar and pestle and grind them so that they become a powder.
  4. Drain the chiles and remove the stems and the seeds. Transfer them to your food processor.
  5. Add the rest of the ingredients to the food processor, including the ground spices, and puree until everything is well integrated and smooth.
  6. Store the mixture in a sterile glass jar. Add some olive oil to the top of the harissa paste and seal the jar. Store in the fridge for up to a few weeks.

Pan-Seared-Tofu

a Rafflecopter giveaway

Curried Spinach and Chickpea Veggie Burgers

spinach-and-chickpea-burger

Let me tell you something about myself. I love veggie burgers. I often judge a restaurant by three things; their veggie burgers, their grilled cheese and their onion rings. I know they sound like simple dishes, but often, they’re what I turn to when I go out to eat. And if those dishes are not good, uh oh.

So I’m always trying out new flavor combinations for veggie burgers at home. It’s a great weeknight dinner and they tend to freeze well for future meals.

This spinach and chickpea burger fell together. I was in the mood for a falafel flavor without the falafel and the mess it comes with. I needed simple. I also had some spinach I wanted to use up and I didn’t want to turn it in to a salad.

I’ve been keeping my Cuisinart food processor out on the counter lately, so these came together super fast.

I mixed up a can of chickpeas, an onion, some garlic and the spinach in the food processor. I then added some spices.

I formed them in to burger shapes and then lightly fried the burgers in a pan that was coated lightly in olive oil. I just wanted them to brown and hold together.

I then placed them in an oven at 375 to finish cooking.

I enjoyed these with a salad, while my kids devoured them on a sandwich thin along with extra spinach and sliced avocado and French fries on the side. Hope you enjoy these as much as we did!


Curried Chickpea and Spinach Burgers
 
Author:
Recipe type: Burger, Sandwich, Veggie Burger
Ingredients
  • 2 tsp. olive oil
  • 1 can chickpeas
  • 1 small onion
  • 1 bag of baby spinach – about 3 cups
  • 3 cloves garlic
  • 2 tsp. cumin
  • 2 tsp. curry powder
  • 1 tsp. sea salt
  • 1 tsp. ground black pepper
Instructions
  1. Mix everything together in a food processor.
  2. Form mixture in to burgers.
  3. Pan fry in a large sauté pan.
  4. Finish cooking in an oven at 375. It should bake for around 10 minutes or so.
  5. Serve them dressed with your preferred burger toppings. Enjoy!

spinach-and-chickpea-burgers

Sriracha Chex Mix

Sriracha Chex Mix

I love Chex Mix. Chex Mix is one of my favorite snacks. Only homemade Chex Mix though. I stock up on Chex Cereals whenever I see them on sale at the grocery store. I’m always trying to come up with new flavor options for the wonderful snack mix.

I’ve made it with Creole seasoning, I loved it with curry seasoning and just recently, I decided I needed to make a Sriracha Chex Mix. Who doesn’t like sriracha? It seemed like it would be the perfect addition to this snack mix. I was right.

In a giant mixing bowl, I mixed up the Rice Chex, Corn Chex, cashews, almonds and peanuts.

I mixed up some melted butter, sriracha, sesame oil,  and tamari.

mixing-chex-mix-

I processed some garlic and ginger in my Cuisinart Mini-Prep so it became a paste and then added it to the bowl with the butter and the sriracha.

I poured the mixture over the Chex and nut mixture. I stirred everything well.

mixing-chexk-mix

I placed everything on a rimmed baking sheet and then I baked it in the oven at a low heat for an hour. I stirred it up every 15 minutes or so.

I then let the mixture cool and then sampled a bit. Oh yeah.

This Chex Mix came with us to our New Year’s Eve party. It’s perfect for any party or just for casual snacking. I love the kick of the sriracha!

Hope you enjoy!


Sriracha Chex Mix
 
Author:
Recipe type: Snack, Gluten Free
Ingredients
  • 6 cups Rice Chex
  • 6 cups Corn Chex
  • 1 cup roasted unsalted cashews
  • 1 cup roasted peanutes
  • 1 cup toasted almonds slivers
  • 1 stick of butter, melted
  • ⅓ cup Sriracha
  • ¼ cup tamari or soy sauce
  • 2 tsp. sesame oil
  • 4 cloves garlic
  • 3-4 inch piece ginger, peeled
Instructions
  1. Preheat oven to 250
  2. In a large mixing bowl, combine the dry cereals and the nuts.
  3. In a smaller bowl, combine the melted butter, tamari, sriracha and the sesame oil.
  4. Puree the garlic and ginger in a food processor and then mix in to the sriracha mixture.
  5. Stir the melted butter and sriracha mixture in to the cereal mixture and stir well, making sure that all nuts and cereal pieces are coated well.
  6. Transfer to rimmed baking sheets.
  7. Bake in the oven for an hour, stirring every 15 minutes.
  8. Remove from oven and allow to cool.
  9. Enjoy!

Sriracha Chex Mix

1 2