Rosemary, Fig & Goat Cheese Latkes

latkes-main

Chanukah starts tomorrow night. It only hit me when I glanced at my calendar on Outlook and it told me that I had to light the first candle on Tuesday.  I stifled a gasp. I’m totally not caught up with holiday preparations. I need to buy Chanukah and Christmas presents. Need to buy presents for my kid’s teachers and therapists. I need to sort out a chanukah party menu. The list goes on. I will breathe after December 23. That’s when I start my staycation.

Chanukah is already in the air though. Even if it hasn’t begun. The Chanukah spirit arrived last week when I made those delicious golden beet latkes. Today, I have another fun Chanukah treat and I’m sure I’ll have some more goodies for you through the holiday.

I’m so excited to share these latkes with you. The idea for these latkes came about one evening when I had some people over for a wine and cheese night. I served an appetizer that had some roasted figs with rosemary and goat cheese on them. As I worked through the flavors, and loved them, I knew these flavors had to become a latke! So here we are today!

I soaked some dried figs in some port wine and brought some goat cheese to room temperature. You can let the figs soak for about 20 minutes, or you can get distracted like I did and keep them soaking for an hour. You want them to soften and plump up. I chopped up the figs along with some shallots and mixed them with the goat cheese. I set that bowl aside.

goat-cheese-and-figs

filling

The potato process needs to happen fast as you want them to keep their light color. I washed and peeled the potatoes. I shredded the potatoes, along with some onion, garlic and more shallots in the food processor using the shredding disc. Next, I rinsed the grated potato mixture and squeezed out all of the liquid.

I placed the mixture in to a large mixing bowl and stirred in some eggs, almond flour, salt, pepper and fresh chopped rosemary.

potato-mixture

Next, I heated up some oil in a large fry pan.

I placed a thin layer of potato mixture in my hand and then placed some fig and goat cheese layer on top of it. You want a decent amount of goat cheese, but make sure that there’s an edge of potato around it. I topped the goat cheese with another thin layer of potatoes. You want the latke to be thin so that it gets crispy and cooked through, but you also want the cheese to shine through. The cheese should be completely covered by the potato mixture.

stuffed-latkes

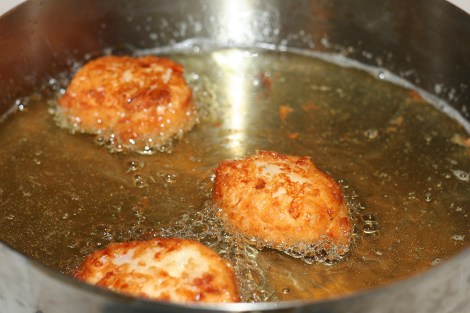
I fried the latkes until crisp on both sides. The trick with latkes is to place them in the pan and leave them alone until you see the shredded potatoes begin to brown at the edges. The browning will poke through. But don’t peek and don’t flip until you can see that it’s very crisp.

frying-latkes

Drain the finished latkes on a cooling rack over a paper towel lined cookie sheet.

drain-latkes

It’s best to serve fresh. But if you have to make these ahead of time, you can keep them warm in a 250-degree oven.

These latkes are out of this world. Because of the creamy goat cheese with figs inside, you don’t need any sauce or sour cream on top. There’s a huge amount of flavor all packed in to the latke! It’s amazing! My first thought as I sunk my teeth in to the latke was that it was “off the hook!” And I never say that! It was that good though. I hope you enjoy them as much as I did!


Rosemary, Fig & Goat Cheese Latkes
 
Author:
Ingredients
Fig & Goat Cheese Filling
  • 7 dried figs
  • 1 cup of port wine or other semi dry red wine
  • 1 shallot, chopped
  • 4 oz. goat cheese (chevre)
Latke Blend
  • 4 large red potatoes, washed and peeled nand quartered
  • 1 medium onion
  • 1 shallot
  • 4 cloves garlic
  • 3 tablespoons fresh rosemary, chopped
  • 1 tbsp. salt
  • 4 tsp. fresh ground pepper
  • additional salt and pepper to taste
  • 8 tbsp. almond flour or all-purpose flour
  • 2 eggs
  • Oil for frying
Instructions
  1. Soak the figs in the wine for at least 20 minutes.
  2. Drain the figs and chop them finely. In a small bowl, mix the figs with the chopped shallot and goat cheese. Set the bowl aside.
  3. In a food processor fitted with a shredding disc, grate the potatoes, onions, garlic and shallot.
  4. Rinse and drain the grated potato mixture. Squeeze out all of the liquid.
  5. Transfer to a large mixing bowl.
  6. Mix the rosemary, salt, pepper, egg and flour into the potato mixture.
  7. Heat about a ½ an inch of oil in a large frying pan.
  8. Form the potato mixture in to a small thin patty in your hand and place a tablespoon or so of goat cheese filling in the middle. Cover it with a small thin layer of potato mixture and seal along the edges.
  9. Fry in the oil until browned and crisp on both sides.
  10. Drain on a cooling rack or paper towels.
  11. Enjoy!

latkes-tower


Smoked Plantain Chips

Smokey-Plantains

I love plantain chips when I am looking for something crunchy to snack on. I love the flavor. Sprinkled with a little salt – it’s the perfect treat.

It never occurred to me to make my own though. Whenever I pick up some green plantains in the market, I tend to stick with tostones or use them in a hash. I’ve always relied on the bagged chips though. Not sure why – especially now that I know how easy they are to make.

What I don’t like about the bagged variety are the additives. Way too much oil and sometimes other preservatives might be added to the mix. Plantains are a fairly healthy starch and when prepared properly, are not so bad for you!

plantains

So I made my own. And since I couldn’t just be all simple, I needed to spice it up. I chose to go the smokey route. I added some smoked paprika, garlic and salt. So easy! Tossed it all on some olive oil. Laid it on a baking sheet and then baked it for about 30 minutes or so, flipping over once. How easy can it get?

I let them cool about a minute before munching on them. They were so good. I’ve definitely given up my bagged plantain chip habit. These are so much better!


Smoked Plantain Chips
 
Author:
Ingredients
  • 3 Green Plantains
  • 1.5 tbsp. olive oil
  • 1.5 tbsp. smoked paprika
  • sea salt
  • ½ tbsp. garlic powder
Instructions
  1. Preheat oven to 350
  2. Peel the plantains (use the linked how-to guide)
  3. Slice the plantains thinly on a diagonal
  4. In a large bowl, toss the plantains with the oil and spices
  5. Lay the plantain chips in a single layer on a baking sheet
  6. Bake in the oven for about 30 minutes, until crisp. Flip the chips half-way through the baking process and check on them toward the end to ensure that they aren't burning.
  7. Cool for a few minutes before eating.
  8. Enjoy!

smoked-plantain-chips.jpg

 Loading InLinkz ...

Butternut Squash & Kale Lasagna

finished piece

I am so happy that Passover is over and I have my kitchen back to normal. I have a love/hate relationship with Passover, and I’m just ready for some more low-key time in the kitchen.

This fabulous lasagna brings two of my favorite ingredients together. I love butternut squash and kale in so many ways, be it a hash or a salad. For some reason, they just go together!

This squash was actually purchased for Passover and I had intended to turn it in to this fabulous kosher-for-passover lasagna from Joy of Kosher. It was a huge hit last year, but I just didn’t get the chance to make it this year. So this dish is somewhat inspired by that amazing lasagna.

I like to use the no-boil lasagna pasta sheets because I’m lazy it skips one long step and they seem to work well.

I started by cutting down the squash. I peel off the hard skin and then using my trusty OXO peeler, I peel long strips of squash, using the full length of the squash. For this lasagna, used around 3 cups of squash strips, but you can certainly use more or less.

peeling butternut.jpg

I then cooked my kale and white sauce simultaneously.

I lightly sautéed the chopped kale in olive oil with fresh garlic. I didn’t need it to wilt completely. I just wanted some of the raw edge off of the leaves.

kale

While  the kale cooked down, I tackled the white sauce.

I heated up some olive oil in a pan with garlic, sage, thyme and chopped onion. Once they were soft, I added some flour to the mix, cooked that a bit and then whisked in some milk. Once the mixture thickened, I added some freshly grated parmesan cheese, salt and some black pepper.

I remove both of the pans from the heat.

I then got to work on the lasagna.

I layered each of the ingredients in my pan. This recipe makes a 9×13  or two 8×8 square pans of lasagna. I used the square pans because they were more easily accessible after I was unpacking my kitchen from Pesach mode.

I ladled some of the white sauce on to the bottom of the pan. I then added the pasta sheets. I spread some ricotta cheese over the pasta. I then added the chopped kale, then the thick layer of squash strips, then some sage leaves, then a small sprinkle of mozzarella and then more white sauce. I repeated this layer and when the pan was full and I used up the sauce, I topped everything with shredded parmesan cheese and more mozzarella. I also sprinkled on some more herbs and black pepper.

lasagna layers step by step.jpg

I baked everything in the oven until the cheese was bubbly and beginning to brown. We dug in. Amazing! My husband and daughter had two helpings! Totally making this dish again!

lasagna in 8x8.jpg


Butternut Squash and Kale Lasagna
 
Author:
Recipe type: Dairy, Pasta, Entree
Ingredients
  • 1 medium butternut squash, skin removed
  • 1 package No-Boil Lasagna Sheets
  • Sage Leaves, About 16-20
  • 1 14oz. container of Ricotta Cheese
  • 1 8oz. package of shredded mozzarella cheese
  • Additional Parmesan Cheese
White Sauce
  • 1 tbsp. olive oil
  • 4 cloves garlic, chopped
  • 1 small onion, chopped
  • 6 sage leaves, chopped
  • 3 sprigs of thyme, leaves removed from stem
  • 2 cups of milk
  • 2 tbsp. flour
  • 2 tsp. salt
  • 1 tsp. black pepper
  • ¼ cup parmesan cheese shreds
For the Kale Layer
  • 1 tbsp. olive oil
  • 4 cloves garlic, chopped
  • 3-4 cups chopped kale (I like the bag from Trader Joe's)
  • salt
  • pepper
Instructions
  1. Preheat the oven to 375
  2. Cut the butternut squash lengthwise. I use the peeler to get thin slices of the squash. Peel about 3 cups of squash and set aside.
For the white sauce
  1. Heat up the olive oil in a saucepan and add the chopped onion, garlic and herbs. Once the onion and garlic have softened, add in the flour. Whisk quickly and then turn the heat to medium-low and whisk in the milk. Let the mixture thicken and add in salt, pepper and parmesan cheese. Remove from heat.
For the Kale
  1. Heat up the oil oil in a large pan and add in the garlic and kale. Let the kale saute a bit so it softens. You are just trying to get the edge off a bit. You don't need it to cook down completely.
On to the Lasagna
  1. In a 9x13, ladle a bit of the white sauce to cover the bottom of the pan.
  2. Lay down the lasagna noodles and spread a layer of ricotta cheese over the noodles.
  3. Next, layer the kale then the butternut squash strips with some sage. Sprinkle a small amount of mozzarella over that and then ladle some more white sauce. Repeat the layering process again.
  4. For the final step, ladle the rest of the sauce over the pan and then sprinkle on some more mozzarella and parmesan. Sprinkle on some black pepper to taste and some extra chopped sage and thyme.
  5. Bake for around 40 minutes, or until the cheese is bubbly and beginning to brown.
  6. Enjoy!

 Loading InLinkz ...

lasagantext.jpg

Lemon Ginger Martini

Lemon-Ginger-Martini

I’ve been obsessed with ginger lately. I love the boost of flavor it brings to a dish and I seem to be adding it to everything. Why not add it to a drink? I love ginger beer. I knew I would love it in other drinks.

I’ve also been building my liquor cabinet and playing with drink recipes lately. My father has always been the bar master in my home growing up. He has a knack for creating amazing cocktails whenever the family entertains. I try to do the same in my home.

My usual drink of choice is a gin & tonic. My gin of choice is Bombay Sapphire. Though I am also known to get creative. Like I did with my Frozen Cantaloupe Mojitos, I like to play with flavor. I was in a martini mood, but wanted to go outside of my typical Dirty Gin Martini. I mean, I love olive juice, but you have to be in the mood, you know?

I’d been craving sweets all day and I had an excess of lemons in the house. Usually when we have extra lemons in the house, we tend to make some lemonade for the kids. I decided it was my turn to enjoy the bounty this time. I decided to make a lemon and ginger simple syrup and make a slightly sweeter gin-based martini.

I juiced 4 lemons, zested some lemon peeled and cut up some ginger and then stirred it in to some water and sugar. I heated everything up and let the sugar dissolve, while letting the flavors combine.

making-simple-syrup

Once the sugar had dissolved and the lemon ginger flavor was well infused, I strained the simple syrup in to a bowl.

straining-simple-syrup

I let the simple syrup cool.

While the mixture cooled, I rimmed my martini glasses with some sugar.

martini-glass-in-sugar

Once the simple syrup was cooled down, I placed some ice in my martini shaker, added about 1/3 cup of the lemon ginger infused simple syrup and then added around a half cup of gin to the shaker. I shook everything and then pour the mixture in to my prepared martini glasses. I also garnished the glasses with some extra lemon zest.

shaker-martini

I couldn’t wait to taste the martini. This lemon ginger martini didn’t disappoint. Amazing! If you’re not a gin fan, swap it for vodka. The drink is fantastic and I encourage you to try it.


Lemon Ginger Martini
 
Author:
Ingredients
Lemon Ginger Simple Syrup
  • Juice of 4 lemons
  • Zest of 1 lemon
  • 2 inches of ginger, peeled and cut up
  • ½ cup sugar
  • ½ cup water
Lemon Ginger Martini (for 2)
  • Ice
  • ½ cup Gin
  • ⅓ cup Lemon Ginger Simple Syrup
  • Sugar to rim the glasses
  • Extra lemon zest strips for garnish
Instructions
Lemon Ginger Simple Syrup
  1. Juice the 4 lemons
  2. In a small sauce pan, mix the lemon juice with the ginger, the water and the sugar
  3. Heat to medium and let the sugar dissolve
  4. Once the sugar has dissolved, remove from flame
  5. Strain the syrup in to a bowl and let cool completely
Lemon Ginger Martini
  1. Rim martini glasses with sugar. Wet the rim of the martini glasses and place the rim of the glass on a plate of sugar to coat the rim,
  2. Place ice in the martini shaker
  3. Add ⅓ cup of the simple syrup and ½ cup gin to the shaker. Shake well.
  4. Pour in to prepared martini glasses.
  5. Garnish with extra lemon zest (optional)
  6. Drink up and enjoy!


lemon-ginger-martini-this-one

 Loading InLinkz ...

Corn & Cheese Fritters with Pear Salsa

fritters-and-sauce

I love being a part of this fantastic group of food bloggers, the Kosher Connection. Each month, we are challenged to cook up some wonderful and unique foods. Each link-up is fun and new. I love seeing the assortment of goodies that the group comes up with. This month was especially difficult. We were tasked with a Chopped style challenge. Like the popular Food Network show, we were given three ingredients to build our dish around. For the most part, we had free reign, but the dish had to include canned corn, pears and Mike & Ike candies.

I had a very hard time coming up with something for the dish. Creating something that involved all three ingredients was super tough. I had initially planned a tofu dish that included a Korean pear based sauce. My husband nixed the idea in favor of something fried. He urged me to make a fritter. I don’t really like frying things, but with Chanukah coming up next month, I decided that if this worked out, it would be perfect for Chanukah. It’s traditional to have fried foods to recognize the miracle of the oil in the ancient temple.

He suggested some sort of latke, but as I brainstormed a bit, I settled on a fritter. I know, not that far off. But there is a difference. I scribbled a slew of ideas on paper. Once I had the house to myself though, I got to work. I settled on a corn and cheese fritter when I saw a brick of pepper jack cheese sitting in the fridge. I  quickly picked up a carton of buttermilk at Trader Joe’s and worked out a quick fritter recipe.  The fritters did not disappoint!

I mixed up the canned corn with the cheese, some chopped onion, spices, buttermilk, eggs, flour and baking powder.

fritter-batter

I scooped them up and fried them in a couple of inches of hot oil.

fritters-frying

I then drained the fritters on a cooling rack with paper towels underneath.

fritters-draining

Incorporating the Asian pears and the Mike & Ike candies proved more challenging. I wanted a pear chutney to dip the fritters in to. I peeled and chopped up the asian pears and began cooking them down with some ginger and water. I also added the Mike & Ike candies to let them get infused with the candy flavor. When tasting the sauce, it was definitely too sweet. I knew that it needed something savory along with some heat.

asian-pears

I added some chopped jalapeño, onion and vinegar and cooked it a bit more. Once everything was softened, I pureed the mixture with my immersion blender.

While the pear and Mike & Ike salsa isn’t perfect, it’s getting there. I call it a work a progress. To be honest, I will leave the candies out the next time I set out to make this dish. It was definitely fun to try my hand at this though.

The fritters have gone on the short list though and will definitely be made next month for Chanukah. The crunch and light outside and the creamy cheese filling. One word. Amazing! Make them now!

fritters-and-sauce


Disclaimer: The pear salsa was made as part of the chopped style challenge. I highly recommend you make the fritters. The fritters are amazing.  I’m not quite sold on pear salsa with mike & ike candies. I do recommend a pear salsa without the candy!


Corn & Cheese Fritters with Pear Salsa
 
Author:
Recipe type: appetizer, snack, starter
Ingredients
Corn & Cheese Fritters
  • 1 can whole kernel white corn, drained
  • ½ red onion, chopped
  • 1.5 cups pepper jack cheese, shredded
  • 1.5 cups all purpose flour
  • 2 tsp. baking powder
  • 1 cup buttermilk
  • 2 eggs
  • 2 tsp. pepper
  • 1 tsp. salt
  • oil for frying


Mike & Ike infused Pear Salsa
  • 2 asian pears, peeled and cubed
  • ½ red onion, chopped
  • 1 inch ginger, chopped
  • ½ jalapeno, minced
  • 2 tbsp. water
  • 2 tsp. salt
  • 3 tsp. red wine vinegar
  • 2 tsp. ground pepper
  • ½ cup Mike & Ike candies (I used two of the fun size boxes) - optional
Instructions
Corn and Cheese Fritters
  1. Mix all of the fritter ingredients, except for the vegetable oil, in a mixing bowl.
  2. Heat up about 2 inches of oil to 350 in a heavy bottomed pan or pot.
  3. Scoop a couple of tablespoons of fritter batter. I used an ice cream scoop. Drop in the hot oil and fry about a minute or two per side. Flip the fritter when browned.
  4. Transfer fritter to a cooling rack placed over paper towels to drain and cool
For the pear salsa
  1. Peel and chop up the pears
  2. Place in a saucepan with the water, ginger and the mike and candies.
  3. Add in the onion, jalapeno, vinegar and spices.
  4. Allow mixture to soften.
  5. Once softened, blend with an immersion blender.
  6. Taste and adjust seasoning as necessary.

fritters-and-sauce

My Favorite Challah

September is a crazy busy month for this lady. September means a busy work schedule, a busy school schedule for the kids and this year, it also means a crazy busy holiday schedule in our house. The Jewish holidays sprung early this year. On one day, it meant searching high and low for the last protractor on this side of New Jersey, while also looking in the depths of every market for a new fruit I haven’t yet eaten.  On other days, it anchors me to my kitchen, dividing my time between my laptop and my stove. I do love this season of Jewish holidays though. As the cool air creeps in, there is this beautiful air of celebration and anticipation of the fall holiday season. Or maybe that’s just the pumpkin spice lattes I’m smelling. Whatever it is, the mood changes. Life is busy, but in a good way.

I recently celebrated the holiday of Rosh Hashanah (the Jewish New Year) as well as the holiday of Yom Kippur (Day of Atonement). Both of these holidays provide me with ample time for reflection and appreciation of the past year as well as the year to come. After the crazy roller-coaster I was on this winter, I am so appreciative and thankful for my good health and for all of the support I had from my friends and family. They’ve been there for me, and I love them for it.

This month’s Kosher Connection link-up is all about Spreading the Joy during this holiday season.

I want to share my challah with you.

Challah

Ever since I was a kid, I have looked forward to Shabbat with my family. Friday night dinner with the family is sacrosanct. You don’t mess with that tradition. It’s not about level of Jewish observance. You just find a way to be at the shabbat table with family and friends, celebrating the end of the week together. Shabbat has been the constant in my life. Through my own various cycles and changes in my own Jewish observance, Shabbat has always meant “home” at the end of a long week.

We come together on Friday evening and light candles, and then sit down together for a warm meal –  over good food, good wine, and good company.  This includes challah. Our special holiday and shabbat bread.

I may not be a baker, but I love making challah. I love the process of working with the dough and getting it just right. I also love some of the spiritual rituals that come with making challah. In Jewish communities around the world, people come together while making challah and use that time to pray for health and wellbeing for loved ones. While preparing the dough, it us customary to keep in mind the names of loved ones who may be unwell or possibly need a job. We say a blessing while keeping the names of these people on our minds.

This past month, I’ve had the opportunity to make challah a few times. Each time, I’ve made challah with a friend who had never made challah before. Somehow, when you make challah around others, it makes this ritual all the more special.

My favorite challah recipe is adapted from a recipe that I found on a bag of flour. Over the past several years, I have tried numerous challah recipes. I’ve had several failures and several successes, but this recipe that I am sharing with you, is a recipe that always results in good challah. You can dress it up with whatever topping you’d like. or you may like to fill it with apples or chocolate chips, like I did for our Rosh Hashanah challahs. On some cool fall days, I have also been known to add some roasted garlic to the mix. Just play with it, and enjoy!


My Favorite Challah
 
adapted from the back of the bag of Glick's flour
Author:
Recipe type: Bread, Shabbat, Jewish Holiday
Ingredients
  • 3.5 tbsp. Active Dry Yeast
  • 5 cups warm water
  • ½ cup sugar
  • 3 tbsp. honey
  • 5 lbs of High Gluten Bread Flour plus extra flour for kneading and shaping (1-2 cups)
  • 3 eggs, beaten
  • ½ cup, plus 2 tbsp. oil
  • 2 tsp. vanilla
  • 2 tbsp. salt
Instructions
  1. Place yeast, sugar, honey and warm water in to a large mixing bowl or in the bowl of your mixer. I used a Bosch for this recipe. Allow the yeast to sit a few minutes until it bubbles.
  2. Add about 6 cups of the flour and mix in to a paste.
  3. Add eggs, ½ cup of oil, vanilla and the salt. Stir together.
  4. Add the rest of the bag of flour and knead for several minutes. The dough may be a little sticky.
  5. Add the 2tbsp, of oil and knead a few more minutes.
  6. If you are using a machine, turn the dough on to a floured counter and knead a few more minutes. You may need to add an additional half a cup of flour. The dough should be smooth and easy to work with.
  7. Oil large bowl and brush oil on the top of the dough and place in the bowl. Cover the dough with a clean kitchen towel or with plastic wrap and allow the dough to rise in a warm place for around 45 minutes. You will need to punch the dough down halfway through. The dough should double in size.
  8. At this point, you can take challah.
  9. Now is the time to shape your challah. I love the various braiding tutorials on the Challah Blog.
  10. Once you've shaped your challah, cover your challahs with plastic wrap or with towels, and place in a warm spot. Allow the challah to rise for another 40 minutes.
  11. Preheat your own to 350.
  12. Brush your challah with an egg wash. Now is the chance to add any toppings like sesame seeds, poppy seeds and other goodies.
  13. Bake your challah at 350 for about 40 minutes.
  14. When you tap on yoiur challah, it should sound hollow. That's a sign of doneness.
  15. Enjoy!

1 2