Wild Mushroom & Roasted Garlic Latkes

mushroom-and-potato-latkes

We light the first candle on our menorah for Chanukah tonight. My kids are so excited. Dreidels and chocolate gelt have already begun to make an appearance in our house. The kids are curious what we have in store for the holiday. Chanukah is always a fun time in our home. As a kid, I patiently waited for Chanukah to start so we could light candles and open some presents. The light of the menorah against the dark night is always beautiful.

Chanukah is also one of my favorite foodie holidays. To commemorate the miracle of the oil in the ancient temple, there’s the tradition to eat fried foods during the holiday. Who doesn’t love fried foods? That Chanukah happens to fall at the same time as Thanksgiving in the US – extra foodie fun!

I try to come up with new latke ideas each year. Some years I’ve focused on a different root veggies, other years I’ve added some herbs. This latke idea came to me just the other day as I was making dinner. Mushrooms are one of my favorite veggies. Why not try and add them to latkes? I had a bag of dried wild mushrooms that I thought would complement the latkes very well. I paired the wild mushrooms with some sage and roasted garlic. Latke perfection! I’m so glad I made these right away!

I roasted a head of garlic and then I soaked the mushrooms in boiling water.

soak-mushrooms

I shredded the potatoes, mushrooms and onions in my Cuisinart food processor. I then mixed everything together and added some eggs, potatoes and sage.

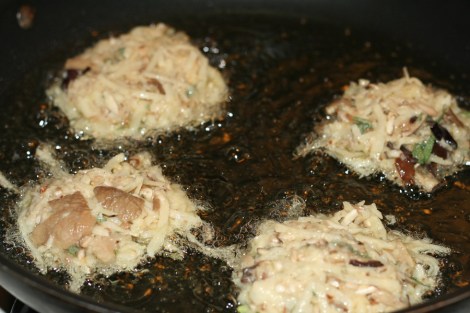
I fried up the latkes and then drained them on a wire rack lined with paper towels.

fry-in-oil

drain-on-towels

These latkes were a huge hit! I highly recommend serving them with sour cream. Enjoy and Have a Happy Chanukah!


Wild Mushroom & Roasted Garlic Latkes
 
Author:
Ingredients
  • 1 head of garlic, roasted
  • 5 Idaho Russet Potatoes
  • 1 large yellow onion
  • 2 cups of dried wild mushrooms
  • 5 oz. cremini mushooms
  • 2 tsp. salt
  • 1 tsp. pepper
  • ½ cup flour
  • 3 large eggs
  • oil for frying
  • additional salt and pepper to taste
Instructions
  1. Preheat the oven to 400. Cut off the top quarter-inch of the head of garlic to expose the cloves. Drizzle some olive oil over the garlic and wrap in foil. Place in oven for 30 minutes and roast. Then allow to cool.
  2. Rinse the dried mushrooms and soak them in boiling water for about 15 minutes. Drain and set aside.
  3. Peel and quarter the onions and potatoes.
  4. Rinse and quarter the Cremini mushrooms.
  5. With a shredding disc, process the potatoes, onion and mushrooms in the food processor.
  6. Transfer to a colander and squeeze as much liquid out of the potatoes as possible. I sometimes like to place them in a tea towel and squeeze more water from there like I did with this latke recipe.
  7. Transfer the mixture to a large mixing bowl.
  8. Squeeze out the roasted garlic cloves in to the bowl.
  9. Add in the chopped sage leaves.
  10. Stir in the eggs, flour, salt and pepper.
  11. Heat up the oil in a deep fry pan.
  12. From potato mixture in to patties and fry. Flip the latke over when you see the edges begin to brown.
  13. Transfer the finished latke to a rack positioned over paper towels to drain and cool.
  14. These latkes are great with sour cream.
  15. Enjoy!

latkeswithtext

My Favorite Challah

September is a crazy busy month for this lady. September means a busy work schedule, a busy school schedule for the kids and this year, it also means a crazy busy holiday schedule in our house. The Jewish holidays sprung early this year. On one day, it meant searching high and low for the last protractor on this side of New Jersey, while also looking in the depths of every market for a new fruit I haven’t yet eaten.  On other days, it anchors me to my kitchen, dividing my time between my laptop and my stove. I do love this season of Jewish holidays though. As the cool air creeps in, there is this beautiful air of celebration and anticipation of the fall holiday season. Or maybe that’s just the pumpkin spice lattes I’m smelling. Whatever it is, the mood changes. Life is busy, but in a good way.

I recently celebrated the holiday of Rosh Hashanah (the Jewish New Year) as well as the holiday of Yom Kippur (Day of Atonement). Both of these holidays provide me with ample time for reflection and appreciation of the past year as well as the year to come. After the crazy roller-coaster I was on this winter, I am so appreciative and thankful for my good health and for all of the support I had from my friends and family. They’ve been there for me, and I love them for it.

This month’s Kosher Connection link-up is all about Spreading the Joy during this holiday season.

I want to share my challah with you.

Challah

Ever since I was a kid, I have looked forward to Shabbat with my family. Friday night dinner with the family is sacrosanct. You don’t mess with that tradition. It’s not about level of Jewish observance. You just find a way to be at the shabbat table with family and friends, celebrating the end of the week together. Shabbat has been the constant in my life. Through my own various cycles and changes in my own Jewish observance, Shabbat has always meant “home” at the end of a long week.

We come together on Friday evening and light candles, and then sit down together for a warm meal –  over good food, good wine, and good company.  This includes challah. Our special holiday and shabbat bread.

I may not be a baker, but I love making challah. I love the process of working with the dough and getting it just right. I also love some of the spiritual rituals that come with making challah. In Jewish communities around the world, people come together while making challah and use that time to pray for health and wellbeing for loved ones. While preparing the dough, it us customary to keep in mind the names of loved ones who may be unwell or possibly need a job. We say a blessing while keeping the names of these people on our minds.

This past month, I’ve had the opportunity to make challah a few times. Each time, I’ve made challah with a friend who had never made challah before. Somehow, when you make challah around others, it makes this ritual all the more special.

My favorite challah recipe is adapted from a recipe that I found on a bag of flour. Over the past several years, I have tried numerous challah recipes. I’ve had several failures and several successes, but this recipe that I am sharing with you, is a recipe that always results in good challah. You can dress it up with whatever topping you’d like. or you may like to fill it with apples or chocolate chips, like I did for our Rosh Hashanah challahs. On some cool fall days, I have also been known to add some roasted garlic to the mix. Just play with it, and enjoy!


My Favorite Challah
 
adapted from the back of the bag of Glick's flour
Author:
Recipe type: Bread, Shabbat, Jewish Holiday
Ingredients
  • 3.5 tbsp. Active Dry Yeast
  • 5 cups warm water
  • ½ cup sugar
  • 3 tbsp. honey
  • 5 lbs of High Gluten Bread Flour plus extra flour for kneading and shaping (1-2 cups)
  • 3 eggs, beaten
  • ½ cup, plus 2 tbsp. oil
  • 2 tsp. vanilla
  • 2 tbsp. salt
Instructions
  1. Place yeast, sugar, honey and warm water in to a large mixing bowl or in the bowl of your mixer. I used a Bosch for this recipe. Allow the yeast to sit a few minutes until it bubbles.
  2. Add about 6 cups of the flour and mix in to a paste.
  3. Add eggs, ½ cup of oil, vanilla and the salt. Stir together.
  4. Add the rest of the bag of flour and knead for several minutes. The dough may be a little sticky.
  5. Add the 2tbsp, of oil and knead a few more minutes.
  6. If you are using a machine, turn the dough on to a floured counter and knead a few more minutes. You may need to add an additional half a cup of flour. The dough should be smooth and easy to work with.
  7. Oil large bowl and brush oil on the top of the dough and place in the bowl. Cover the dough with a clean kitchen towel or with plastic wrap and allow the dough to rise in a warm place for around 45 minutes. You will need to punch the dough down halfway through. The dough should double in size.
  8. At this point, you can take challah.
  9. Now is the time to shape your challah. I love the various braiding tutorials on the Challah Blog.
  10. Once you've shaped your challah, cover your challahs with plastic wrap or with towels, and place in a warm spot. Allow the challah to rise for another 40 minutes.
  11. Preheat your own to 350.
  12. Brush your challah with an egg wash. Now is the chance to add any toppings like sesame seeds, poppy seeds and other goodies.
  13. Bake your challah at 350 for about 40 minutes.
  14. When you tap on yoiur challah, it should sound hollow. That's a sign of doneness.
  15. Enjoy!

Oreo Cheesecake

What do you do when you can’t find a recipe or have trouble with a recipe? Do you look to the cookbooks? Do you look to Chef Google? No! We turn to social networking! Really! We tweet our kitchen nightmares, or blog about it. Or we updated our facebook status with the latest. It’s instant. My cookbooks get old and dusty and sit on my bookshelves until I am bored and just need a hint of an idea to run off of. Google is nice and all, but not necessarily trustworthy like tried and true resources. It’s so much more gratifying to get that instant response in the form of a comment to my kvetchy status update.

So it was the case a few nights ago, when my facebook status made mention of my troubles in the cheesecake department.
Shavuot is one of my favorite holidays. I love having some sort of extra salute from above to stick to a vegetarian menu. Of course, part of that whole Shavuot dairy thing, is the essential dessert – the cheesecake. I love most things dairy and vegetarian – except for cheesecake. I have never felt the cheesecake love. Maybe it’s that whole sensitive stomach thing. Who knows. Cheesecake doesn’t love me back. It’s mutual. I’ve made peace with it. I’m still supposed to make it. Gotta keep up with the customs, right? So I have attempted cheesecake a couple times in the past 10 years of Shavuot cooking. The first time I tried, it’s just fell apart. No love lost. A few years ago, I was determined. I googled “easy cheesecake recipe.” That was probably my first mistake. The second mistake was the recipe I chose. It was some “no bake easy cheesecake.” So many things wrong with that stament. Anyhow, facebook pulled through for me this year. My status eluded to my past cheesecake failures. An old camp friend (and culinary genius) came through and quickly sent me a tried and true cheesecake recipe that I quickly adapted to work with what I had (lots and lots of JoeJoe’s cookies). As promised, the cheesecake came out great and everyone was happy. Thanks, Matt! The recipe is below.
Oreo Cheesecake –
only slightly tweaked from my friend, Matt, who adapted it from someone else

Ingredients
1 1/4 cup oreo crumbs – about 24 cookies crushed
3/4 cup sugar
1/2 cup melted butter, plus an extra 2 tablespoons – also melted
16 oz. sour cream
2 eggs
2 teaspoons vanilla
1 lb cream cheese – 2 of those rectangular boxes
another dozen or so crush oreo cookies, plus more for garnish – and a few more for eating

Preheat oven to 350

Shove a bunch of cookies into a ziploc bag. With a rolling pin, crush the cookies.
Mix the cookie crumbs, 1/4 cup sugar, and melted butter in a bowl.

Press the mixture into the bottom of an ungreased springform pan

In a blender, blend the sour cream, 1/2 cup sugar, eggs, and vanilla for a minute. Add in the cream cheese. Blend until smooth. This goes fast. Add the crumbled cookies at this point. Add in the melted butter. Blend a bit more.

Pour into the springform.
Garnish with the oreos if you’d like.

Baked in the lower third of the oven for 45 minutes.

When baking is finished, turn the oven to broil. Broil the cheesecake until the top begins to show some nice brown spots. Matt said that they should be “attractive spots of brown.” Hmmm. Have I ever met an ugly cake? I’ll give on this one. I hope my cheesecake was pretty enough.

Chill in the fridge for at least day before serving. Enjoy!
1 2