Raspberry & Chocolate Cream Cheese Rugelach + Baking Chez Moi Review

rugelach-main

Dorie Greenspan is a baking god in my book. I look up to her. So when I was recently approached to adapt Dorie’s rugelach recipe with some fresh Driscoll raspberries, I got super excited. I jumped at the opportunity to check out her latest cookbook, Baking Chez Moi: Recipes From My Paris Home To Your Home Anywhere.

baking chez moi

And then it hit me. They wanted me to make rugelach. I’ve made rugelach once before, but only once. Rugelach meant that I would have to take out my rolling pin. You know how much I despise rolling out dough. But I’m doing it for Dorie. Because she’s a great teacher.

So I got to work. I read and reread the cookbook and studied the rugelach recipe. Her dough recipe is so simple and comes together fast. I mixed up the flour, butter, cream cheese and salt in my food processor. It took just a couple of minutes.

mixing-dough

I formed the mixture in to two squares, wrapped them up in plastic wrap and then chilled for a couple hours. While the dough chilled, I made the filling. I knew that I needed to fill the rugelach with some form of raspberry and chocolate, but it needed to be different than the last time I made rugelach. I decided to make my filling using cream cheese, sugar, the fresh raspberries and some 72% dark chocolate. I’m so glad I went in that direction.

raspberries

Next, I reviewed her rolling technique over and over. To be honest, at first I doubted her method. With the first batch of the cookies, I stuck to the pie slicing method that I’d used in the past. Of course it didn’t turn out the way I wanted to. I relented and tried Dorie’s method of rolling rugelach. She recommends rolling the dough into a rectangle and slicing in half and on each half, filling and then rolling the long way.

rolled-out-dough

I froze the two long rugelach tubes for a little bit before slicing. They sliced beautifully once chilled.

unbaked


I baked the rugelach for around 15 minutes. Lo and behold, Dorie’s version came out perfectly.

cooling

And that raspberry and chocolate and cream cheese filling? Amazing and rich. The perfect dessert. It meshes so well with the flaky and buttery dough. I am definitely making these rugelach again soon. I’m sure I will mix up the filling ingredients over and over again, but for now, this works for me.

Thanks to the publishers, I have a copy of Dorie Greenspan’s cookbook available to give away. Please enter below!


Raspberry & Chocolate Cream Cheese Rugelach + Baking Chez Moi Review
 
Author:
Ingredients
Dough:
  • 4 oz. cold cream cheese
  • 1 stick of butter
  • 1 cup all-purpose flour
  • ¼ tsp. salt
Filling:
  • 4 oz. room temperature cream cheese
  • 1 heaping cup fresh Driscoll's raspberries (around 6 oz.)
  • ⅓ cup sugar
  • 5 oz. chopped 70% or greater dark chocolate
For Top of Dough Rolls:
  • 1 egg beaten with a tablespoon of water
  • ½ cup sugar (approx.)
Instructions
  1. Cut up the cream cheese and butter in to chunks.
  2. Place the flour and salt in the bowl of a food processor.
  3. Add the butter and cream cheese to the food processor and pulse several times until it becomes crumbly. Don't let it come in to a ball on its' own.
  4. Transfer mixture to a floured board and form in to a ball with your hands. Separate in to two pieces.
  5. Shape each piece into a square and wrap in plastic wrap.
  6. Chill dough squares in fridge for two hours.
  7. For the filling, place the cream cheese, berries and sugar in the food processor and pulse until combined. You don't want the raspberries completely pureed - you want some pieces. Set mixture aside.
  8. Chop up the chocolate well. Set aside in small bowl.
  9. Take one square of dough out of the fridge. Move to a floured surface and dust the top of the dough and your rolling pin with flour.
  10. Roll out the dough to a 12 x 12 rectangle.
  11. Slice the rectangle in half to 12x6.
  12. Spread filling on rectangle, leaving one long edge without filling.
  13. Roll up the dough from that one edge. Roll it up jelly roll style, with seam side down.
  14. Repeat process with the second dough rectangle,
  15. Transfer both rolls to the freezer.
  16. Preheat the oven to 400.
  17. Once the oven is heated to temperature and the dough rolls are chilled thoroughly, remove the rolls from the freezer.
  18. Brush the top of the rolls with the egg mixture and sprinkle on some of the sugar.
  19. Slice each roll in to 1 inch slices
  20. Baked on parchment lined baking sheets for about 15 minutes
  21. Transfer to cooling racks
  22. Repeat the process with the rest of the dough.
  23. Enjoy!

 a Rafflecopter giveaway

Rugelach-Vertical

Lemon Lavender Hamentashen

lemon-lavender-hamentashen

Disclosure: I got this silicone baking product mentioned below as part of an advertorial. All opinions and content are my own.

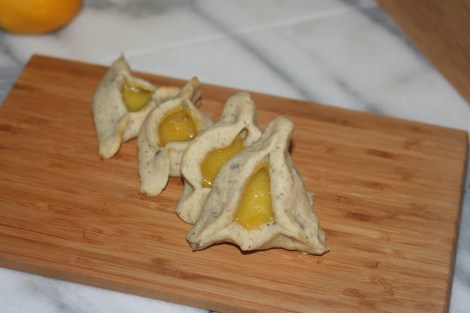
I know I just shared some hamentashen the other day, but since those kimchi hamentashen were savory, I decided to share something sweet with you today. I also wanted to feature my awesome new Cuina Silicone baking mat with you. I figured that freshly baked hamentashen were the perfect way to take advantage of both needs. Stay tuned for the end of this post. You’ll have a chance to win your own Silicone baking mat!

It’s Meyer Lemon season apparently.  I don’t think I’ve ever cooked with them, but I love the taste. They are much sweeter than traditional lemons. When I saw them at the market, I knew I had to incorporate some of them in to my cooking or baking. I’ve been wanting to make lemon curd since I can’t seem to find one that is kosher certified. I was surprised to find out how easy it is to make the curd.

I combined egg yolk with sugar and heated over medium heat, whisking the whole time. I then juiced and zested the lemons and stirred it in to the egg yolks mixture. I stirred for several minutes, letting it thicken then added a stick of butter. You want the mixture to get thick. It should coat the back of your wooden spoon. Once ready. I transferred to jars and chilled in the refrigerator.

lemon-curd-collage

I was debating between lemon rosemary or lemon lavender dough for the hamentashen. I have a foolproof hamentashen dough that I have played with over the years and knew I could make it work for this application. I just had to choose the right herb. I cook with rosemary often, but rarely use lavender – yet I have it in my house. I decided to challenge myself and use the lavender. I know that both herbs work well with lemon anyways, just not necessarily all together.

I mixed up the dough in my Kitchenaid. I then transferred the dough to a rolling mat coated with lots of flour. I rolled out the dough, and with a small drinking glass, I cut rounds of dough. I then shaped in to Hamentashen and transferred to my baking mat lined baking pan.

dough-rounds

Now I want to tell you about this Cuina Kitchen brand silicone baking mat. The fine folks at Cuina Kitchen sent it to me and I was so excited since I had never used one before. I always tend to use parchment paper instead. This silicone baking mat allows you to make cookies without any spray or parchment paper. You just place the mat in your half sheet pan and the cookies go on. They didn’t stick at all! It was so simple. Why did I never buy a baking mat before? Anyways, I highly recommend this silicone baking mat. It worked really well. My cookies came out perfectly and there was no sticky mess to clean up. At the bottom of this post, you’ll have your very own chance to win one of these baking mats!

cuina-kitchen-sheet

Meyer Lemon Curd
 
Author:
Recipe type: spread, sweet
Ingredients
  • 6 egg yolks
  • 1 cup sugar
  • Juice and Zest from 4-5 Meyer Lemons (around ½ cup of juice)
  • 1 stick butter
  • 1 tsp. salt
Instructions
  1. Beat the egg yolks with a form lightly and place in a small heavy-bottomed sauce pan, along with the cup of sugar.
  2. Whisk well over medium heat, letting the sugar melt in.
  3. Add in the lemon juice and zest and stir with a wooden spoon. Let the mixture thicken a bit.
  4. Stir in the butter, keep stirring with the wooden spoon until the back of the spoon is coated in the curd mixture.
  5. Once the curd has thickened, remove from heat, transfer to jars and chill in refrigerator. Enjoy!


  meyerlemoncurd  

Lemon Lavender Hamentashen
 
Author:
Ingredients
  • 1 cup lemon curd (see recipe above)
  • 1 stick butter
  • 1 cup sugar
  • 1 egg
  • 1 tsp. ground vanilla
  • 1 tbsp. lavender
  • 2 tsp. baking powder
  • 2 cups flour (plus more for rolling
  • 1 tsp. salt
Instructions
  1. Preheat the oven to 375.
  2. Cream the butter and sugar together.
  3. Mix in the eggs, vanilla and the lavender.
  4. Add in the dry ingredients and mix well until it forms a dough.
  5. Transfer to a rolling area that has been liberally dusted with flour.
  6. Make sure to dust your hands and rolling pin as well.
  7. In batches, roll out the dough to about a ½-inch thickness. Cut out circles of dough with a glass. Place a teaspoon of the filling at the center of the dough round. Pinch corners in well to form a triangle.
  8. Transfer formed hamentashen to a lined baking mat.
  9. Bake in oven for around 10-11 minutes.
  10. Cool on rack.
  11. Enjoy!

Lemon-Lavender-Hamentashen-Upright

I received one or more of the products mentioned above for free using Tomoson.com. Regardless, I only recommend products or services I use personally and believe will be good for my readers.

a Rafflecopter giveaway

My Favorite Challah

September is a crazy busy month for this lady. September means a busy work schedule, a busy school schedule for the kids and this year, it also means a crazy busy holiday schedule in our house. The Jewish holidays sprung early this year. On one day, it meant searching high and low for the last protractor on this side of New Jersey, while also looking in the depths of every market for a new fruit I haven’t yet eaten.  On other days, it anchors me to my kitchen, dividing my time between my laptop and my stove. I do love this season of Jewish holidays though. As the cool air creeps in, there is this beautiful air of celebration and anticipation of the fall holiday season. Or maybe that’s just the pumpkin spice lattes I’m smelling. Whatever it is, the mood changes. Life is busy, but in a good way.

I recently celebrated the holiday of Rosh Hashanah (the Jewish New Year) as well as the holiday of Yom Kippur (Day of Atonement). Both of these holidays provide me with ample time for reflection and appreciation of the past year as well as the year to come. After the crazy roller-coaster I was on this winter, I am so appreciative and thankful for my good health and for all of the support I had from my friends and family. They’ve been there for me, and I love them for it.

This month’s Kosher Connection link-up is all about Spreading the Joy during this holiday season.

I want to share my challah with you.

Challah

Ever since I was a kid, I have looked forward to Shabbat with my family. Friday night dinner with the family is sacrosanct. You don’t mess with that tradition. It’s not about level of Jewish observance. You just find a way to be at the shabbat table with family and friends, celebrating the end of the week together. Shabbat has been the constant in my life. Through my own various cycles and changes in my own Jewish observance, Shabbat has always meant “home” at the end of a long week.

We come together on Friday evening and light candles, and then sit down together for a warm meal –  over good food, good wine, and good company.  This includes challah. Our special holiday and shabbat bread.

I may not be a baker, but I love making challah. I love the process of working with the dough and getting it just right. I also love some of the spiritual rituals that come with making challah. In Jewish communities around the world, people come together while making challah and use that time to pray for health and wellbeing for loved ones. While preparing the dough, it us customary to keep in mind the names of loved ones who may be unwell or possibly need a job. We say a blessing while keeping the names of these people on our minds.

This past month, I’ve had the opportunity to make challah a few times. Each time, I’ve made challah with a friend who had never made challah before. Somehow, when you make challah around others, it makes this ritual all the more special.

My favorite challah recipe is adapted from a recipe that I found on a bag of flour. Over the past several years, I have tried numerous challah recipes. I’ve had several failures and several successes, but this recipe that I am sharing with you, is a recipe that always results in good challah. You can dress it up with whatever topping you’d like. or you may like to fill it with apples or chocolate chips, like I did for our Rosh Hashanah challahs. On some cool fall days, I have also been known to add some roasted garlic to the mix. Just play with it, and enjoy!


My Favorite Challah
 
adapted from the back of the bag of Glick's flour
Author:
Recipe type: Bread, Shabbat, Jewish Holiday
Ingredients
  • 3.5 tbsp. Active Dry Yeast
  • 5 cups warm water
  • ½ cup sugar
  • 3 tbsp. honey
  • 5 lbs of High Gluten Bread Flour plus extra flour for kneading and shaping (1-2 cups)
  • 3 eggs, beaten
  • ½ cup, plus 2 tbsp. oil
  • 2 tsp. vanilla
  • 2 tbsp. salt
Instructions
  1. Place yeast, sugar, honey and warm water in to a large mixing bowl or in the bowl of your mixer. I used a Bosch for this recipe. Allow the yeast to sit a few minutes until it bubbles.
  2. Add about 6 cups of the flour and mix in to a paste.
  3. Add eggs, ½ cup of oil, vanilla and the salt. Stir together.
  4. Add the rest of the bag of flour and knead for several minutes. The dough may be a little sticky.
  5. Add the 2tbsp, of oil and knead a few more minutes.
  6. If you are using a machine, turn the dough on to a floured counter and knead a few more minutes. You may need to add an additional half a cup of flour. The dough should be smooth and easy to work with.
  7. Oil large bowl and brush oil on the top of the dough and place in the bowl. Cover the dough with a clean kitchen towel or with plastic wrap and allow the dough to rise in a warm place for around 45 minutes. You will need to punch the dough down halfway through. The dough should double in size.
  8. At this point, you can take challah.
  9. Now is the time to shape your challah. I love the various braiding tutorials on the Challah Blog.
  10. Once you've shaped your challah, cover your challahs with plastic wrap or with towels, and place in a warm spot. Allow the challah to rise for another 40 minutes.
  11. Preheat your own to 350.
  12. Brush your challah with an egg wash. Now is the chance to add any toppings like sesame seeds, poppy seeds and other goodies.
  13. Bake your challah at 350 for about 40 minutes.
  14. When you tap on yoiur challah, it should sound hollow. That's a sign of doneness.
  15. Enjoy!

Peach and Cream Cheese Danish

peach-danishIt happened. I baked again. I don’t know what came over me, but out came the beaters and the oven turned on.

Actually, I know what came over me. Peach season happened. Or rather, is happening. I have an abundance of peaches between the CSA and my fruit share from the co-op. My kids are getting sick of the peaches in their bag lunches. I have a hunch that some of the peaches get traded off to some hungry friends. Other peaches manages to be found mushy in the corners of backpacks about a week or two later. I obviously needed a better plan.

I committed to using up my peaches over the weekend. I had to do something before the next batch comes in. I set aside a bunch of peaches for cobblers, but I still had a few left over. I decided to try my hand at some peach danish. I figured the family would appreciate a special breakfast treat, and the peaches would be a welcome addition.

I had some puff pastry in the freezer – so this came together quickly. I defrosted the puff pastry dough.

While the dough softened, I peeled and cubed the peaches and set them aside.

peaches

I then whipped up some cream cheese along with some sugar and egg to make the cheesy filling.

Once the dough was ready, I spread out the dough and spread some cheese filling along the center. I sprinkled some cubed peaches on top. I then cut slits in the dough like in the photo below.

peachandpuff

I criss-crossed the dough pieces over each other.

I then brushed an egg wash over the dough and placed in the oven for about 25 minutes.

This recipe makes two long danish pastries.


Peach and Cream Cheese Danish
 
Author:
Ingredients
  • 2 sheets of puff pastry
  • 10 oz. cream cheese, softened
  • ½ cup sugar
  • 2 egg yolks
  • 1 tsp. vanilla
  • 1 tsp. lemon juice
  • 6 very ripe peaches, peeled and cubed
  • 2 tbsp. sugar
  • 1 egg white for egg wash
Instructions
  1. Preheat oven to 350
  2. Defrost the puff pastry sheets.
  3. In a mixing bowl, whip up the cream cheese, sugar, egg yolks, vanilla and lemon juice.
  4. Make slits in the puff pastry as in the photo.
  5. Spread the cream cheese mixture down the center of the dough sheet.
  6. Arrange cubed peaches on top.
  7. Sprinkle some sugar on top of the peaches.
  8. Seal up the dough as in the photo.
  9. Bake in oven for around 25 minutes. Dough will be light brown.


Cookbook Review: "The Kosher Baker" by Paul Shoyer

When I say I’m a hesitant baker, I really do mean it. I can tackle challahs and and make a mean oatmeal chocolate chip cookie, but when it comes to real baking – I get the jitters. I need good, easy recipes and techniques or a Betty Crocker mix to get me through the yummy sweet stuff.

So, when “The Kosher Baker” by Paula Shoyer showed up at my doorstep, I was excited and nervous. I have a lot of cookbooks on my shelves, but very few baking books. I asked my daughter to pick out a few recipes. Then I sat in a corner and paged through the book – deciding what to make first.

uprightbook

I was impressed by the variety of recipes in this book. From simple cookies and cakes to tarts and babkas to macarons and challahs. This cookbook has a baked treat for everyone.

I love that right from the beginning, the table of contents breaks the recipes down by ease of preparation. It makes someone like me more at ease. I also love that this cookbook is dairy-free. It gives options for margarine and soy-based dairy alternatives, allowing  the home cook to delve in to all areas of baking. Throughout the cookbook, you will also find that the recipe ingredients are not very complicated. Many of the ingredients are those that you already have in your home and the others are very easy to find in a regular supermarket.

Paula Shoyer eases the home cook in to baking with a nice introduction to baking – instructing cooks on the basic tools and pantry staples. She also gives us some helpful cooking tips to help with the process. From how to crack eggs, to baking in water baths – Shoyer explains the various tricks of the trade.

In addition to the nice overview of the kitchen to help you, there are numerous photos to draw you in to each recipe.  I know that the photo is often the deciding factor of whether or not I will try that recipe. Her photos even include some lovely step-by-step shots for some of the more intricate recipes.

The first recipe I was pulled in to, were the Scones au Chocolate. The chocolate oozing out of the scone got to me. I had to make that first. The recipe and instructions were spot on. The Scones pleased everyone in the room.

Later, I decided to try out something fruity. I turned to her rasbperry bars. I am always a sucker for raspberry bars and I had all of the ingredients in my house. I was also struck by her technique for the crust topping – which included shaving the dough on to the raspberry filling. So creative!

When I set out to make the raspberry bars, I was once again left feeling happy. Paula Shoyer’s step-by-step instructions leave nothing out and are very easy to understand. The rasbperry bars came out perfectly, with no complaints.

IMG_2271

Overall, I would definitely recommend “The Kosher Baker” for someone looking for a baking book to ease in to. If you are looking for simple and easy to follow recipes that happen to be pareve, then this is the book for you. I am sure I will be turning to this cookbook when the holidays come around again, as there are so many recipes to pick from.

I am sharing with you her raspberry bar recipe. I hope you will enjoy them as much as I did.

Raspberry Bars
by Paula Shoyer, “The Kosher Baker”

Crust: 
2 cups plus 2 tablespoons all-purpose flour
1 cup confectioner’s sugar
1 cup (2 sticks) pareve margarine, frozen for 15 minutes, plus extra for greasing pan and parchment paper
1 teaspoon pure vanilla extract

Filling:
12 oz (1 1/2 cups) seedless red raspberry jam

Directions:

Preheat the oven to 350 degrees.

Grease a 9-by-13-inch pan with some margarine.

Place a piece of parchment in the pan that is large enough to go up the sides and hang over a few inches. Grease the top and sides of the parchment.

To make the crust:Place the flour and sugar into the bowl of a food processor fitted with a metal blade. Process for 10 seconds. Cut the margarine into pieces and add to the bowl with the vanilla. (You can also make the crust by hand by cutting the margarine in to the dry ingredients with a pastry cutter or two knives.) Process or hand mix with a wooden spoon until the dough comes together.

Divide the dough in to two parts, 1/3 and 2/3 of the dough. Wrap the smaller piece in plastic, flatten and place in the freezer. Take the larger piece and break it into pieces and scatter over the parchment. Press the pieces into the pan as evenly as you can. Place in the oven and bake for 15 minutes.

Remove from the oven and let cool for 15 minutes.Use a silicone spatula to spread the jam all over the crust in the pan. Remove the other dough piece from the freezer, and using the large holes of a box grater, grate the remaining dough over the filling. Use your hands to spread the grated dough all over to cover the filling.

Bake for 30 minutes, or until the edges start to brown. Let cool. Trim off about 1/4 inch of the sides and then cut into squares or long bars.

Enjoy!

IMG_2286

VeganMofo: Gluten Free Rosemary Crackers

A while back, I went with my parents to a fabulous Italian restaurant. We were starving, and as we waited for our food, we stuffed our faces with these fabulous rosemary and olive oil flat bread crackers. They were super thin and super yummy.

Since then, I have been wanting to recreate these great crackers at home – both with and without the gluten.  Today, I am sharing with you a gluten free rosemary cracker, that while not as thin as the cracker from the restaurant, the rosemary flavor in these crackers, combined with the sea salt and olive oil, give me the flavor and crunch that I’m looking for.

Gluten Free Rosemary Crackers


Gluten Free Rosemary Crackers / Flatbread
Ingredients:

1 cup cooked brown rice
1 1/2 cups garbanzo bean flour (plus more for rolling)
1 tsp. sea salt (plus more for sprinkling over)
2 tbsp. chopped rosemary (plus a bit extra for sprinkling)
1/4 cup olive oil (plus more for brushing)
1/4 cup water

Directions:

Preheat oven to 375.

In the bowl of a food processor, process the brown rice. It should be mushy. Slowly add in the rest of the ingredients while pulsing. Process until it forms a ball and moves away from the sides of the bowl.

Dust a flat surface with some more garbanzo flour. Knead a bit for a minute. The dough will be a bit sticky.

Place half of the dough on a piece of parchment paper that is sized to a baking sheet.

Roll out the dough as thin as possible on to the parchment paper. It’s important that you roll it thin so it can achieve ideal crispiness. Try for around 1/8 inch.

Gluten Free Rosemary Crackers

Brush the dough with olive oil and sprinkle on some sea salt and more rosemary sprigs.

Gluten Free Rosemary Crackers

Cut dough with a pizza cutter to preferred crackers shapes/sizes.

Gluten Free Rosemary Crackers

Repeat with the other half of the dough.

Bake in oven for around 25 minutes. Check periodically for browning. The crackers should be browner around the edges and browned a little on the bottom of the crackers. They will harden more once you let them cool down a bit.

Gluten Free Rosemary Crackers

Store in an airtight container. Enjoy!

veganmofo
1 2